Cryo-Can 6-Pack V1.0
prusaprinters
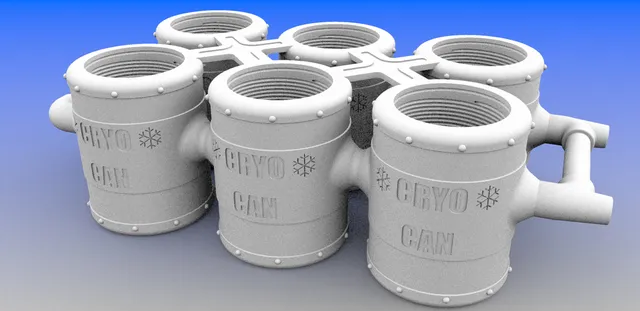
Look, we've all been there. Your soda or beer is just a shade above scalding. Something needs to be done. To make matters worse, five of your friends are over to watch Adam Sandler's newest hit and they are looking to you for leadership on this issue. Decisions need to be made. You need a solution! No, you need 6 solutions! You need 6 solutions to immediately cool your beverages from scalding hot, to Siberian Permafrost cold. Meet the Cryo-Can 6-Pack! When its not solving disputes between major governments, the Cryo-Can 6-Pack is just what you need to bring those excessive beverage temperatures down. Start by pushing 6 standard beverage cans all the way down inside the Cryo-Can 6-Pack's cooling sockets. This is just like your standard 3d printed coozie, but 6 times better! Next, hook up coolant lines of your choice to the entry and exit ports for the Cryo-Can 6-Pack's internal cooling manifolds. Either pump, or siphon, your coolant through the Cryo-Can 6-Pack and in no time flat, your beverages will be ice colder than a summer day, on the moon of Titan. The coolant enters through the intake port and is distributed by internal manifolds to 6 helical cooling channels in each socket. The exit manifolds from one socket feeds directly into the entry manifolds for the next socket. As it makes it way around the cans, the coolant picks up heat and is ejected via the exit port. As always, if you have trouble removing the cans push up through the hole in the bottom of the socket The Cryo-Can 6-Pack features room for 6 beverages and uses helical cooling channels in each socket that butt right up against your beverages for maximum cooling effectiveness. There are a inlaid races for seals near the top lip and at the bottom of each socket to keep your Cryo-Can 6-Pack from leaking when used. The entry and exit ports are meant to be threaded into with brass barb fittings which can easily be attached to the flexible tubing of your choice. I recommend printing with a very thick wall, if not 100%, especially around the intake and exit ports. It needs to be strong and watertight. There a high probability that this thing will be used by groups of drunk people. There are 6 peices that need to be printed for assembly, the front, rear, two middle Cryo-Cans, and two x- braces to hold everything rigid. Epoxy should do the trick. Reference nubs make assembly a breeze. Hardware needed: 2x Small threaded brass barb fittings for hoses. Flexible hose of your choice sized to match the barb fittings. Rubber bands or RTV to craft seals. (depending on the fit of the cans, these may not even be necessary.) Buckets for coolant. Coolants: I recommend ice water with ice cream salt added but you do you. Cheers! Category: Kitchen & Dining
With this file you will be able to print Cryo-Can 6-Pack V1.0 with your 3D printer. Click on the button and save the file on your computer to work, edit or customize your design. You can also find more 3D designs for printers on Cryo-Can 6-Pack V1.0.
