Creality K1 Max ERCF top mount
prusaprinters
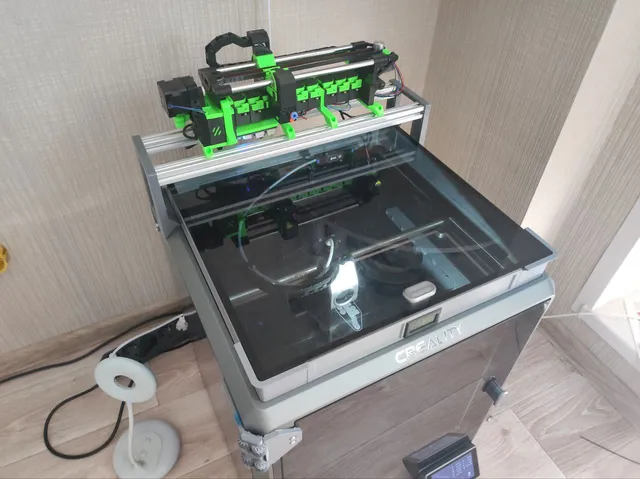
This is a "simple" mount for an ERCF to be attached to the top back corners of Creality K1 series printers (Max, K1c). At the moment, the project includes several variations for you to choose from.A few warnings before you proceed. Although it runs fine on my printer, the project is experimental, and some software may not work for you. I will try to help troubleshoot it, but I can't guarantee 100% compatibility.If you have a Raspberry Pi (Orange Pi etc.), the easiest way to build and roll out the board firmware would probably be through your Pi board, as it already has a Linux environment with compilers readily available.The ERCF board firmware can not be built directly on the K1's system, because there is no cross-compiler for ARM on Entware repos. If you don't have a Pi, you will probably have to build it on your PC, using a cross-compiler. Please keep this in mind.HappyHare v2 has a conflict with Save Z-Offset feature from Helper Script, you will have to remove the [save_variables] section from it's config - or avoid the feature entirely. If you are using a constant offset, please consider setting it to 0 and adjusting this value instead:This mount involves the use of two 435mm long 2020 extrusions for K1 Max (holes are 1cm deep and have ~1mm clearance beyond the width of the printer, so both 430mm and 440mm extrusions will work). Length was chosen to match the width of the printer (mine is 438mm). K1's have a width of 335mm to 355mm depending on revision, so that's the length of extrusions for them - please measure your machine before ordering/cutting the extrusions.The extrusion footprint of a 9-channel ERCF v1.1 measured by it's feet is 277mm long, so it fits just fine on k1 and k1c length-wise. 12-channel ones are rare, they may not fit, did not get a chance to measure one.The design allows a little stickout beyond the length of the printer (up to 4mm) just in case. If you are cutting the extrusions manually, you can use this jig to ensure the edge is perpendicular to the long sides: https://www.printables.com/model/943492-2020-extrusion-cutting-sanding-jig The mount is designed to match the shape of the corners of the printer and to let the glass be removed without the risk of catching and breaking the glass. It is designed to be used with risers of up to 50mm tall and still provide a 30mm clearance. If you want your ERCF to sit as low as possible, there is a version that allows it to be installed on a K1 Max with no riser, but doing so will definitely cause loading issues, as the bend in the PTFE tube is too sharp and causes filament to get stuck at the feeder opening.The installation process requires replacing two corner screws on each of the acrylic side panels with longer ones (10mm M3 screws should work), and using washers is absolutely necessary to prevent any damage to the part (otherwise you might overcompress the plastic into the counterbore on the acrylic side cover, with unforeseen consequences). Countersunk screws are not recommended for the same reason. It is also highly recommended to remove the glass lid before installation, as the ERCF module is pretty heavy, and dropping it onto the glass lid may cause it to shatter. The lid should fit back easily after installation. If you have clearance issues, please leave a comment, I will increase the clearance for you (right now it is 30mm for both K1C and K1 Max, and you can install the K1C version onto your Max to get 60mm clearance if needed).Recommended to print in ABS, the design was NOT tested in PLA and might turn out to be too brittle. 3 perimeters should be ok, but I recommend putting more walls around the screws using a modifier in the slicer, especially if you plan to skip on washers (seriously, just get some washers).It is highly recommended to pair the MMU with a filament sensor: https://www.printables.com/model/686275-k1-extruder-with-filament-runout-sensor-remixed/filesFor easier cable management, I made a custom corner piece for a riser, that can be found here:https://www.printables.com/model/940842-k1-max-riser-corner-piece-with-usb-extension-cord . The design calls for a 1.8m USB extension cord, that is later cut to length. The male socket is cut off immediately and the cable is driven through the cable channel down to the base of the printer, in where it attaches to one of the PH2.0 ports on the motherboard - either the Lidar USB port, the front panel USB port, or (in my case), attached to a USB Hub, which in turn is connected to either of the two. You can always just run a 1m long cable directly to the front USB port, but then it will be occupied forever, and you will always have a cable dangling around your machine.The hub can be found here: https://aliexpress.ru/item/1005005887148469.html As of 21.09.2024, the patch to support K1 has been included into mainline HappyHare v2. The patch includes all the right folder paths, so they don't need to be specified (unless you are running a custom klipper with custom folders). The only “difference” from the official guide is that you need to call the script through Bash explicitly:bash ./install.sh -iBash needs to be installed from opkg (Entware), which is available from Helper Script.Don't forget to adjust the filament sensors to NOT trigger on runout! Otherwise, your MMU will keep unloading the filament immediately after it has been loaded:[filament_switch_sensor filament_sensor] pause_on_runout: false switch_pin: !PC15 #runout_gcode: # {% if printer.extruder.can_extrude|lower == 'true' %} # G91 # G0 E30 F600 # G90 # {% endif %} [filament_switch_sensor toolhead_filament_sensor] pause_on_runout: false switch_pin: !nozzle_mcu:PA10I renamed the sensors so it's a bit more clear which one does what. You will need to copy the switch_pin from toolhead sensor into one of the MMU config files (/mmu/base/mmu_hardware.cfg):extruder_switch_pin: !nozzle_mcu:PA10UPD 14.07.2024: Split design - there are now versions with and without oval cutouts along the stems. Going to test which looks better and performs better.UPD: Version with cutouts is rigid enough, and can save you some material. The cutouts are visible, but they don't catch the eye at all.UPD 09.08.2024: Added extra mounting holes in K1C version (for 20mm spacing - files are marked v2). Please report if these don't fit!UPD 18.08.2024: The script from Pastebin is no longer compatible with HappyHare v2.7.0 - I made a PR with the changes to the main branch. Right now, the functioning script for v2.7.0 can be found here: https://github.com/k1-801/Happy-Hare/blob/k1/install.sh - please report if it works or not.UPD 23.08.2024 Sorted the projects into folders so the K1c and K1 Max versions don't get confused.UPD 25.08.2024: Reuploaded some of the Universal (K1c) files that were exported without a champher in the holes (Ooops). For @baustiman_1102226's request, I'm also adding a version without the external mounting holes (for K1 and K1c only). The naming scheme was also changed, the version with both sets of mounting holes is now called Universal. Also added the right sides with no text and right sides for Max with text (mirrored in Blender :D)UPD 16.09.2024: Updated installation instructions. ===Для русскоязычных пользователей, пара ссылок на товары, не упомянутые выше, которые сложно найти или невозможно заказать из-за границы из-за санкций:Проводок со штекером для сенсора филамента в голове (JST MX1.25 P3): https://www.chipdip.ru/product0/9001322241 Конструкционный алюминиевый профиль 2020: https://ozon.ru/t/gGVaQQA
With this file you will be able to print Creality K1 Max ERCF top mount with your 3D printer. Click on the button and save the file on your computer to work, edit or customize your design. You can also find more 3D designs for printers on Creality K1 Max ERCF top mount.