Creality CR-10S Pro magnetic base screw stablized
prusaprinters
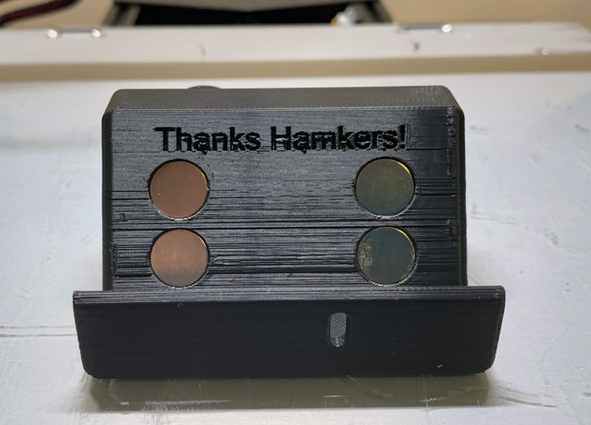
<h3>Summary</h3><p>This design is a remix of <a href="https://www.thingiverse.com/thing:3336651">TallNHairyDave's magnetic base for the CR-10S Pro</a> of Hamkers' camera arm.</p><p>I love the design, but I had two problems:</p><p>1) I could not source the same size magnets from Amazon used in the original. So instead, I switched to a 0.5in (12.7 mm), which I could pick up at the local craft store <a href="https://www.michaels.com/pro-mag-neodymium-magnets-.5%22%22/10382640.html">https://www.michaels.com/pro-mag-neodymium-magnets-.5%22%22/10382640.html</a> I also switched to using 4 of them instead of two to compensate for the smaller size.</p><p>2) The design was prone to slipping if bumped if using a large arm design. TallNHairyDave's solution was to coat the back with a rubber anti-slip coating. Unfortunately, I did not have something on hand, so I modified the design to use the case screw on to bottom corner to prevent unwanted movement. I replaced the OEM screw with an M3-6mm screw to hold the panel and mount it in place.</p><p>Update 3/14/2022: Added Step file and mirrored version for the left-hand side</p><h3>Print Settings</h3><p><strong>Printer brand: </strong>Creality</p><p><strong>Printer: </strong>CR10S PRO</p><p><strong>Rafts: </strong>No</p><p><strong>Supports: </strong>Yes</p><p><strong>Resolution: </strong>0.20</p><p><strong>Infill: </strong>20%</p><p><strong>Filament Brand: </strong>ESUN</p><p><strong>Filament color: </strong>Black</p><p><strong>Filament material: </strong>PLA</p><h3>Post-Printing</h3><p><strong>Step 1</strong></p><p>Remove the supports from the arm attachment point and sand if necessary/desired.</p><p><strong>Step 2</strong></p><p>Glue the magnets into the four spots on the base and allow them to dry.</p><p><strong>Step 3</strong></p><p>Remove the front corner screw from the bottom of the printer case on the side you are installing the mount. Next, place the magnetic base on the printer and slide it over until the holes line up. Then, insert the new screw into the hole on the base and tighten it.</p>
With this file you will be able to print Creality CR-10S Pro magnetic base screw stablized with your 3D printer. Click on the button and save the file on your computer to work, edit or customize your design. You can also find more 3D designs for printers on Creality CR-10S Pro magnetic base screw stablized.