Crankbait Fishing Lure
thingiverse
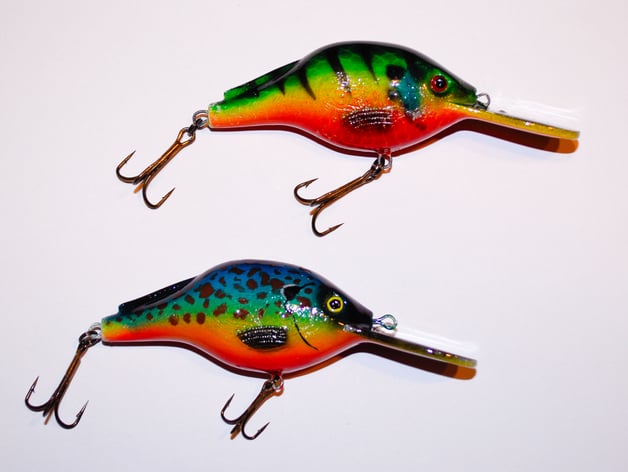
This is my first attempt at designing a full-size printed crankbait, and I'm thrilled with the finished model and results - plenty of fish caught to show for it! The bait is printed in two halves that are carefully glued together using super glue, with three small pieces of 1.75mm filament serving as guides to align the halves perfectly while joining them. A single piece of wire (motorcycle safety wire) is bent into loops for tying on and hook mounts, then inserted between the halves before gluing. I printed this one with a .25 nozzle and .10 layer height to ensure a smooth finish - your results may vary depending on your settings. After gluing the halves together, I simply sanded the glue seams flush. The lure was airbrushed following the excellent YouTube tutorials by "Lure Me In Custom Painted Crankbaits." I highly recommend them for their ease of use and professional-looking results. With basic primary paint colors, I managed to mix and match to create a convincing finish - but be sure to follow his advice: a little paint goes a long way! To seal the lure, I initially tried using Miniwax spray-on polyurethane, but it turned out to be too weak for the task - a two-part clear epoxy would have been stronger. Luckily, I discovered that coating them with EnviroTex Lite Pour-On High Gloss Finish epoxy really brings the colors to life! I used #4 Treble Hooks and #3 Split Rings on these crankbaits, and some initial tuning may be necessary if they don't run true - simply bend the front loop in the opposite direction it runs. Running depth is around 6-8 feet depending on your retrieve speed. Adding a rattle effect can be as simple as dropping a few BB's or bearings into the float chamber (see picture). And for an extra touch, you can add glow-in-the-dark filament - I've caught quite a few fish using this feature, but I'm not sure if it's the glow that's attracting them or just their natural curiosity! To make one of these crankbaits, simply print the two halves, glue them together, and sand the seams flush. Then airbrush to your heart's content, seal with epoxy, and add a few treble hooks and split rings - voila! You're ready to catch some fish. Check out more of my lures at https://www.theneverendingprojectslist.com/. And if you do manage to catch something on this design, be sure to post your catch in the Makes.
With this file you will be able to print Crankbait Fishing Lure with your 3D printer. Click on the button and save the file on your computer to work, edit or customize your design. You can also find more 3D designs for printers on Crankbait Fishing Lure.