Craftsman 10" Table Saw Model 137.218300 Rip Fence End Piece
prusaprinters
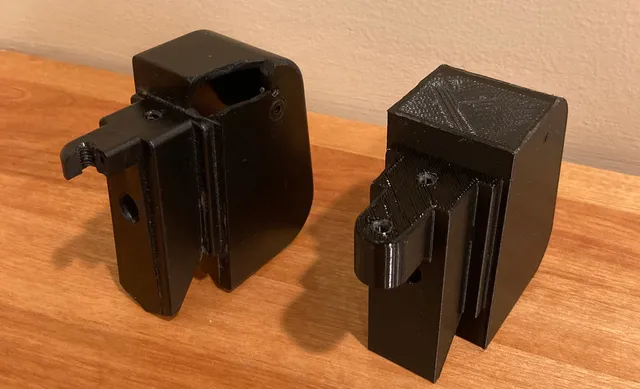
See Post-Printing section for installation tipsThis is the plastic end piece for the rip fence that came with a Craftsman 10" Table Saw Model Number 137.218300. This is quite an old tool, and I doubt anyone will ever find this useful but just in case I am posting it after designing and printing a replacement part for myself.The photos are from the test-fit piece, there were just a few small changes on the final model, notably some fins to guide the rod into place. Cover photo is of the original broken part next to the new 3D printed part. There are extra angle artifacts on the original that were probably there to allow the injection molded part to eject better. They serve no mechanical purpose on the part and have been left off for simplicity.I've included the Fusion 360 file as well.Print SettingsPrinter Brand:CrealityPrinter: Ender 3 ProRafts:NoSupports: YesResolution:0.28mm layer heightInfill: 100Filament: N/A N/A N/ANotes:As this is a functional piece on a tablesaw (which is NOT known for being gentle) I highly recommend using 100% infill. I used a 15mm brim, and supports over 45 degrees only touching the build plate. STL should orient part upside down with top touching build plate. If not, rotate part so the top is touching the build plate.Post-PrintingInstallationDuck tape the rod on the front end in placeFit replacement part around the rod at the endInsert and tighten the 2 top screws, securing the replacement part in placePut the spring on the end of the rodPut the flapper in place while compressing the spring with needlenose pliersInstall the nut at the end of the rod - do not tighten!Insert pin.You're not going to have a good time installing the flapper first and then trying to press that spring down into the little space and guiding the rod through several holes without it buckling and smacking you in the face.Use a heavy gauge guide wire to ensure the pin goes through the holes on the flapper and with a little tappy tap tap hammer the pin through.If it doesn't grip at first when the handle is pressed down, use 2 10mm sockets on the front and rear nut to tighten the clamping action. Once it slightly grips, use half or quarter turns until you can't slide it back and forth anymore.Category: Parts
With this file you will be able to print Craftsman 10" Table Saw Model 137.218300 Rip Fence End Piece with your 3D printer. Click on the button and save the file on your computer to work, edit or customize your design. You can also find more 3D designs for printers on Craftsman 10" Table Saw Model 137.218300 Rip Fence End Piece.
