CR-10 Precision Thumbdial
prusaprinters
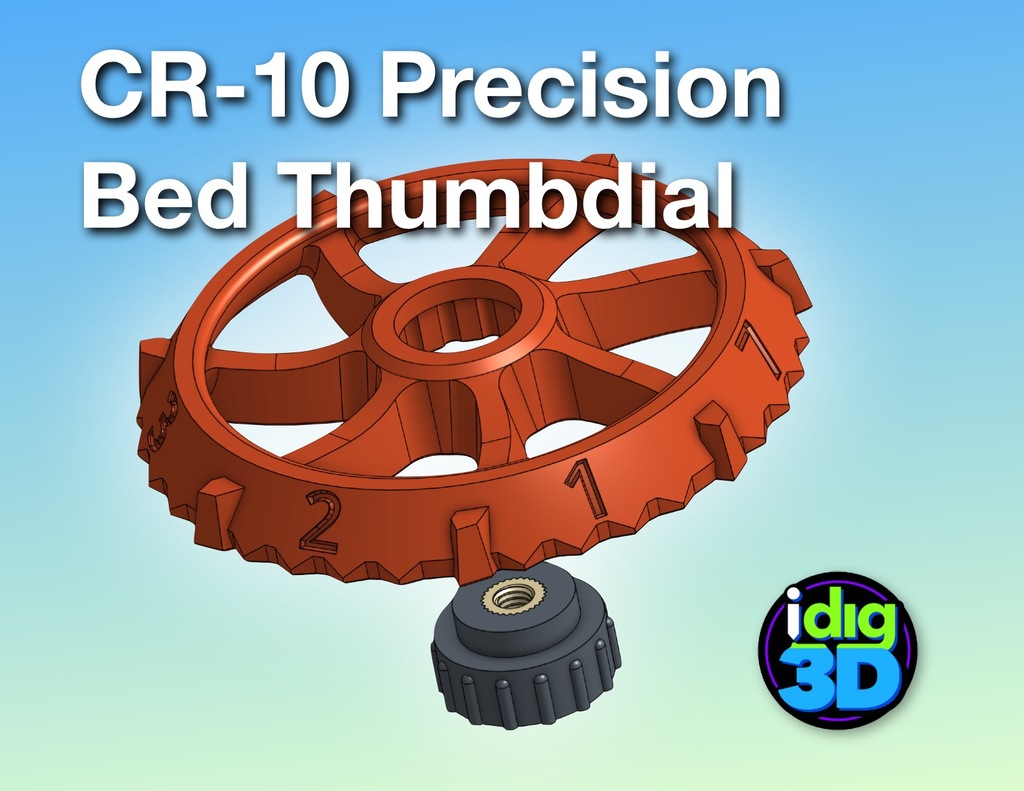
<p>A more precise way to dial in your CR-10's bed. Fits over existing bed knobs.</p> <p>M4 threads have a 0.7mm pitch, so turning the knobs 1/7 of a turn will change the distance 0.1mm.</p> <p>I beveled the face and added numbers so you could read numerical adjustment. Each big point is 0.1mm. Small points are 0.02mm. Bigger numbers mean a bigger gap.</p> <p>The file named "cr10_thumbdial_ws_idig3d.stl" is with support. The support is a solid ring you can snap out when the print is completed. A screwdriver may help.</p> <p><em>Contribute to my coffee fund if you find this useful and want to encourage my insanity. Thanks!</em></p> <h3>Print Settings</h3> <p><strong>Printer:</strong></p> <p>CR-10</p> <p class="detail-setting rafts"><strong>Rafts: </strong> <div><p>No</p></div> <p><strong>Supports:</strong></p> <p>No</p> <p class="detail-setting resolution"><strong>Resolution: </strong> <div><p>0.2-0.25mm layers</p></div> <p><strong>Infill:</strong></p> <p>25-33%</p> <p><br/> <p class="detail-setting notes"><strong>Notes: </strong></p> </p><div><p>3 shells/perimeters. If you want you slicer to generate support, use the file without "ws" in the name.</p> Slow down the first layer since there are some smaller sections. <h3>Post-Printing</h3> <p>If you printed the 'ws' (With Support) version, snap out the ring.</p> <p>Remove each bed knob one at a time.</p> <p>Press the knob into the thumbnail.</p> <p>Screw back on the bed screw.</p> <p>Repeat for all four screws.</p> <p>Relevel the bed.</p> <p>I usually print a few lines of a skirt around my prints and turn the dials to get the bed dialed in.</p> </div></p></p> Category: 3D Printer Parts
With this file you will be able to print CR-10 Precision Thumbdial with your 3D printer. Click on the button and save the file on your computer to work, edit or customize your design. You can also find more 3D designs for printers on CR-10 Precision Thumbdial.