CoreXY Engraver
prusaprinters
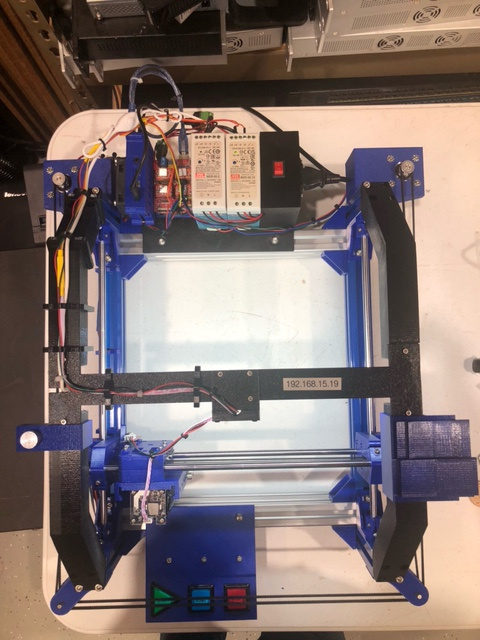
<p>I've never looked at a CoreXY design so I found this interesting. I used the STL files provided and fit without any issues. Use <a href="https://www.printables.com/model/18771-corexy-laser-engraver/related">Thomas's original STL files</a> for the base build.</p><p>Here is a few notes regarding the build:</p><ol><li>I only needed end stops for the X-Left and Y-Front. Instead I use homing and soft limits. Therefore I did not install the X-Right or the Y-Back end stops.</li><li>The Belt Diverters on the 2 front corners may need to be extended or tweaked a little. As they stand the belt hits and rubs on the belt coming the opposite direction where it enters the X carriage.</li><li>The Linear_Rod_Mount_Y fixtures may need to be lengthened out on the bottom foot and the hole moved out as well. As they are designed you have to trim down the T-Nut that goes underneath as it his the front and back 3060 pieces.</li><li>I used an Arduino Uno with a <a href="https://www.amazon.com/gp/product/B07DXNZ9PS">CNC Shield</a> to run the motors and laser. It's running Grbl 1.1 so I had to use the Z- pin on the CNC Shield as the PWM for the laser.</li><li>I added a Raspberry Pi and configured it to run CNCjs. That is my outside interface to the laser. I also linked the <a href="https://cnc.js.org/">CNCjs</a> “Watch” directory to a shared drive on my network to make uploading gcode easier.</li><li>I built a 3 button box to make simple tasks easier and mounted it to the front. I wrote a NodeJS program for it to interface with CNCjs. I can now run loaded files easily using the Start button on the machine.</li><li>I added a top structure to facilitate routing of wires from the laser and for the mounting of other things as needed.</li><li>My <a href="https://www.amazon.com/gp/product/B09NHK65CG">laser</a> height is adjusted by two thumb screws on the X axis mount. I have a small round cylinder that helps me get exact spacing. I made a mount for that cylinder on the top structure so it's convenient to get to.</li><li>I created spacing chucks that can be placed on the front inside and the Left inside to space work pieces out to the 0,0 home position of the laser. I also made a storage slot for them on the top structure.</li><li>I used a DIN rail for mounting all of my electronics on the back and 3D printed a cover for the high voltage portion.</li><li>I bought a small <a href="https://www.amazon.com/gp/product/B08VDH1GJV">LED light bar</a> from Amazon and afixed it under my top structure.<br>I added a camera. Since you can't really see it engraving anyway, I placed it over the top which gives me a decent view. I used an Axis P1214-E camera just because I had one laying around.</li><li>I use <a href="https://openscad.org/">OpenSCAD</a> for my designs (because I'm a geek). I love it and will include files here for any models. Not these have not been cleaned up - they are a representation of a work in progress.</li><li>I use <a href="https://www.vectric.com/products/aspire">Vectric Aspire</a> for my engraving layouts just because I already had a license and use it for other CNC stuff. It is expensive but an amazing tool if you do a lot of CNC stuff. I made an easy modification to the Grbl post-processor to remove any reference to the Z axis. Otherwise a lot of engraving time is wasted as it moves it's “Virtual Z” up and down between items on the engraving.</li></ol><p>I am including sample pictures of a small token coin and a jig I made to hold them easily along with a screenshot of CNCjs running it.</p><p>I am building another CoreXY based on 1"x1" and 1"x2" extrusions which will be a small router motor and have full Z control. I will publish that once done.</p>
With this file you will be able to print CoreXY Engraver with your 3D printer. Click on the button and save the file on your computer to work, edit or customize your design. You can also find more 3D designs for printers on CoreXY Engraver.
