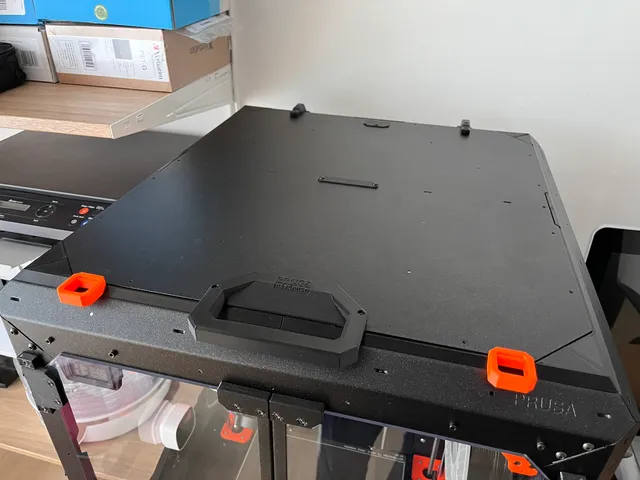
Complete modified Hinged lid for Original Prusa Enclosure
prusaprinters
For English please roll down. CZ: Přepracovaná verze odklápěcího víka pro Original Prusa EnclosureVlastnosti:nový systém zámků víkanení potřeba otáčet víko = hladší víko bez závitových výstupků, ideální pokud používáte pro odkládání věcísnížené riziko vytrhnutí zalisovaných matic - nyní síla působí ve směru zalisování, nikoli proti. S poškozením/vytržením mám vlastní zkušenost:menší madlo, které je i jednodušeji tisknutelnémadlo má snížený profil, takže pokud víko při otevření opíráte o zeď, tiskárna může být blíže ke zdiZ původního řešení (Hinged lid for adding MMU2S to Original Prusa Enclosure) prosím použijte pouze soubory:Hinge-bracket-L.stlaHinge-bracket-R.stl Montáž:demontujte horní kryt dle návodu Hinged lidnamontujte 4x díl connect_V2 šipkami směřujícími ven z Enclosure pomocí šroubu M3x4 (původní šrouby z víka)namontujte jednotlivé díly zadního (frame_rear_V2) a bočního (frame_side_V2) rámu (každá část bude přidělána 2 původními šrouby M3x4). Před montáží doporučuji zašroubováním a vyšroubováním šroubu do děr vyříznout závit. Velmi si zjednodušíte montáž na Enclorure.vložte Lid_lock_V2 do předních rámů frame_front_V2 a namontujte na Enclosure (každá z předních částí bude přidělána 3 šrouby M3x4)sestavte a namontujte pant dle kroku 6 - 10 z návodu Hinged lidnamontujte víko dle kroku 11, ale víko neotáčejte!namontujte Handle dle kroku 14 a 15HOTOVO! EN: Redesigned version of the hinged lid for Original Prusa EnclosureFeatures:new lid lock systemno need to rotate the lid = smoother lid without threaded tabs, ideal if you use it for storagereduced risk of pulling out crimped nuts - now the force is in the direction of the crimping, not against. I've had my own experience with damage/tearing:smaller handle, which is also easier to printthe handle has a lowered profile so that if you lean the lid against the wall when opening, the printer can be closer to the wall Please use only the files from the original solution (Hinged lid for adding MMU2S to Original Prusa Enclosure):Hinge-bracket-L.stlandHinge-bracket-R.stl Installation:remove the top cover according to the Hinged lid instructionsmount the 4x connect_V2 part with the arrows pointing out of the Enclosure using the M3x4 screw (original screws from the lid)mount the individual parts of the rear (frame_rear_V2) and side (frame_side_V2) frame (each part will be attached with 2 original M3x4 screws). I recommend screwing and unscrewing the bolt into the holes before assembly. You will greatly simplify the assembly on the Enclorure.Insert the Lid_lock_V2 into the frame_front_V2 and mount on the Enclosure (each of the front parts will be attached with 3 M3x4 screws)assemble and mount the hinge according to step 6 - 10 of the Hinged lid instructionsmount the lid according to step 11, but do not turn the lid!mount the Handle_V6 according to step 14 and 15DONE! Doporučené nastavení tisku/Print recomanded settings Frame Rear + Frame Front + Frame SideMaterial: PETGLayer: 0.2mmPerimeters: 5Solid layers - top: 9Solid layers - bottom: 0Infill: 15% (Rectilinear)Supports: For supports enforces only- potřebné pouze pro označená místa/ needed only in marked places:Lid LockMaterial: PETGLayer: 0.2mmPerimeters: 4Solid layers - top: 8Solid layers - bottom: 8Infill: 100% (Rectilinear)Supports: For supports enforces only - potřebné pouze pro označená místa/ needed only in marked places: HingeMaterial: PETGLayer: 0.2mmPerimeters: 8Solid layers - top: 8Solid layers - bottom: 8Infill: 20% (Rectilinear)Supports: no supportConnectMaterial: PETGLayer: 0.2mmPerimeters: 3Solid layers - top: 4Solid layers - bottom: 4Infill: 15% (Rectilinear)Supports: no supportHandleMaterial: PETGLayer: 0.2mmPerimeters: 4Solid layers - top: 8Solid layers - bottom: 8Infill: 25% (Gyroid)Supports: For supports enforces only - potřebné pouze pro označená místa/ needed only in marked places:
With this file you will be able to print Complete modified Hinged lid for Original Prusa Enclosure with your 3D printer. Click on the button and save the file on your computer to work, edit or customize your design. You can also find more 3D designs for printers on Complete modified Hinged lid for Original Prusa Enclosure.
