Compact Wall Mounted Forstner Bit Holder
prusaprinters
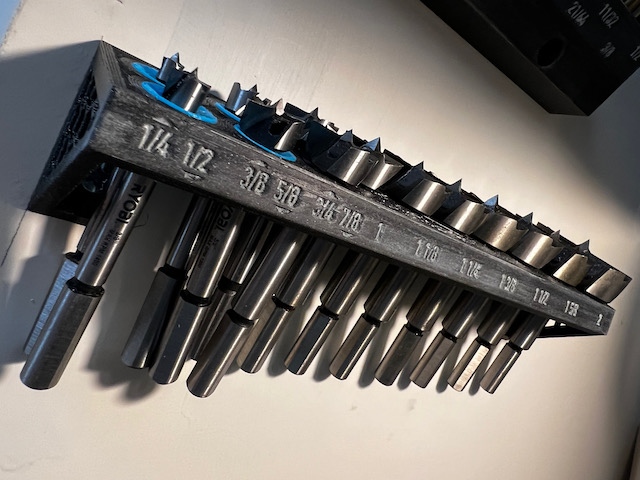
<p>A compact, wall mounted holder for a complete set of Forstner bits 1/4" through 2" in 1/8" increments (more or less, 13 bits total, no spots for 1 3/4" or 1 7/8"). The holder measures 9.5" in length and presents the bits at a 15º angle for easy access. For smaller size Forstner bits, where the shaft diameter is either <i>larger</i> than the cutting head or nearly the same size, printed flexible inserts are used to keep the bits firmly in place.</p><figure class="image image_resized" style="width:75%;"><img src="https://media.prusaprinters.org/media/prints/134541/rich_content/274b3e2d-76c7-447d-b2c3-538ac921eb4b/img_0531.jpeg#%7B%22uuid%22%3A%22add4d233-2b42-424d-8bbf-d9281ec41cee%22%2C%22w%22%3A640%2C%22h%22%3A480%7D"></figure><p><strong>IMPORTANT!</strong> Tested to work with Ryobi “x-wing” style Forstner bits available at Home Depot (in the US) or on Amazon (<a href="https://amzn.to/3LCqLqr">https://amzn.to/3LCqLqr</a>). These bits do not require as much room to store as Forstner bits with “full circle” cutting heads (see example image below).</p><p>If you have the more common “full circle” Forstner bits, please see <a href="https://www.prusaprinters.org/prints/137549-universal-forstner-bit-holder-with-mounting-adapte">my other bit holder designed to fit most full-size Forstner bits</a>.</p><figure class="image image_resized" style="width:75%;"><img src="https://media.prusaprinters.org/media/prints/134541/rich_content/d4b5f9b9-4b96-41c3-b374-4d5b5c68cfb6/img_0542.jpeg#%7B%22uuid%22%3A%2281ccecfb-3348-4383-831c-a482f2c176e2%22%2C%22w%22%3A640%2C%22h%22%3A469%7D"></figure><p><i>Image: A compact style 2" Forstner bit compared to a traditional 2" Forstner bit</i></p><p>Designed to be mounted to a wall with two screws, but could be adapted to mount with adhesive (like Command Strips) or magnets.</p><h4><strong>Print Instructions</strong></h4><p>This object requires two prints:</p><ol><li><strong>Main body: </strong>Print in PLA, 20% infill, 0.25mm layer height, no supports. Print with large flat side of model on the print bed.<br><br><i>NOTE: Due to the size of this part, there is an increased tendency to warp during printing (even with PLA). Take extra precautions to minimize warping (such as bed glue and higher bed temp).</i><br> </li><li><strong>Flexible inserts: </strong>Print in Flex (TPU or similar), 100% infill, 0.20mm layer height, no supports. Print with flat surface of model on the print bed.</li></ol><p>Final assembly requires 4 flexible inserts, so I suggest printing 6 to 9 so you have extras in case of printing errors or damage. This can be done as a single job with multiple copies of the object.</p><h4>Finishing and Assembly</h4><p>After printing, test fit your Forstner bits and flexible inserts to make sure everything fits properly. Flexible inserts should simply pop in to place and be flush with the top of the main body.</p><figure class="image image_resized" style="width:75%;"><img src="https://media.prusaprinters.org/media/prints/134541/rich_content/437cafc5-d36f-406b-b794-09d21c43bd62/img_0516.jpeg#%7B%22uuid%22%3A%2281301f2e-c4f2-4359-948d-ddb72948471c%22%2C%22w%22%3A640%2C%22h%22%3A480%7D"></figure><p>Now, remove the inserts and bits, mask the main body, and generously paint over the recessed size labels on the front surface in a high contrast color. After painting, wipe away the excess paint on the surface (you may need to use paint thinner to help remove excess paint). The paint should get “stuck” in the recessed labels while the surface wipes clean, creating higher contrast and easy readability.</p><figure class="image image_resized" style="width:75%;"><img src="https://media.prusaprinters.org/media/prints/134541/rich_content/58be576f-e354-4f5b-a74e-5d5bdce7ab44/holder-painting-collage.jpg#%7B%22uuid%22%3A%2234d1fd06-d7aa-4a68-98db-915e47a9c6f3%22%2C%22w%22%3A1200%2C%22h%22%3A1200%7D"></figure><p>(Tip: When wiping paint away, don't use a paper towel or small amounts of paper can get stuck in the labels and reduce readability of the numbers. Use a rag or lint free shop towel.)</p><p>Next, put a small bead of CA glue (aka “super glue”) around the recess of each flexible insert and re-insert in the main body. The glue will help ensure the inserts do not get dislodged using the bit holder. Use CA “kicker” to help cure faster.</p><figure class="image image_resized" style="width:75%;"><img src="https://media.prusaprinters.org/media/prints/134541/rich_content/ace25325-2352-4788-83e4-cc9d23b5b293/img_0522.jpeg#%7B%22uuid%22%3A%22b2202d5f-63c5-4a95-b5ea-625c4d9340ff%22%2C%22w%22%3A640%2C%22h%22%3A480%7D"></figure><p>That's it! You're now ready to mount to the wall with two, short flat head wood screws. (Or, modify the design and install magnets to attach to a metal surface…or add pegs to attach to peg board…go crazy.)</p><figure class="image image_resized" style="width:75%;"><img src="https://media.prusaprinters.org/media/prints/134541/rich_content/86622331-c1a6-4732-b03c-55b258957fba/img_0527.jpeg#%7B%22uuid%22%3A%22242fcd41-72d4-4459-bc7b-0cd0d1736665%22%2C%22w%22%3A640%2C%22h%22%3A480%7D"></figure><p>As shown, main body sliced with IdeaMaker and printed on Raise3D E2 with Prusament PLA. Flexible inserts sliced with PrusaSlicer and printed on Prusa Mini+ with ATARAXIA ART Flexible PLA.</p><h4><strong>Need Help? Feedback?</strong></h4><p>If you have any questions or trouble with this print, or if you have suggestions for additional revisions, <a href="https://www.prusaprinters.org/messenger/new/160843">send me a message</a>. Happy printing.</p><p>And while you're at it, <a href="https://www.prusaprinters.org/social/160843-toddanglin/about">help yourself to my other prints</a>. </p>
With this file you will be able to print Compact Wall Mounted Forstner Bit Holder with your 3D printer. Click on the button and save the file on your computer to work, edit or customize your design. You can also find more 3D designs for printers on Compact Wall Mounted Forstner Bit Holder.