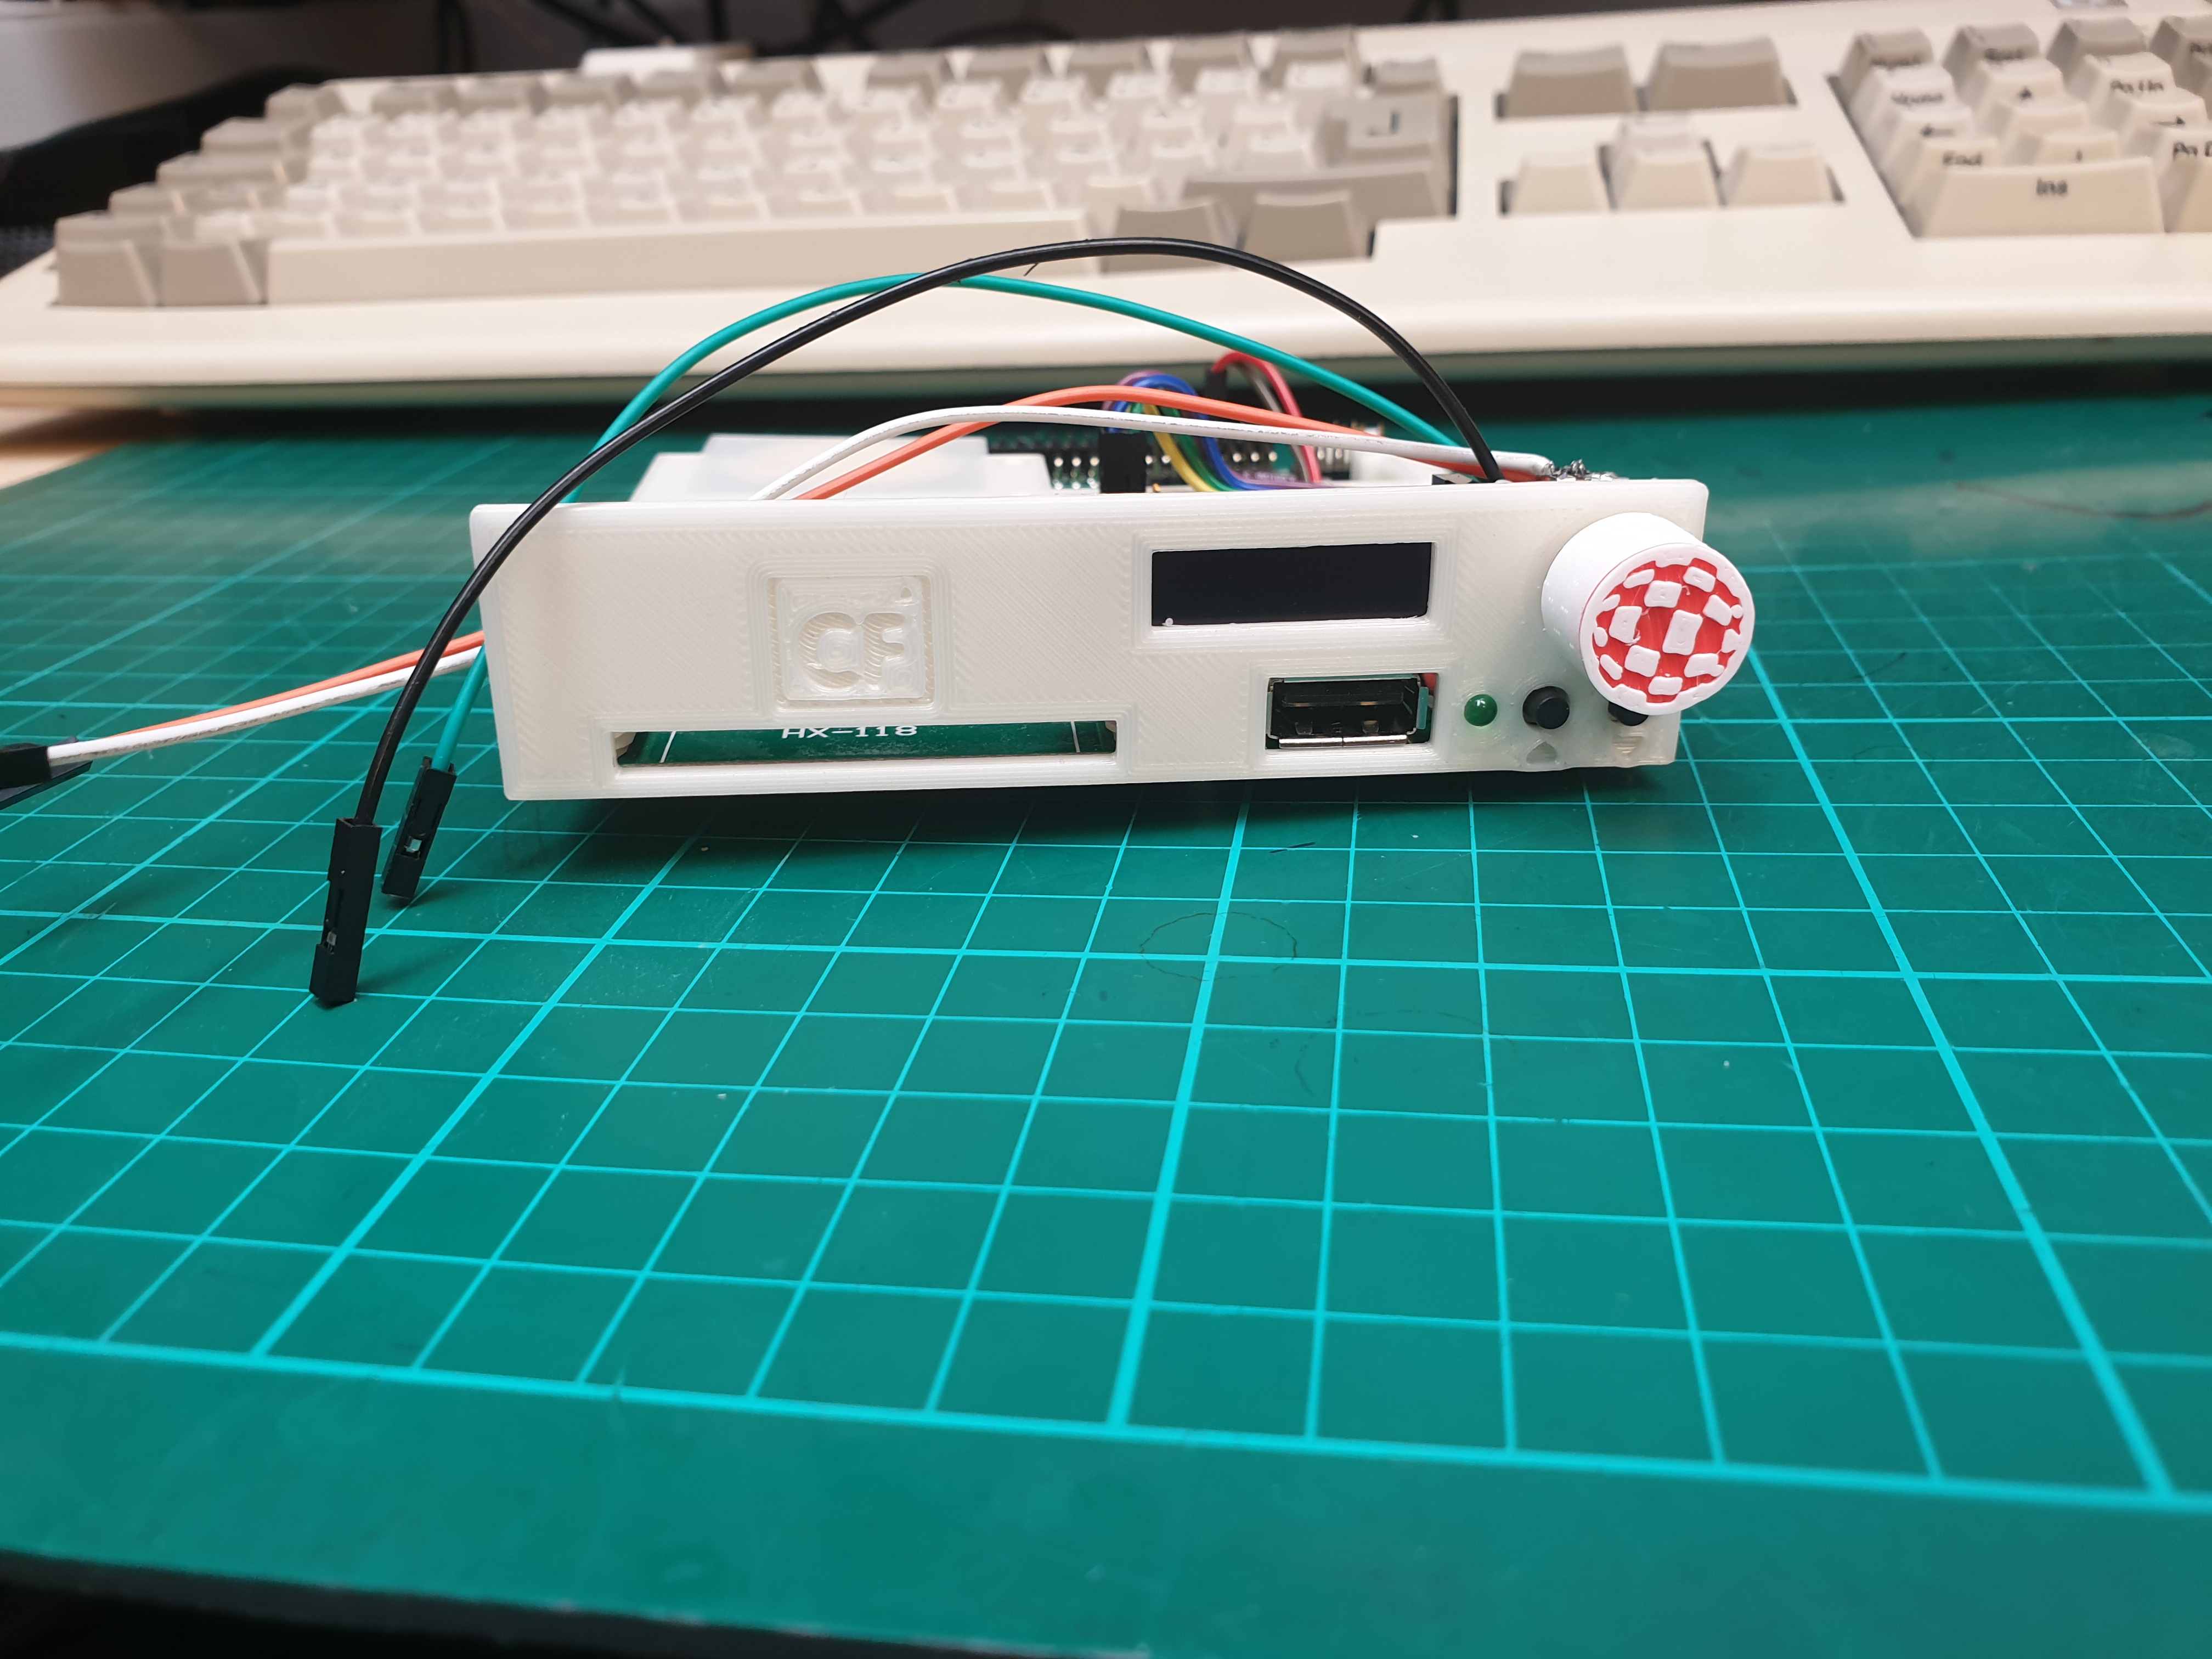
Combined Gotek and CF-ide in 3.5" disk drive
prusaprinters
<p>I have a Gotek drive and CF-IDE card reader for my Amiga 4000.<br>As I already use the 5,25” bay for a CD-ROM drive, and one of the 3,5” bay’s for the original Floppy drive, I needed another solution.<br>My A4000 has a standard height floppy drive, so there is room for two 3.5" drives.</p><p>My idea was to try to combine the two in a single 3,5” drive bay.</p><h3>Print instructions</h3><p>Printed with a couple of small support enforcers on the front part.<br>If you want to be creative you could make a filament change so the logos on the front are more visible. </p><p>What you need:</p><ol><li>a Gotek drive or just its PCB.</li><li>CF To IDE found on eBay the one I designed for is the one that says HX-118 on the PCB.</li><li>ec11 rotary encoder 15mm. If you want to use that with the Gotek.</li><li>Piezo buzzer.</li><li>OLED display 0.91 Inch 128x32 IIC.</li><li>a bit of wire.</li><li>8 M3x5 screws.</li></ol><figure class="table" style="width:100%;"><table><tbody><tr><td><figure class="image image-style-align-center image_resized" style="width:100%;"><img src="https://media.prusaprinters.org/media/prints/55962/rich_content/b5c12ca8-fea2-4255-ba93-aadb34406796/20210207_124827.jpg#%7B%22uuid%22%3A%22d1c7a553-1c98-4d0b-aab0-6eae476acb1e%22%2C%22w%22%3A4032%2C%22h%22%3A3024%7D"></figure></td><td style="width:20%;"><p> </p><figure class="image image-style-align-left image_resized" style="width:100%;"><img src="https://i.ebayimg.com/images/g/KeAAAOSweedceKJb/s-l1600.jpg" alt="Image 1 - 1pc Single Compact Flash CF to 3.5 IDE 40Pin Male adapter Card YBFPRH4"></figure></td><td style="width:20%;"><figure class="image image-style-align-left image_resized" style="width:100%;"><img src="https://media.prusaprinters.org/media/prints/55962/rich_content/48866bec-8960-4e2c-9565-67bc5d1cb12a/image.png#%7B%22uuid%22%3A%22e93aa24c-a3f2-4c05-a35c-e280ddc7c9ef%22%2C%22w%22%3A302%2C%22h%22%3A432%7D"></figure><p> </p><p> </p><p> </p></td><td style="width:20%;"><figure class="image image-style-align-center"><img src="https://media.digikey.com/Photos/Murata%20Photos/7BB-20-6L0.jpg" alt="7BB-20-6L0 Murata Electronics | 490-7712-ND DigiKey Electronics"></figure><p> </p></td><td style="width:20%;"><figure class="image image-style-align-left image_resized" style="width:100%;"><img src="https://imgaz.staticbg.com/thumb/large/oaupload/banggood/images/8B/FD/19e4b5bf-b35a-476c-af5d-e0c96ff111da.jpg.webp"></figure></td></tr></tbody></table></figure><p> </p><h3><strong>Assembly</strong><br> </h3><p>Start by disassembling the Gotek Drive</p><p> </p><figure class="image image-style-align-center image_resized" style="width:100%;"><img src="https://media.prusaprinters.org/media/prints/55962/rich_content/34c2e3cc-0a15-4998-a120-dc785405d85e/20210207_124900.jpg#%7B%22uuid%22%3A%2219987949-e48f-45a7-9e4e-081fae084467%22%2C%22w%22%3A4032%2C%22h%22%3A3024%7D"></figure><figure class="image"><img src="https://media.prusaprinters.org/media/prints/55962/rich_content/96470f40-54d9-40d6-b34c-a4ff5bdc1246/20210207_124908.jpg#%7B%22uuid%22%3A%22bd1c3c8e-1c90-413a-812b-9609e085e9c2%22%2C%22w%22%3A4032%2C%22h%22%3A3024%7D"></figure><p>Gotek side by side with the CF-IDE card reader</p><figure class="image"><img src="https://media.prusaprinters.org/media/prints/55962/rich_content/2fc71cea-663a-43ae-ad91-3afe3f177c51/20210207_124924.jpg#%7B%22uuid%22%3A%2250a4dfd0-6daf-4450-b8c3-718f867c3bba%22%2C%22w%22%3A4032%2C%22h%22%3A3024%7D"></figure><p>Remove the breakpoints on the Gotek PCB</p><figure class="image"><img src="https://media.prusaprinters.org/media/prints/55962/rich_content/78b5682c-a8ad-4816-9e32-d7aeb5c59abf/20210207_125015.jpg#%7B%22uuid%22%3A%22e63993a2-c08f-42a1-afeb-9e124974c477%22%2C%22w%22%3A4032%2C%22h%22%3A3024%7D"></figure><figure class="image"><img src="https://media.prusaprinters.org/media/prints/55962/rich_content/ea40acb0-2d11-4d0b-a736-82519c9a7136/20210207_125227.jpg#%7B%22uuid%22%3A%225f3056cc-e375-4db5-a822-3fc317ecc529%22%2C%22w%22%3A4032%2C%22h%22%3A3024%7D"></figure><p>Solder an upright pin header, and wires for the LED.<br>Be careful not to damage the thru-hole vias on the PCB when unsoldering the header. </p><figure class="image"><img src="https://media.prusaprinters.org/media/prints/55962/rich_content/729d80c3-8bfc-49b5-8f7e-271fd589ad8b/20210211_155159.jpg#%7B%22uuid%22%3A%227d620ccd-f783-4562-9738-b4a3ec2003be%22%2C%22w%22%3A4032%2C%22h%22%3A3024%7D"></figure><figure class="image"><img src="https://media.prusaprinters.org/media/prints/55962/rich_content/a8c19d69-702a-47c7-aa7f-b589101ffeb8/20210211_160933.jpg#%7B%22uuid%22%3A%226f94094d-6ddf-43da-b122-bbe4a2f8be4b%22%2C%22w%22%3A4032%2C%22h%22%3A3024%7D"></figure><p>Remove the supports from the front part.</p><figure class="image"><img src="https://media.prusaprinters.org/media/prints/55962/rich_content/abfc3219-6ed0-4518-965a-330eff3b6ece/20210212_070414.jpg#%7B%22uuid%22%3A%227517d455-f725-4c09-ade3-4b55f68ec954%22%2C%22w%22%3A4032%2C%22h%22%3A3024%7D"></figure><p>Assemble front and back using 3 M3x5 screws.</p><figure class="image"><img src="https://media.prusaprinters.org/media/prints/55962/rich_content/b7328f4a-c788-45eb-abff-db3831e4c9ee/20210212_071049.jpg#%7B%22uuid%22%3A%22ce8daf2d-0e7a-4fcc-8ea3-f0f8ed2350d1%22%2C%22w%22%3A4032%2C%22h%22%3A3024%7D"></figure><figure class="image"><img src="https://media.prusaprinters.org/media/prints/55962/rich_content/63d02fb7-0ed0-468d-98d5-c1556d0b7896/20210212_071144.jpg#%7B%22uuid%22%3A%22fa9dc9f5-1d47-4455-87aa-8449af99a1d2%22%2C%22w%22%3A4032%2C%22h%22%3A3024%7D"></figure><figure class="image"><img src="https://media.prusaprinters.org/media/prints/55962/rich_content/a6c1f315-cd0a-4897-ba7f-952c85a0ebb7/20210212_071316.jpg#%7B%22uuid%22%3A%222934d406-32cb-4cf8-bec7-eec46008b817%22%2C%22w%22%3A4032%2C%22h%22%3A3024%7D"></figure><figure class="image"><img src="https://media.prusaprinters.org/media/prints/55962/rich_content/3cd2464b-16b5-4c39-bd23-628effd4ee6f/20210212_071353.jpg#%7B%22uuid%22%3A%2217019f2c-f840-4c3c-83f7-49088f506480%22%2C%22w%22%3A4032%2C%22h%22%3A3024%7D"></figure><figure class="image"><img src="https://media.prusaprinters.org/media/prints/55962/rich_content/5ed679bb-074a-4a15-abe0-249c2e1dd8b8/20210212_071454.jpg#%7B%22uuid%22%3A%2248edf09b-3a76-4706-b249-b3d4d52c0177%22%2C%22w%22%3A4032%2C%22h%22%3A3024%7D"></figure><p>Mount the Gotek PCB with 3 M3x5 screws.</p><figure class="image"><img src="https://media.prusaprinters.org/media/prints/55962/rich_content/d9bce03c-8a7a-4c49-b7c3-57aff9aa0ac4/20210212_071515.jpg#%7B%22uuid%22%3A%22232a1365-bd67-40d1-85fc-fd08d25ed7fc%22%2C%22w%22%3A4032%2C%22h%22%3A3024%7D"></figure><figure class="image"><img src="https://media.prusaprinters.org/media/prints/55962/rich_content/34e15c4a-e49e-4051-aaa6-5f353c320f0a/20210212_071710.jpg#%7B%22uuid%22%3A%227fd9911f-52f3-4b28-97a5-4683c120063c%22%2C%22w%22%3A4032%2C%22h%22%3A3024%7D"></figure><figure class="image"><img src="https://media.prusaprinters.org/media/prints/55962/rich_content/f54e108f-e005-437f-9c1c-d9f1bc0ddbdd/20210212_071724.jpg#%7B%22uuid%22%3A%221c8c8335-0921-4440-983f-f768af796086%22%2C%22w%22%3A4032%2C%22h%22%3A3024%7D"></figure><p>Mount the CF to IDE adapter with 2 M3x5 screws.</p><figure class="image"><img src="https://media.prusaprinters.org/media/prints/55962/rich_content/0f7e5469-ad12-4980-acd0-150c5c465798/20210212_071822.jpg#%7B%22uuid%22%3A%22cda6e649-b70b-4ae2-b001-9fe9aea9badb%22%2C%22w%22%3A4032%2C%22h%22%3A3024%7D"></figure><figure class="image"><img src="https://media.prusaprinters.org/media/prints/55962/rich_content/49ca433c-f4b0-48b4-91c8-0803d5717967/20210212_071846.jpg#%7B%22uuid%22%3A%226d89f4b6-0d82-4daf-9ac6-88857e77de03%22%2C%22w%22%3A4032%2C%22h%22%3A3024%7D"></figure><figure class="image"><img src="https://media.prusaprinters.org/media/prints/55962/rich_content/a13ff320-4499-47d6-87de-1128d5b552b6/20210212_071929.jpg#%7B%22uuid%22%3A%2216a24259-fa98-4592-8e9f-829f1745598c%22%2C%22w%22%3A4032%2C%22h%22%3A3024%7D"></figure><p>Place the Piezo buzzer in the small pocket. </p><figure class="image"><img src="https://media.prusaprinters.org/media/prints/55962/rich_content/ccce9961-0d06-4d3c-bf46-10a763663878/20210212_071948.jpg#%7B%22uuid%22%3A%22529e2d6c-6442-4083-b5d5-475a2b175448%22%2C%22w%22%3A4032%2C%22h%22%3A3024%7D"></figure><figure class="image"><img src="https://media.prusaprinters.org/media/prints/55962/rich_content/d8db3e22-a4cd-49a9-9a98-02179eb9b20b/20210212_072004.jpg#%7B%22uuid%22%3A%22f5502e8f-9ec8-4fb4-88d6-c80160ca8575%22%2C%22w%22%3A4032%2C%22h%22%3A3024%7D"></figure><p> </p><figure class="image"><img src="https://media.prusaprinters.org/media/prints/55962/rich_content/c06a790f-c910-48d1-b028-b457ff5f0cd5/20210502_183133.jpg#%7B%22uuid%22%3A%22ba15d935-f061-4086-b3d0-cf67b3b918e6%22%2C%22w%22%3A4032%2C%22h%22%3A3024%7D"></figure><p>Add the Rotary encoder and the knob.</p><figure class="image"><img src="https://media.prusaprinters.org/media/prints/55962/rich_content/a390939d-9c3f-4409-b95f-00652312706c/20210502_183635.jpg#%7B%22uuid%22%3A%22c44abb96-29cf-4201-9816-7a9a0a5bfb7d%22%2C%22w%22%3A4032%2C%22h%22%3A3024%7D"></figure><figure class="image"><img src="https://media.prusaprinters.org/media/prints/55962/rich_content/78bc9185-9633-407c-99e6-3f65f52134d9/20210502_183646.jpg#%7B%22uuid%22%3A%22ea7ae467-4a3c-4136-a238-9b00f34fa9a1%22%2C%22w%22%3A4032%2C%22h%22%3A3024%7D"></figure><p>Now it is ready for the mounting in the case.</p><figure class="image image-style-align-left image_resized" style="width:100%;"><img src="https://media.prusaprinters.org/media/prints/55962/rich_content/170f9bb7-3bb6-47d7-82a9-8bc77c48d9fb/20210502_184631.jpg#%7B%22uuid%22%3A%22d2093184-1a88-4807-94a1-548564024484%22%2C%22w%22%3A4032%2C%22h%22%3A3024%7D"></figure><p> </p><p> </p><p> </p><p> </p><p><br> </p><p> </p><p> </p><p> </p><figure class="image"><img src="https://media.prusaprinters.org/media/prints/55962/rich_content/acabb404-b50a-445b-a7ce-032c0969b5c9/20210502_190135_2.jpg#%7B%22uuid%22%3A%22100fede1-aafb-4ecc-80dc-bf6918f40d42%22%2C%22w%22%3A3804%2C%22h%22%3A1208%7D"></figure><p>Links: </p><p>OLED and Rotary encoder connections described Here:</p><p><a href="http://llamamusic.com/s50s550/FlashFloppy_GOTEK.html">http://llamamusic.com/s50s550/FlashFloppy_GOTEK.html</a></p><p>And Here: </p><p><a href="https://github.com/keirf/FlashFloppy/wiki/Hardware-Mods">https://github.com/keirf/FlashFloppy/wiki/Hardware-Mods</a></p><p> </p>
With this file you will be able to print Combined Gotek and CF-ide in 3.5" disk drive with your 3D printer. Click on the button and save the file on your computer to work, edit or customize your design. You can also find more 3D designs for printers on Combined Gotek and CF-ide in 3.5" disk drive.
