Colleciton of upgrade/replacement parts for Hosim 1:16 Scale RC car Q905/Q903
prusaprinters
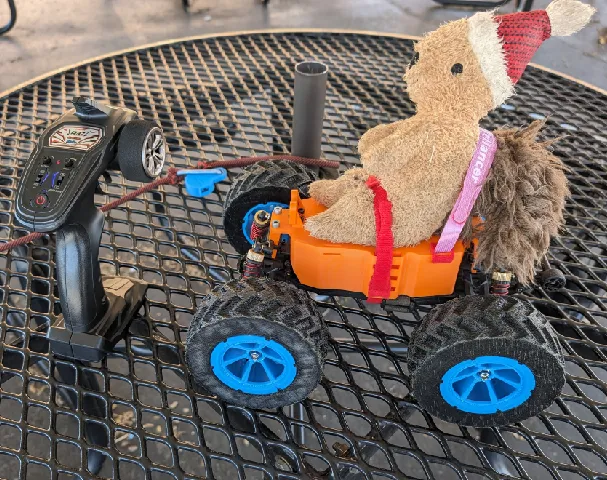
This is a small collection of replacement / upgrade parts for a cheap RC car that I use to exercise my dog. The car I use is [Hosim 1:16 Scale 2845 Brushless RC Car Monster Truck Q905](https://www.hosim.com/products/1-16-scale-2847-brushless-rc-monster-truck). Weather or not you should use an RC car for this, which RC car is best...etc depends on so many different factors that any comprehensive answer is well beyond the scope of this post. Generally speaking, though: - The car should be smaller than and almost as quick as your dog. This is for their safety.- Don't splurge, the car will be subject to some accelerated wear and tear. Do not purchase unless spare parts are easy to get; not all parts are easy to CAD model or print. OEM replacement parts for the q905 can be found [here](https://www.hosim.com/collections/parts-for-q903).You can also take the OEM part number and search for that; you may find other 3rd party compatible parts on various sites. Everything I am sharing here today was designed with the goal of making the car "dog proof" but some of the parts can be used for other purposes / general replacement parts. I am sharing the STEP files for all of the parts so that you can modify them to suit your needs. PrusaSlicer works natively with STEP files as well. In a few cases, I am sharing the 3mf files as well with the recommended print modification/settings applied already.All parts are designed to print with no support material required except hub.step That absolutely requires some support material for good results. In the attached photos, the blue parts are PLA, orange is ABS and black is TPU.All photographed prints were done on a mk3s with a 0.6mm nozzle but various prototypes were printed on other printers with both .4 and .6mm nozzles so you should be able to print these on just about any printer so long as it's dimensionally accurate to about .2mm or so. All screw holes are designed for either the same screws that came with the car (in photos: philips head) or use common M3 or M4 screws (in photos: hex head). I've noted the screw sizes for each part below.The diameter of the screw holes are intentionally undersized by about 0.1mm for a "self-tapping" effect. ## Body Parts - body/shell.step: This is meant to replace the decretive blow-molded shells that come with the car. Naturally, those were the first things destroyed by my dog. The shell attaches to body-pin.step which mates with the car's frame in the same way that the OEM body posts do. There are several auxiliary attachment features designed into this; the photos attached show a few different uses of cheap Velcro straps. - body/body-pin.step: This inserts into the car's frame in the same way that the OEM body posts do. The shell attaches to this using some left over m4x8 screws. You will want to print at least two of these, but I recommend printing all four. When inserting into the car frame, the curved face should be facing away from the center of the car. - body/led-mount.step: The car comes with two LEDs mounted on a simple PCB attached to the stock front bumper. This bumper was more aesthetic than functional so I removed it. With the 115mm variant of the tyre tread, the stock bumper is no longer the forward most part of the car and is therefore (mostly) useless. This is an optional part that can be used to mount the stock LED "headlight" pcb to the car if you want to keep the LEDs. This mounts to the shell.step using two m3x8 screws. The LED pcb is attached to this part using the same screws that held it to the stock bumper. - body/led-mount-cover.step: This is a simple cover to protect the stock LED pcb from the elements and or dog slobber. - body/1x_full_set_all_body.3mf: This contains all body/*.step files in a single print job already oriented correctly for printing. ## Wheel Parts After replacing the "soft" body with the hard-to-bite shell, my dog next went for the tires. The stock tires are a soft rubber that is easily chewed so I designed a few different tread types/sizes and printed them in much more durable TPU. They are all "press-fit" onto "universal" hubs. - wheels/hub.step: This is the blue part you see in the photos. Be mindful that ALL of the force from the motor is transmitted into the hub through the tiny metal pin that runs perpendicular to the axle. For this reason, you will need to be mindful of material choice and should print this portion of the wheel with the maximum possible number of perimeters and or infill. Even with 100% infill and durable material choices, expect that this part will wear out over time. - wheels/4x_hub.3mf: This just contains 4x of the hub.step file with a basic modifier to ensure the maximum number of perimeters and infill in the critical area. ## Tires The files names indicate which variant of the tire they are. alt / flat indicate the tread pattern. Files without alt or flat in the name are the first generation of tread designs. I don't know what will work best for you but I can tell you that I found it worth the time to come up with an alt trad style. The second experiment I did was with flat treads and alt is the third revision. The flat tread style is the most like a traditional "dragster" style tire but is useless on anything but pavement. The car is also quite lite so "force pushing wheel into ground" is still the limiting factor here. Tread size is either stock or 115mm. This represents the outer diameter. Stock is ~50mm and 115mm is... 115mm. I experimented with a few different types of tread / sizes and found that the alt tread style in 115mm size with fuzzy skin was the most durable and provided the best performance on grass and reasonably good performance on harder surfaces.As for pavement, all tires perform about the same; good at speed but lots of wheel-spin and skidding at low speeds. Adding some mass to the car did help with this but I didn't find it to be worth the trade-off in terms of reduced run-time. In all cases, TPU is a lot less flexible than the stock rubber tires which _does_ impact traction / performance.This is the trade off to be made for a tread that can't be trivially punctured and chewed by a dog. **TL;DR:** The car is over powered and can easily drive a 115mm OD tire. The elevation is critical to good performance on grass and still has good performance on harder surfaces. I am most satisfied with tread.alt.fuzzy-115mm.3mf but I am including earlier revisions / iterations for you to experiment with. - wheels/tread-115mm.step- wheels/tread-stock-flat.step- wheels/tread-stock.step- wheels/tread.alt-115mm.step- wheels/tread.alt.fuzzy-115mm.3mf- wheels/tread.flat.115mm.step
With this file you will be able to print Colleciton of upgrade/replacement parts for Hosim 1:16 Scale RC car Q905/Q903 with your 3D printer. Click on the button and save the file on your computer to work, edit or customize your design. You can also find more 3D designs for printers on Colleciton of upgrade/replacement parts for Hosim 1:16 Scale RC car Q905/Q903.