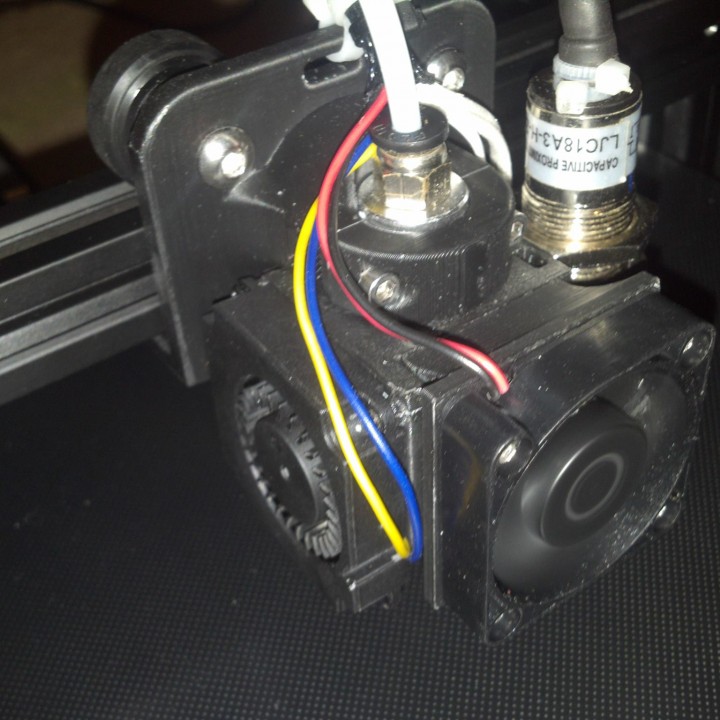
Cobra Carriage - E3D v6 Carriage for Ender 3 / CR10 / Anet A8 and mini V Slot!
myminifactory
Introducing the Cobra Carriage, a game-changing 3D printer accessory born out of a passion for innovation and problem-solving! I wanted to design a carriage that could support a powerful 4010 blower fan while keeping it lightweight, so I got to work on this project. The 4010 blower is surprisingly potent for its size, and I think it's also impressively quiet compared to the larger 5015 blowers. The Cobra Carriage has been designed with precision and care, specifically tailored for use with Anet A8 printers that feature 45mm rail spacing on the X axis. However, this clever design can easily adapt to other 3D printers with similar rail spacing, making it a versatile accessory for many users. Weighing in at just 45 grams without any additional hardware, the Cobra Carriage measures a compact 60mm wide by 74mm tall and 66mm deep when fully assembled. This sleek design not only saves space but also reduces weight, making it an ideal addition to your 3D printing setup. The fan duct, however, is still a work in progress, and I'd love for someone with expertise in this area to help me create a better one. For now, I'm running the fan at 75% to avoid thermal runaway triggers, but I'm confident that with a bit more tweaking, we can get it just right. Before you start printing, please note that there are two versions of the A8 printer, each with different rail spacing. Make sure to check which version you have before investing time in printing the Cobra Carriage. If you're using an Anet A8 X axis redux (available on Thingiverse), I've found it works beautifully with this carriage. When assembling the carriage, be aware that the positioning of the nozzle may cause issues with your X axis motor holder and idler when homing. To avoid this problem, consider printing some spacers to place between the bearing blocks and Y carriage (you can find these on Thingiverse too). For optimal print quality, I recommend printing the Cobra Carriage in ABS or PETG, as PLA may soften and warp due to the fan shroud's heat output. To assemble the carriage, you'll need the following hardware: * 1 x M3x30mm Bolt for attaching the fan shroud to the E3D cold end * 4 x M3x15mm Screws for securing the 30mm fan * 2 x M3x20mm Bolts for mounting the E3D clamp into the main body (use Amazon's 20 x M3x20mm Cap head screws) * 2 x M3x10mm Bolts for mounting the Bltouch sensor (use Amazon's 10 x M3x10mm Cap head screws) * 5 x M3 Nuts (2 for E3D clamp, 2 for Bltouch mount, and 1 for fan shroud clamp) * 4 x M2x5mm Screws for attaching the 4010 blower and its duct * Screw the duct from inside the edge closest to the hot end * 3 x igus RJ4JP-01-08 polymer bearings or LM8UU linear bearings (or equivalent alternatives) * 1 x E3D V6 or V6 clone (clone available on Amazon) * 1 x 30mm 12v Fan OR 40mm fan using the adaptor available on Thingiverse * 1 x 4010 12v Blower Fan (available on Amazon) * 1 x Bltouch or 3Dtouch sensor (available on Amazon) Assembly is straightforward: bolt the fans and sensor to the shroud before installing it onto the E3D. You may need to use a flat screwdriver to pry open the slits on the bearing carriers as they can be quite tight. The belt holder has been designed specifically for use with "GT2" belts from eBay, so make sure you have one of these handy when assembling the carriage. Offsets: * #define X_PROBE_OFFSET_FROM_EXTRUDER 24 * #define Y_PROBE_OFFSET_FROM_EXTRUDER -1 * #define Z_PROBE_OFFSET_FROM_EXTRUDER -0.25 * #define LEFT_PROBE_BED_POSITION 20 * #define RIGHT_PROBE_BED_POSITION 200 * #define FRONT_PROBE_BED_POSITION 20 * #define BACK_PROBE_BED_POSITION 200 * #define X_MIN_POS -28 * #define Y_MIN_POS -10 These offsets are rough estimates and may vary depending on your specific setup, especially if you're using the "X axis redux" modification. If you find more accurate or better offsets, please share them in the comments below! If you enjoy this thing, consider showing your appreciation by tipping me a virtual beer – it's always appreciated!
With this file you will be able to print Cobra Carriage - E3D v6 Carriage for Ender 3 / CR10 / Anet A8 and mini V Slot! with your 3D printer. Click on the button and save the file on your computer to work, edit or customize your design. You can also find more 3D designs for printers on Cobra Carriage - E3D v6 Carriage for Ender 3 / CR10 / Anet A8 and mini V Slot!.
