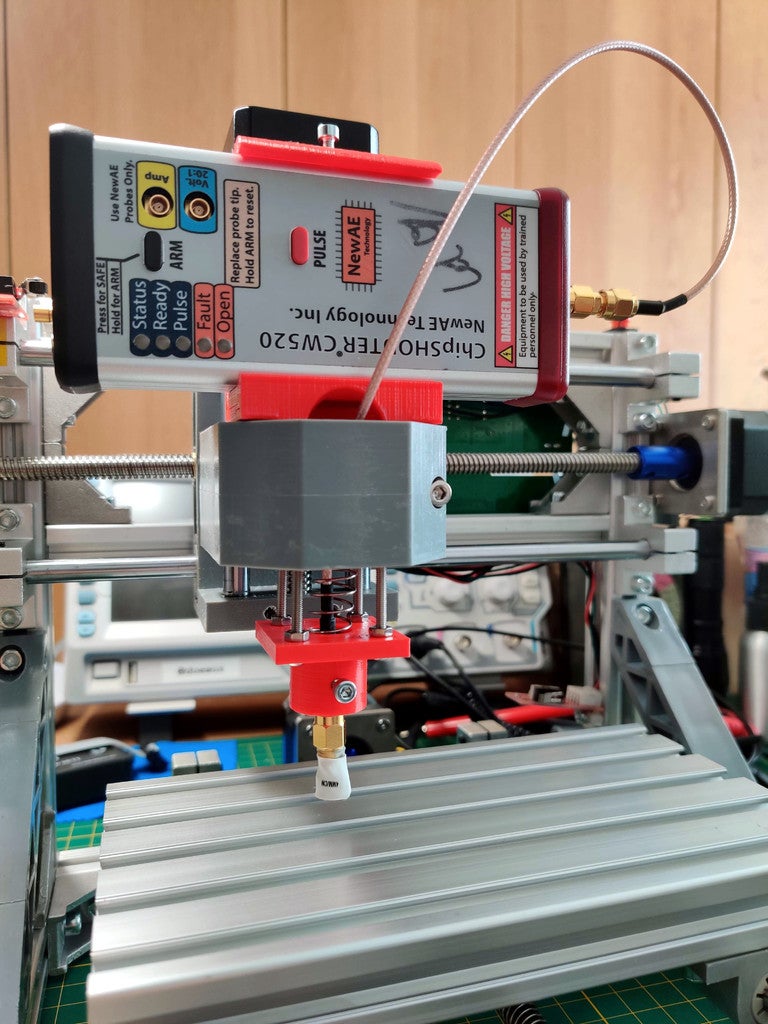
CNC 1610 ChipSHOUTER Holder / Mount
prusaprinters
<p>Here is a mount for the ChipSHOUTER, a electro-magnetic fault-injection tool, to fit a classical CNC laser module mount.</p><p>If your CNC mount doesn't have the notches to fit a square laser module, you can easily adapt the design to be shaped as a motor cylinder.</p><p>Warning: this design deports the ChipSHOUTER away with the help of a SMA cable. Please test first if such deport is ok for you or not. Cables might vary. With my cable I didn't notice any loss or any difference in the effects of the pulses against tested chips.</p><p>Why such setup and why the spring mount? To avoid costly hardware destruction in case of mistake (e.g. moving too far towards the target).</p><p><strong>Notes:</strong></p><p>Print it lying on its side to better strength of the element holding the ChipSHOUTER.</p><p>The original prototype was a bit tight for the screw nuts, screw rods and SMA nut to fit.<br>This was easily solved with a hot air gun, nevertheless I added a small extra tolerance in the scad and in the generated STLs. See extra_tol and try by yourself if it fits your needs.</p><h3>Post-Printing</h3><p><strong>Required material</strong></p><ul><li>a spring, 12 mm diameter, 50 mm at rest. I used the spring of an anti-backlash nut for 8 mm rod;</li><li>a SMA cable, at least 22 cm long. Mine is 35 cm long;</li><li>a SMA female-to-female gender changer adapter;</li><li>2 small M3 screws and nuts;</li><li>4 40 mm M3 screws and 8 nuts; </li></ul><figure class="image"><img src="https://media.prusaprinters.org/media/prints/75112/rich_content/d962127b-c2b1-4ab7-88b3-30706920384a/material.jpg#%7B%22uuid%22%3A%22b0743348-7c46-49b1-8022-6345a19f711e%22%2C%22w%22%3A3438%2C%22h%22%3A2579%7D"></figure><p><strong>Assembly</strong></p><p>Insert nuts in their hole (on top and inside tip holder), help with hot air gun if needed;</p><ul><li>make sure long screws can move freely in their holes at bottom of main support, enlarge if needed;</li><li>screw SMA adapter on SMA cable;</li><li>make sure SMA cable nut fits in tip holder hole up to the bottom, help with hot air gun if needed;</li><li>insert SMA cable in main support;</li><li>add spring and insert SMA cable in tip holder, with the adapter already screwed on the cable;</li><li>add screw to hold the SMA nut in the tip holder;</li><li>add long screws to the tip holder with their nut but <strong>don't tighten it yet</strong>;</li><li>insert long screws and spring in the main support;</li><li>attach them with a nut inside the cavity. I find it easier to just throw a nut in position and gently turn the screw from outside;</li><li>once the 4 nuts are on their screw in the cavity, tighten the other nuts on the tip holder;</li><li>make sure both pieces can move freely with the spring;</li><li>add the ChipSHOUTER, optionally secure it with a screw on top;</li><li>put the apparatus in place on the CNC;</li><li>enjoy!</li></ul><p> </p>
With this file you will be able to print CNC 1610 ChipSHOUTER Holder / Mount with your 3D printer. Click on the button and save the file on your computer to work, edit or customize your design. You can also find more 3D designs for printers on CNC 1610 ChipSHOUTER Holder / Mount.
