Clockmaker - 140mm Fan Fume Extractor
thingiverse
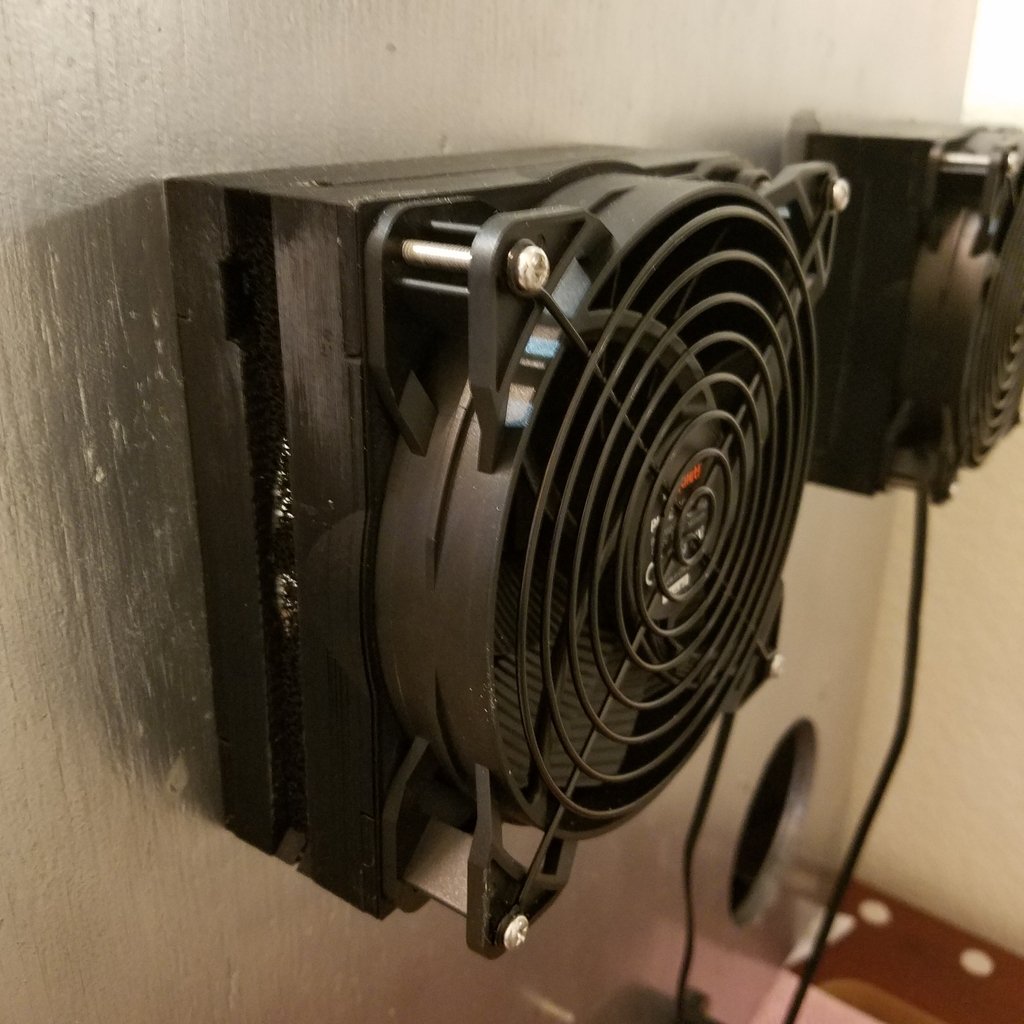
This is the backbone of The Clockmaker: the fume extractors. This part is designed to efficiently channel through a 120mm cornhole into a 130mm square charcoal filter and through a 140mm fan. ## Materials Needed - 1x top piece - 1x base plate, printed upside down - 8x edge triangles - 8x M4 hex nuts - 4x M4 30-35mm screws for the fan mount - 4x M4 screws long enough to attach the base securely - 1x 140mm fan - 1x 130mm square charcoal filter Additionally, you will require: - E6000 or a similar strong adhesive - Proper protection when using the glue and during the curing process - Clamps for secure holding ## Sanding/Glue Prep Steps - Smooth out rough sections on the top and bottom pieces. Since they mate together, a smooth connection is crucial. - Start with 150 grit sandpaper if the surface is uneven or has a lot of roughness to remove. - Move to 220 grit to finish any patches that prevent a good join. - Also ensure that both halves can easily accommodate a filter when joined. ## Gluing Hex Nuts - Wear protective gear, including gloves and a half-mask respirator or equivalent. - Apply a small amount of glue inside the hex nut holes using a toothpick or similar tool. Immediately insert a nut after applying the glue. - Ensure the nut is set before adding more glue and edge pieces. Clamp each edge piece down over the nut carefully but firmly. - Let it set for at least a day if you're using E6000, preferably in an enclosed container or outdoors to ventilate. ## Gluing Halves Together - Wear protective gear again; safety is crucial here. - Place the two halves together with the nuts set under edge pieces and a smooth surface. If both are correct, proceed with gluing. - Thread an M4 screw through each hex nut to remove excess glue that may have entered the threads. - Apply E6000 along the mating edges in a thin layer. - Squish them together, removing any excess glue that comes out. Check for gaps and add more glue as needed. - Clamp your work securely on each corner and let it set for two days. ## Final Steps After everything is glued in place, all that remains is mounting the fan, inserting a filter, and securing the block.
With this file you will be able to print Clockmaker - 140mm Fan Fume Extractor with your 3D printer. Click on the button and save the file on your computer to work, edit or customize your design. You can also find more 3D designs for printers on Clockmaker - 140mm Fan Fume Extractor.