clip glass prusa MK2
thingiverse
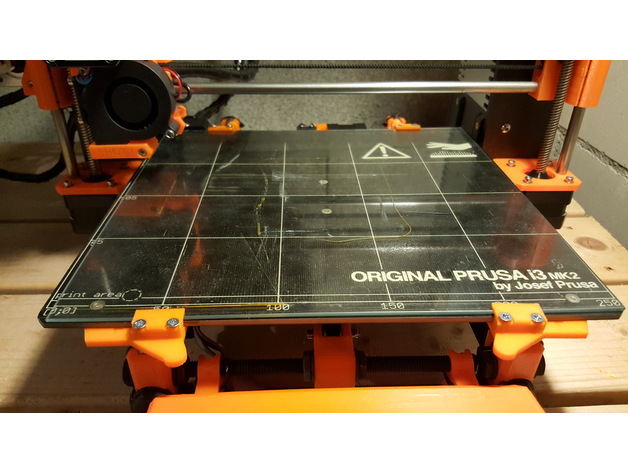
I'm absolutely thrilled with my Prusa MK2 and I really wanted to print on glass using it, so I checked out TechTipTricks' video on YouTube about that: https://www.youtube.com/watch?v=VQNCvE2OLhA. The G-code required for this is available at prusamk2.com: http://www.prusamk2.com/printing-on-glass-with-your-prusa-i3-mk2-ohhh-so-smooth/. Unfortunately, all my clips to hold the glass didn't work very well and were often pulled away by the extruder, just like in TechTipTricks' video. So I created my own clips that can be integrated into the heatbed without disturbing the extruder. Here's the manual for installing them on your Prusa MK2 (compare the pictures): Unscrew all six screws (two front, two back, and two middle) that hold the heatbed to the printer. Put four hex-nut pieces into the four bottom-clip parts (FL, FR, BL, BR). Make sure they're under the bottom-clip parts! Clean the top-clip parts and put some M3x16 screws through them. Let them stand out a little bit like shown in the pictures. Combine all the bottom-clip parts and the top-clip parts except for the BL part by screwing them together. Leave some space between both parts. Put the clips together with the already installed hex-nut pieces under the heatbed's hex nuts. Make sure the hex-nut pieces are not on top (compare pictures). The clips are labeled: FL (front left), FR (front right), BL (back left), and BR (back right). Tighten all the screws to the heatbed again. Be careful not to jam the white cable from under the heatbed by the BL clip (it should go around it). Now put the top-clip part and the BL clip together with the screws. Put the glass on the heatbed and close all clips. Then tighten all screws until the clips hold the glass tightly and can be removed easily. Make sure the screws don't poke out from the top-clip parts, especially not on the FL and FR parts! If they do, they might get in contact with the extruder. G-Code: This is the G-code I use on my printer for the starting procedure. Be sure to adapt it for your own: G1 Z2.0: Enter the thickness of your glass in this line of code (in this example 2.0 millimeters). You have two minutes to insert the glass (beep after the first minute). G21; set units to millimeters G90; use absolute positioning M82; absolute extrusion mode M104 S{material_print_temperature}; set extruder temp M140 S{material_bed_temperature}; set bed temperature M190 S{material_bed_temperature}; wait for bed temperature M109 S{material_print_temperature}; wait for extruder temperature G92 E0.0; reset extruder distance position G80; mesh bed leveling G1 Y-3.0 F1000.0; go outside the printing area G1 F600 Z+30 G4 P30000; pause for 1 minute M300 S1567 P240; play a beep M117 One minute remaining; one minute warning G4 P30000; pause 1 more minute G1 Z2.0; consider glass thickness Measure your glass thickness first G92 Z0; set absolute positioning for the rest of the print G1 X60.0 E9.0 F1000.0; intro line G1 X100.0 E12.5 F1000.0; intro line G92 E0.0; reset extruder distance position That's it! Now you have a MK2 with mounted clips that are not influenced by the extruder and can be removed easily to take out the glass. Have fun! Print Settings: Printer: Prusa i3 MK2 Rafts: No Supports: No Resolution: 0.4 mm Infill: 30%
With this file you will be able to print clip glass prusa MK2 with your 3D printer. Click on the button and save the file on your computer to work, edit or customize your design. You can also find more 3D designs for printers on clip glass prusa MK2.