Civil War Canon
pinshape
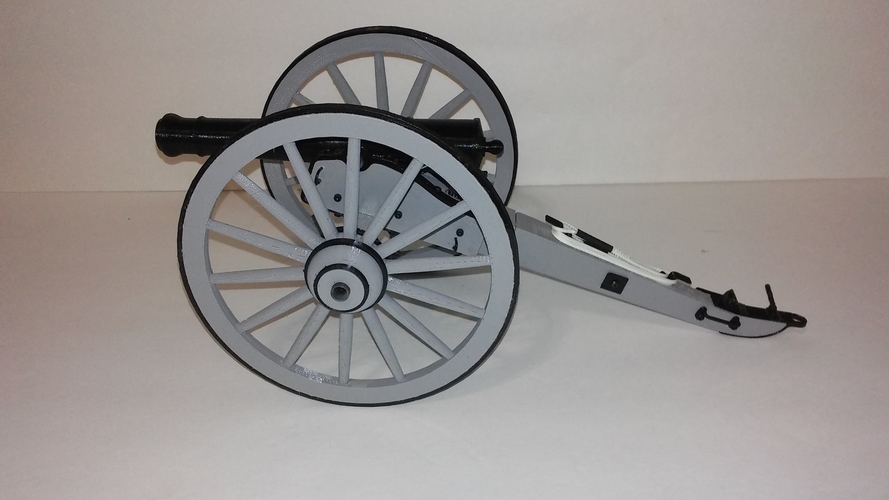
This is a highly detailed model of a civil war cannon, complete with intricate designs and precise measurements. I've printed and assembled four of these cannons, and the design has been thoroughly refined. The finished cannon measures 12.5 inches in length, 6.25 inches in width, and approximately 6 inches in height, making it a stunning conversation piece for any coffee table. I created solidworks drawings from sketches found on various websites, which are included as images. To ensure optimal results, most parts should be printed with 100% fill to guarantee robust screw holes. If you choose to reduce the fill percentage to save time and material, carefully examine your slicer output to verify that the holes have sufficient support. In some cases, it may be necessary to ream out mounting holes to accommodate 2-56 bolts, taking care not to compromise the printed tube. The center frame is divided into two pieces to accommodate my WANHAO i3 printer. A small hole (0.3 inches) in each piece accepts a short carbon fiber archery arrow segment to align and reinforce the frame halves when glued together. Alternatively, you can use a 1/4-inch dowel rod for alignment purposes. The two frame halves are bolted to the center frame using 2-56 x 1/2 hardware through the six frame spaces. The trunnion plates are secured to the perimeter of the frame sides with 2-56 x 1/4 hardware. A 2-inch segment of carbon fiber archery arrow serves as the pivot shaft for the barrel, which can be inserted after the frame assembly is complete. The wheels are printed in two halves and glued together, providing an optimal flat surface for printing. Use a cut piece of carbon fiber archery arrow to align the wheel halves when gluing them and clamp the halves until the glue sets. The black wheel rim and hub rims have a good press fit on the finished wheel but can be glued if necessary. The barrel is printed in two halves, as shown in the included slicer image. It may be essential to add weight to the rear half of the barrel to ensure it tips down against the elevation screw. I printed the barrel with approximately 10% hex fill and inserted BBs into the fill cavities as the rear half printed (do not insert BBs into the barrel cavity itself). To create small parts, print them solid fill and then glue them to the frame pieces, as shown in the included images. The barrel brush is made by stringing ten bristle pieces together on the handle at random rotation angles to simulate a real brush. The elevating screw consists of a 6-32 x 1/2-inch screw run through the screw lift spindle and into the elevating screw base, which is then glued onto the top of the center frame. The curved tow hook piece is glued conformally to the rear of the center frame as shown. The two lift handles can be either glued or bolted to the rear frame. The two small square plates are bolted to the sides of the center frame using 2-56 hardware, protecting the frame from the caisson wheels when the gun is being horse-drawn. The coiled rope can be created from any coarse string that approximates the scale rope. I plan to upload the linder parts as a separate offering soon. This model required significant engineering efforts on my part to refine and perfect. I believe my asking price is reasonable considering the effort invested, so please consider purchasing these files to support my continued development of similar models. Thank you for your time.
With this file you will be able to print Civil War Canon with your 3D printer. Click on the button and save the file on your computer to work, edit or customize your design. You can also find more 3D designs for printers on Civil War Canon.