Circuitry-Inspired Keychain Marble Maze
prusaprinters
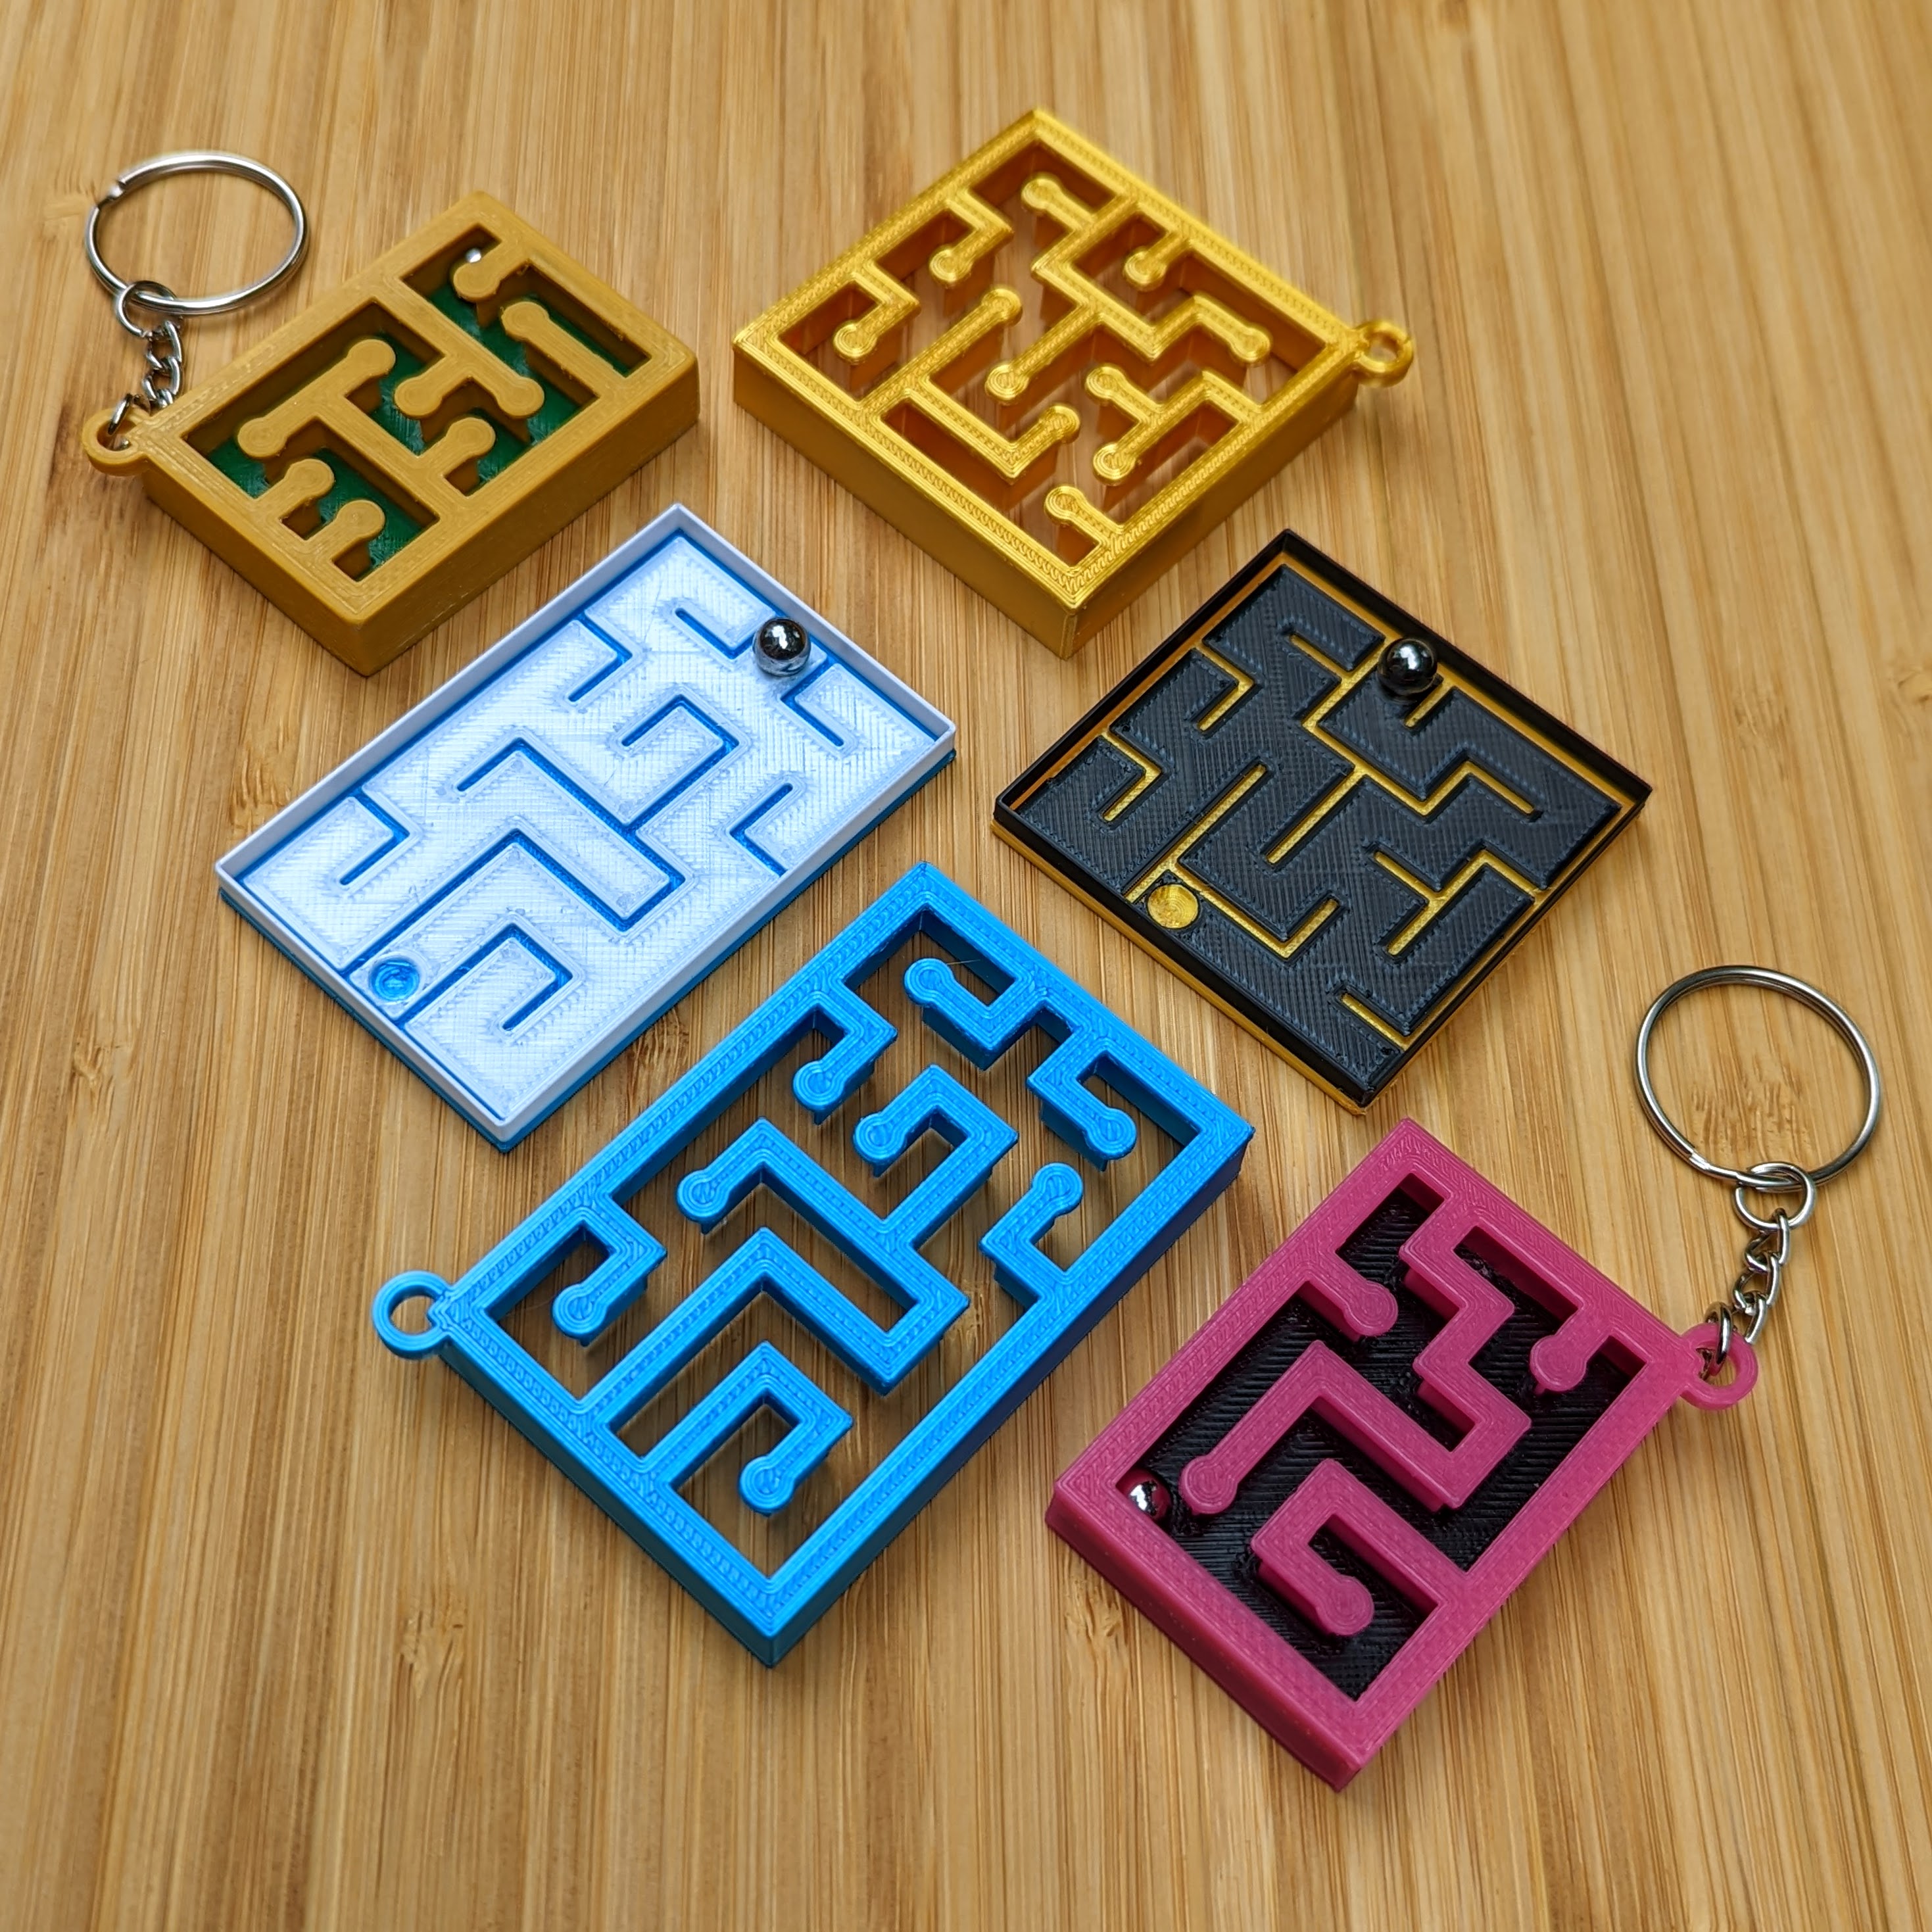
<p>This attractive keychain-sized marble maze prints quickly with no supports, and the only hardware needed is a ball bearing - best of all, the ball cannot fall out, so you can take it with you to keep you occupied while waiting in lines, or play with as a fidget toy. The ball makes a super satisfying sound as it moves around!</p><p>I designed the maze to resemble a circuit board, since building electronics with microcontrollers is what inspired me to get into 3D printing. The maze looks good in any color, but I love using silky gold and green PLA to resemble an actual circuit board. My kids love anything on a keychain, so they were the other inspiration for this project. </p><p>There are 3 sizes, all perfect for carrying on a keychain. I've included a few different mazes, and will be happy to upload more if folks like these! </p><p><strong>Note</strong>: For safety, do not give this maze to a young child who might put small items in their mouth!</p><h3>Hardware</h3><ul><li>These designs use a 1/4” ball bearing, which I found at my local hardware store for $1.25, or you can buy a pack on Amazon, such as these: 25 pieces for $5: <a href="https://www.amazon.com/Inch-Stainless-Steel-Bearing-Balls/dp/B007B2AHM6">https://www.amazon.com/Inch-Stainless-Steel-Bearing-Balls/dp/B007B2AHM6</a></li><li>To make it a keychain, you’ll also want to buy keychain hardware, such as this one: <a href="https://www.amazon.com/gp/product/B09XV879DQ">https://www.amazon.com/gp/product/B09XV879DQ</a> - you can also find this hardware at a craft / hobby store.</li></ul><p>No other hardware is needed! The maze snaps together <strong>(remember to put the ball in first)</strong> and stays together, without screws or a plexiglass cover. The base of the maze has small divots to mark the start & end of the maze. If you print the base in two colors, the divots really stand out!</p><h3>Printing</h3><p>To print, select the “top” and “bottom” files for the size maze you want - there are currently mazes in 4x6, 6x6 and 5x8, with a few different maze patterns, all with the keychain attachment. The “top” should be printed upside down. </p><p>For a single color maze, you can print both parts at once.</p><p>To make a two-toned version with visible start & end divots, print the walls in your main color, then print the floor in that same color with a pause at around layer 11 when printing with 0.2 mm layers, then change to your accent color. The divots for the ball will match the walls, and the floor of the maze will show in your accent color.</p><p>You can also print the top and bottom each in a different color, without worrying about changing the filament during the print - this will look great, you just won’t see the divots as well - but you could color them in with a bit of paint or a paint marker.</p><p><strong>Important: Let the maze cool!</strong> Do not rush removing it from your build plate! There are lots of very thin parts which will be held in place once assembled, but if you try to pry it off the plate while hot, you might bend or break the maze. I found it most effective to pop the build plate in the freezer for a bit!</p><h3>Assembly</h3><p><strong>Insert the ball bearing before closing the two halves!</strong></p><figure class="image image-style-align-center image_resized" style="width:50%;"><img src="https://media.printables.com/media/prints/273702/rich_content/13ad9641-6817-4eb3-b371-af4a2bda2c35/marble-maze-assembly.gif#%7B%22uuid%22%3A%224697c7d9-61fc-4803-9805-43e3afe30bc4%22%2C%22w%22%3A320%2C%22h%22%3A374%7D"></figure><p>Clean up the pieces - remove any stringing, sand if desired - you may want to lightly sand the corners of the bottom half, which will slide into the two walls of the top half, so if you have a rough z-seam you’ll want to clean that up so it fits nicely.</p><p><strong>Place the ball bearing in one half of the maze</strong>, then snap the two halves together - if you forget to put the ball bearing in, you may not be able to get the maze open again - this is by design, to make it safe to carry around, but it does mean <strong>you need to remember to add the ball bearing before closing it up!</strong></p><p>You may need to press fairly firmly to get the maze to close completely. The bottom should be flush with the outer walls of the top half. If the maze doesn’t close, check that all of the inside walls in the top half that make up the actual maze have aligned with the slots in the bottom half, then try again.</p><p>If your print doesn't stick with just the pressure-fit, add a little super glue to keep it closed :) </p><p>Add a keychain using split-ring hardware, attach to your keys, and enjoy!</p><figure class="image image_resized" style="width:50%;"><img src="https://media.printables.com/media/prints/273702/rich_content/45fef047-724b-4db9-92a6-4114db319b93/keychain.gif#%7B%22uuid%22%3A%2201e6d35e-b47e-487a-982e-8b4042885a10%22%2C%22w%22%3A320%2C%22h%22%3A374%7D"></figure><p><strong>Note</strong>: For safety, do not give this maze to a young child who might put small items in their mouth!</p><h3>TLDR:</h3><p>Print the top and bottom in the size & pattern you want, put a ¼" ball bearing inside, then close it up and add keychain hardware!</p>
With this file you will be able to print Circuitry-Inspired Keychain Marble Maze with your 3D printer. Click on the button and save the file on your computer to work, edit or customize your design. You can also find more 3D designs for printers on Circuitry-Inspired Keychain Marble Maze.