Ciclop 3D Scanner Adjustable Laser Mount
thingiverse
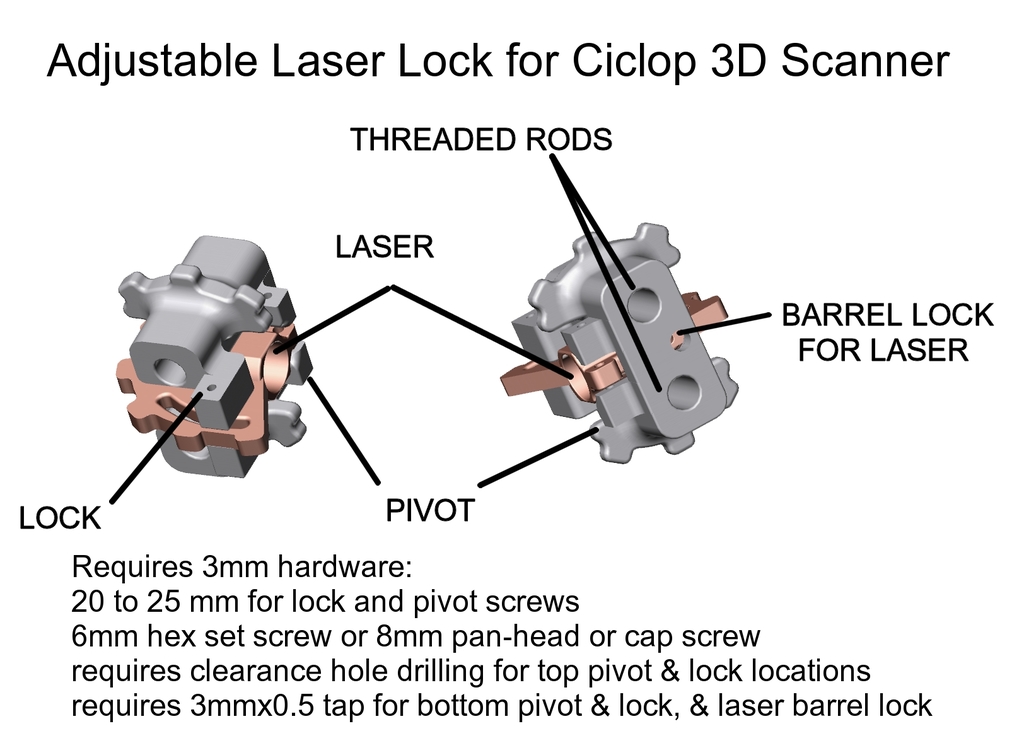
Tinkering with lasers can be maddeningly frustrating, especially when trying to get them aimed just right. The BQ style design featuring threaded rods has a major drawback - no side-to-side adjustment is possible. This improved model assembly makes precision aiming a breeze. This new model requires drilling and tapping, but it's otherwise a seamless drop-in replacement for traditional mounts. Working with threads and holes can be a real pain when 3D printing, especially when relying on outdated charts that never seem to work out as planned. In this case, tapping 3mm holes is a laborious process - the tap constantly gets clogged with PLA and needs to be backed out every few turns, leaving behind precarious threads. If you accidentally ruin a hole, you can try overdrilling it slightly, filling it with 24-hour or 5-hour JB Weld, coating a mating screw in Vaseline, wiping off the excess, and threading it into the hole loaded with JB Weld. When it sets up, the screw will back out easily due to the Vaseline film, leaving you with decent threads. There's also an alternative design that uses a piece of wire or an unfolded paperclip for the pivot, eliminating the need for tapping and sourcing another screw. The files for this option end in "wire". Before drilling or tapping, mark the left and right sides of the model so that your screws are positioned on top of the mounting blocks, drill clearance holes in the top bosses, and drill/tap threaded holes in the bottom bosses. Enjoy! By the way, I added a break-off disk to the pivot to keep it stable during printing. Also, I just uploaded the laser pivot v6 with the set-screw hole now passing through the barrel area. In v5, the hole didn't quite make it through. Users would have caught this during pre-drill prior to tapping, but it's better to have the hole pass through. And finally, who are we as a community of users? The Ciclop is open-source, but the quality and location of documentation are sorely lacking. It took me hours over several days to collect drawings or renderings with dimensions - BQ had the best, showing the location of every feature to the nearest 0.1mm. None of the documentation addresses lasers crossing at the center of the platform, although I suspect we're supposed to move the lasers in or out from center using the threaded rod adjustment. Using my design must alter the 30-degree geometry slightly and affect the accuracy of the scan. There's no single consistent document on lighting - some say create an outside lit photo booth while others suggest pure darkness. From my experience, my unit needs tweaking to perform at its best. Some comments mention using green lasers for better results and the Logitech 920 camera for higher resolution. The newbie user is in trouble from day one, just trying to get the Logitech image to show and connect - yet nobody addresses this in their setup videos. Using VLC or Logitech/Microsoft's utilities can prove your camera before trying to get it all up at once in Horus. This device desperately needs a single repository for all documentation covering all flavors of the design. Maybe a wiki that allows anyone to upload? ** Credits: The dimensional sketch is courtesy of BQ and the laser alignment images come from https://maquinaslibres.noblogs.org/tag/ciclop/ **
With this file you will be able to print Ciclop 3D Scanner Adjustable Laser Mount with your 3D printer. Click on the button and save the file on your computer to work, edit or customize your design. You can also find more 3D designs for printers on Ciclop 3D Scanner Adjustable Laser Mount.