Christmas bell
prusaprinters
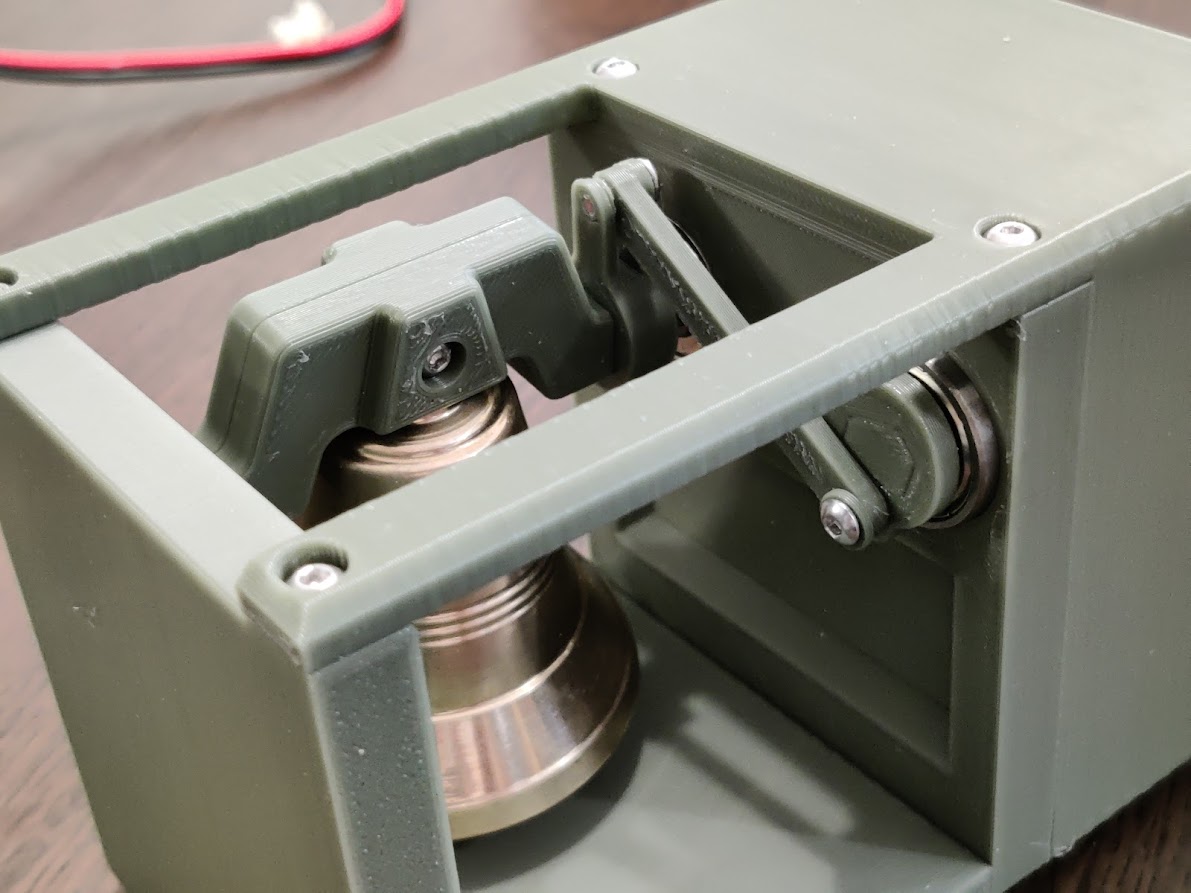
<figure class="media"><oembed url="https://www.youtube.com/watch?v=QmWEGSyZTZs"></oembed></figure><h4>HW needed:</h4><ul><li>screws M3x6</li><li>screws M3x10</li><li>1pc set screw M3x6</li><li>1pc screw M3x12</li><li>2pcs nut M3</li><li>4pcs 608 bearing (8x22x7 mm)</li><li>bell, diameter max 55 mm, height max 65 mm: <a href="https://www.aliexpress.com/item/4000803588459.html?spm=a2g0o.productlist.0.0.2ff54d32NY3g9d&algo_pvid=02004041-e00e-4206-8358-c44a5040c318&algo_exp_id=02004041-e00e-4206-8358-c44a5040c318-0&pdp_ext_f=%7B%22sku_id%22%3A%2210000014302903094%22%7D&pdp_pi=-1%3B2.37%3B-1%3B-1%40salePrice%3BUSD%3Bsearch-mainSearch">Aliexpress 1</a>, <a href="https://www.aliexpress.com/item/33000718604.html?spm=a2g0o.productlist.0.0.2ff54d32NY3g9d&algo_pvid=02004041-e00e-4206-8358-c44a5040c318&algo_exp_id=02004041-e00e-4206-8358-c44a5040c318-30&pdp_ext_f=%7B%22sku_id%22%3A%2210000000422105726%22%7D&pdp_pi=-1%3B2.88%3B-1%3B-1%40salePrice%3BUSD%3Bsearch-mainSearch">Aliexpress 2</a>, <a href="https://www.zvony.com/product-page/zvonek-st%C5%99edn%C3%AD">ČR</a></li><li>N20 mini motor with gearbox, 6V, 200 RMP: <a href="https://www.aliexpress.com/item/1005003229045831.html?spm=a2g0o.productlist.0.0.516d11841px0eV&algo_pvid=f6e35414-a151-491d-a411-60c313ec43f4&algo_exp_id=f6e35414-a151-491d-a411-60c313ec43f4-0&pdp_ext_f=%7B%22sku_id%22%3A%2212000024757391437%22%7D&pdp_pi=-1%3B2.78%3B-1%3B-1%40salePrice%3BUSD%3Bsearch-mainSearch">Aliexpress</a></li><li>6V DC power source</li></ul><h4>Optional HW:</h4><ul><li>Remote control over WiFi: Sonoff SV WiFi relay switch low voltage: <a href="https://www.aliexpress.com/item/32985779544.html?spm=a2g0o.productlist.0.0.8ace6f78RaObTh&algo_pvid=b8d0f255-c70d-4b72-9056-5b1aad9c6cfa&algo_exp_id=b8d0f255-c70d-4b72-9056-5b1aad9c6cfa-1&pdp_ext_f=%7B%22sku_id%22%3A%2266808025206%22%7D&pdp_pi=-1%3B5.61%3B-1%3B-1%40salePrice%3BUSD%3Bsearch-mainSearch">Aliexpress</a>, <a href="https://botland.cz/sonoff-inteligentni-wifi-ovladace/16700-sonoff-sv-rele-5v-24v-wifi-android-ios-5904422326333.html">ČR</a></li><li>For discontinuous ringing: Cycle Digital Time Delay Relay Trigger: <a href="https://www.aliexpress.com/item/10000001437185.html?spm=a2g0o.productlist.0.0.64b35846ko2gBn&algo_pvid=5213e348-8c62-4c8b-a96c-77cf3af9f6ad&algo_exp_id=5213e348-8c62-4c8b-a96c-77cf3af9f6ad-17&pdp_ext_f=%7B%22sku_id%22%3A%2220000000004656490%22%7D&pdp_pi=-1%3B2.42%3B-1%3B-1%40salePrice%3BUSD%3Bsearch-mainSearch">Aliexpress</a>, <a href="https://botland.cz/elektronicke-a-digitalni-spinace/12126-tranzistorovy-spinac-s-nastavitelnym-zpozdenim-15a-36v-5904422318727.html">ČR</a></li></ul><h4>Before the print:</h4><ul><li><strong>Headstock is made for specific bell. In case you use different bell, some adaptation might be needed.</strong></li></ul><h4>Print instructions:</h4><ul><li>PLA</li><li>0,2mm or 0,3 mm layer height</li><li><i>MOTOR_MOUNT, DRIVE_WHEEL, DRIVEN_WHEEL</i> and<i> AXLE</i> with 100% infill</li><li>Use 3 perimeters for stand and headstock.</li><li>Motor is little bit on the noise side when under the load, so I recommend to print <i>MOTOR_MOUNT</i> and <i>MOTOR_HOLDER </i>from softer TPU.</li></ul><h4>Print postprocessing:</h4><ul><li>Remove custom support from <i>STAND_A</i> and <i>DRIVEN_WHEEL.</i></li><li>Tolerances are tight, so some sanding might be needed. But with well calibrated printer the assembly should be smooth.</li><li>Remove bridging in holes in <i>STAND_A</i> and <i>MOTOR_MOUNT.</i></li></ul><p>Assembly:</p><ul><li>Insert M3 nut into <i>MOTOR_MOUNT</i>, press motor mount onto the motor axle and secure it with M3 set screw.</li><li>Axle assembly – from left to right <i>DRIVE_WHEEL</i>, bearing, <i>STAND_A</i>, bearing, <i>MOTOR_MOUNT</i>:</li></ul><figure class="image"><img src="https://media.prusaprinters.org/media/prints/126577/rich_content/036b4264-3611-40be-8b2f-95e144df396e/assembly1.jpg#%7B%22uuid%22%3A%220b0d571d-c80f-441a-b4e6-3ee906ee5b3c%22%2C%22w%22%3A564%2C%22h%22%3A359%7D"></figure><ul><li>Secure position of the <i>DRIVEN_WHEEL</i> with superglue.</li><li>Use M3x12 screw and M3 nut to attach bell to the HEADSTOCK.</li><li>Use M3x6 screws to assembly the rest of the mechanism:</li></ul><figure class="image"><img src="https://media.prusaprinters.org/media/prints/126577/rich_content/1676772f-5f6b-4c9a-b388-a349f3febbe3/image.png#%7B%22uuid%22%3A%22371ca839-d488-46ca-a071-7e6d8305903e%22%2C%22w%22%3A919%2C%22h%22%3A661%7D"></figure><ul><li>Mount the <i>MOTOR_HOLDER</i> to the <i>STAND_A</i> using M3x10 screws. Pay attention to the orientation, see image above.</li><li>Optional: use holes in <i>STAND_A</i> together with <i>SPACER</i> to mount Sonoff WiFi relay, use M3x10 screws.</li><li>Optional: use holes in <i>COVER</i> to mount delay relay trigger, use M3x6 screws.</li><li><strong>Do the wiring.</strong></li><li>Put <i>COVER</i> on, use M3x10 screws to secure it to the rest of the assembly.</li><li>Optional: put some rubber feet at the bottom to prevent item from moving on the table.</li></ul><p>Happy ringing!</p>
With this file you will be able to print Christmas bell with your 3D printer. Click on the button and save the file on your computer to work, edit or customize your design. You can also find more 3D designs for printers on Christmas bell.