Cheap cure wash module (CCW) V1
prusaprinters
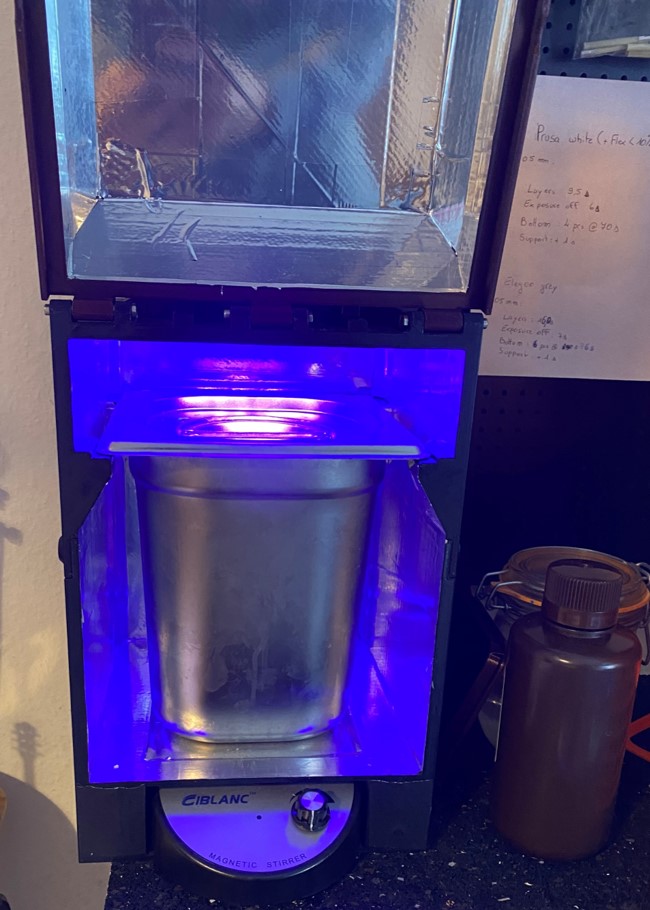
<p>Update 01.02.2020: bean protector grill and cleaning basket were updated for easier use and more washing volume.</p> <p>Cheap cure wash (CCW) module V1.0:</p> <p>As a SLA printer operator, you quickly figured how annoying and messy post processing of prints is.<br/> After checking the internet, it is pretty obvious, cleaning and curing machines are pretty expensive. The aim of this project is<br/> to share my solution to these two problems keeping a certain fancy parameter. the machine is (relatively) cheap and combines washing and curing capabilities.<br/> There are many cheaper DIY combos but for my need I wanted something a bit "cleaner". this is only a V1, in the furture It would aim<br/> at being developed by the community to maybe make it a bit more " clever" with some electronics and programming like the real stuff. ;-)<br/> This product is not for sale nor aimed at profit, sharing is caring.</p> <p>I Have been using it since a few months now and I would never go back!</p> <p>It has been designed specifically for Zortrax Inkspire build platform. However it should fit main brands like Anycubic, PRUSA SL1, EPAX ... build plates with no issue as they are all smaller.</p> <p>It features:</p> <ul> <li>magnetic stirring washing (safer than ultrasonic when using IPA for washing)</li> <li>and strong UV curing (lamp from peopoly)</li> <li>standard G1/6 200mm gastropan for washing with ca.3L capacity</li> <li>cleaning basket</li> <li>compatible with turning solar powered table for curing</li> <li>wasing up to ca. 125x140x170mm</li> <li>curing up to ca. 194x240x220mm</li> </ul> <p>BOM to buy (or gather from spares):</p> <ul> <li>magnetic stirrer from amazon (you will need to cut the tiny feet out of it for assembly):</li> </ul> <p><a href="https://www.amazon.de/gp/product/B07CYNVQYV/ref=ppx_yo_dt_b_asin_title_o01_s00?ie=UTF8&psc=1">https://www.amazon.de/gp/product/B07CYNVQYV/ref=ppx_yo_dt_b_asin_title_o01_s00?ie=UTF8&psc=1</a></p> <ul> <li>gastropan G1/6 200mm:</li> </ul> <p><a href="https://www.amazon.de/gp/product/B01CXFL77O/ref=ppx_yo_dt_b_asin_title_o00_s00?ie=UTF8&psc=1">https://www.amazon.de/gp/product/B01CXFL77O/ref=ppx_yo_dt_b_asin_title_o00_s00?ie=UTF8&psc=1</a></p> <ul> <li>optional fitting cover:</li> </ul> <p><a href="https://www.amazon.de/gp/product/B01CXFL79C/ref=ppx_yo_dt_b_asin_title_o00_s00?ie=UTF8&psc=1">https://www.amazon.de/gp/product/B01CXFL79C/ref=ppx_yo_dt_b_asin_title_o00_s00?ie=UTF8&psc=1</a></p> <ul> <li>curing lamp from peopoly:</li> </ul> <p><a href="https://peopoly.net/products/uv-curing-light-60w-light-output-1">https://peopoly.net/products/uv-curing-light-60w-light-output-1</a></p> <ul> <li><p>at least 2 rolls of material (colour up to you) PLA or PETG. I used only PLA for mine in use since 5 months with no issue. I think without accessories, lower infill ( I was at 25%) and no colours could be under 2 rolls needed. Best is to play with print parameters and check estimates in slicer :).</p> </li> <li><p>one roll of aluminum tape or similar to laminated curing chamber.</p> </li> </ul> <h3>Door:</h3> <ul> <li><p>12x magnets diam. 8mm x3mm</p> </li> <li><p>1x self tapping screw 3mm x16mm for the door knob</p> </li> <li><p>7x hex M3x10.5mm screws (M3x10 or 11 also ok)</p> </li> <li><p>7x square nuts M3x6x2mm</p> </li> <li><p>6x disc washers M3 for the door's inges (optional)</p> </li> <li><p>3x hex M3x40mm screws for door's inges</p> </li> <li><p>3x hex M3x2mm nuts door's inges</p> </li> </ul> <h3>Housings:</h3> <ul> <li><p>6x hex M3x8mm screws</p> </li> <li><p>6x square nuts M3x6x2mm</p> </li> </ul> <h3>Gatropan's rails:</h3> <ul> <li><p>6x hex M3x16mm screws</p> </li> <li><p>6x square nuts M3x6x2mm</p> </li> </ul> <p>assembly:<br/> the assembly is fairly easy. however a few piece of advice to make it easier.</p> <ul> <li>start by assembling the housing without the rails.</li> <li>laminate interior of built housing and the rails (separately) with aluminum/reflective tape</li> <li>assemble housing and rails together.</li> <li>for the doors, assemble them and screw the knob before laminating it (to hide the screw head)</li> <li>PAY EXTRA ATTENTION WHEN INSTALLING THE MAGNETS. you want the housing's magnet to ATTRACT the door's magnet.</li> <li>to assemble the magnetic stirrer, cut its feet first to fit it tight in the housing. In the 3D printed housing, cutout the cable opening protector.</li> </ul> <p>ENJOY !</p> <h3>Print instructions</h3><p>printed on original prusa MK3s without any support needed except for "top door" part.<br/> 3-4 perimeters advised for housings and doors' parts.</p>
With this file you will be able to print Cheap cure wash module (CCW) V1 with your 3D printer. Click on the button and save the file on your computer to work, edit or customize your design. You can also find more 3D designs for printers on Cheap cure wash module (CCW) V1.