Cheap 4K Webcam
prusaprinters
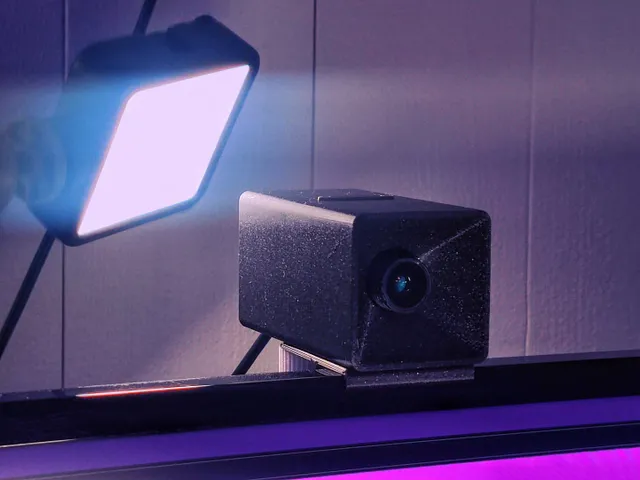
Here are Some Sample Images. (Instructions Below)Download Full-Res ImagesRead All of the Instructions Before Attempting This Project! PreparationsThere are some essential things to keep in mind before you attempt this project, so here's a checklist.Make sure you have a clean space with very little dust. (This will be necessary for when you install the new lens.)You'll need a good Philips head screwdriverYou're going to need to buy some things off AliExpress. (Totals roughly $60.)Shopping ListThe Webcam ModuleThis is the configuration I bought mine with, but you can choose any config you like. It's crucial that you don't select “No Lens”, as with a lens you get the necessary screws and a lens to play around with. The LensIt's important that you choose the 6mm lens, as the 4mm lens is a fisheye lens with way less bokeh, which wouldn't make for a very good webcam meant to capture faces.Streaming UsageYou can manually adjust the settings inside OBS InstructionsMAKE SURE YOU'RE IN A CLEAN DUST-FREE ENVIRONMENT BEFORE YOU BEGIN! Disconnect the USB cable from the webcam module. Snip off the 2 small protruding bits on the lens. It should look like this close-up once you've snipped the 2 protruding bits. Unscrew the 2 screws on the back of the webcam module.CAUTION:It's super important that you do this step really carefully, as you don't want to end up scratching the sensor in any way. Now it's time to peel the protective film off the lens. Put the lens on the webcam module and use the screws we previously unscrewed to put it into place.CAUTION:It's super important that you do this step really carefully, as you don't want to end up scratching the sensor in any way. Tighten the screws. You are now done with the webcam itself, we can now begin doing the 3D printing! When you're 3D printing this, there are some important parameters to keep in mind.Use 100% infill for “BodyPin”, “MonitorMount”, “MonitorMountScrew1” and “MonitorMountScrew2”.It's beneficial to print with a brim when printing “MonitorMount”, as its area against the bed is very small. It would sometimes fail to print if I didn't use a brim.I printed everything with the 0.20mm Quality setting on a Prusa Mini+ and got good results. Now we got the parts printed, time for some assembling! Pull the USB cable through the main body like shown here and connect it with the webcam module. Pull the cable back and put the webcam module inside the main body as shown and make sure the small plastic pins poke through the indicated holes. Bundle up the small wires inside the small cavity and carefully push the cable into place between the friction tabs. Make sure the small plastic pins are still poking through the webcam module and carefully push on the front body making sure the 2 holes are aligned on the same side.CAUTION:Be careful when sliding on the front body, because if the webcam module is misaligned it could scratch the lens.This step might take several tries as the webcam module easily misaligns with the plastic pins while sliding on the front body. If you got the webcam module aligned properly when carefully sliding on the front body, you should be able to see straight through the cooling slit. Once you've made sure it's properly on, you can take the body pin and push it into place on the top side of the webcam assembly (NOT the side with the round threaded hole.)CAUTION:The body pin is a very thin and fragile piece, be careful when you push it in, as it's a very snug fit. Congratulations!!! You've now assembled the webcam, but it's not a true webcam without a way to put it on your monitor, so hang in there. The assembly of the monitor mount is very straightforward, so I'll just leave in the pictures of the assembly process. (If you still find it unclear, please comment so and I will add written instructions as well.)CAUTION:Don't tighten any of the screws too hard, as the threads are all plastic and easily wear out or break. Once on the monitor, adjust the long screw to adjust the pitch of the webcam so that it looks straight at your head. Focus the camera by turning the lens, but be careful not to smudge it, so only touch the sides and not the glass. YOU MADE IT!!!This project took me a long time to make. Roughly half of the time was spent cadding a housing that would be easy to assemble and with only 3D printed parts, the other half was spent researching a ton of camera sensors and lenses to see which one would give you the most bang for your buck. So I'd appreciate it if you shared this project, maybe you know someone who is in desperate need of a webcam.
With this file you will be able to print Cheap 4K Webcam with your 3D printer. Click on the button and save the file on your computer to work, edit or customize your design. You can also find more 3D designs for printers on Cheap 4K Webcam.