 prusaprinters
Chain Clock
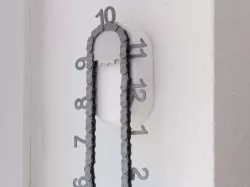
This clock is a functional timepiece that shows roughly the time by rotating a roller chain twice per day.It works with a simple clock mechanism. The chain is 26 cm long.Print instructionsUpdate: I reworked the clock and added some features. The clock movement is now removable without disassembling anything. The outerplate of the chain links now fits much more tightly. Assemble with some force, either with a hammer or a bench vice.Because some people are having problems here is a disclaimer: The chain has very small tolerances, please test with a few pieces before printing the whole chain. The Rollers need to roll on the pins and the Outer Plate also needs to go over the pins without much friction.This clock is a functional timepiece that shows roughly the time by rotating a roller chain twice per day.It works with a simple clock mechanism. The chain is 26 cm long.Additional hardware needed:3x M3 screws 6-10 mm1x clock mechanism, the shaft needs to be 20 mm in total length, this is the one I bought:https://amazon.de/gp/product/B01LXWJFPW1x Bearing: 10x15x4mmhttps://www.amazon.com/gp/product/B00RWGXNVI/3x M3 Heat-Set Inserts PrintingPrint the following parts:1x Enclosure_inserts if you would like to use heat-set inserts or Enclosure_no_insert if you just want to use screws. No supports, the keyhole in the top has a one layer bridge built in2x Sprocket, the only part that needs supports1x Holder1x Pin1x Lid1x Big_gear1x Small GearChain:All the number links 1-1224x CL_OuterPlatePin30x CL_OuterPlate60x CL_Roller54x CL_InnerPlateDepending on your printer, you might need to sand the links to reduce the friction in the chain. Otherwise, the chain will skip and the time will not be accurate.AssemblyChain assembly:Print some test pieces and test the fit first. The CL_OuterPlate should fit on the pins with some force and stay (use a hammer or a bench vice if needed).Then assemble like shown in the pictures. There should be 5 rollers between the numbers.Body assembly:Insert bearing into the holder.Push pin through the bearing like in the pictures.Push the Big Gear onto the pin.Insert clock mechanism and secure with lid.Push the Small Gear onto the minute hand of the clock mechanism.Insert the assembled holder into the enclosure and secure with M3 screws.Push one of the Sprockets onto the pin.
Direct link to the original creator's page
Also Available On
More from kingsman

Similar Models


Model Specifications
Frequently Asked Questions
How do I download Chain Clock?
Click the "View on prusaprinters" button above to visit the original model page on prusaprinters. You can download the STL file directly from the creator's page for free.
What 3D printer can I use for this model?
This STL file is compatible with most FDM 3D printers (Creality Ender 3, Prusa MK3S+, Bambu Lab, etc.) and resin printers (Elegoo, Anycubic). Check the original page for recommended print settings and materials.
Is this 3D model free to download?
Yes, this model is available as a free download on prusaprinters. Some creators accept tips or donations.
Can I modify this STL file?
Most STL files can be modified using free software like Blender, TinkerCAD, or Meshmixer. Check the license on the original prusaprinters page to see if modifications are permitted by the creator.