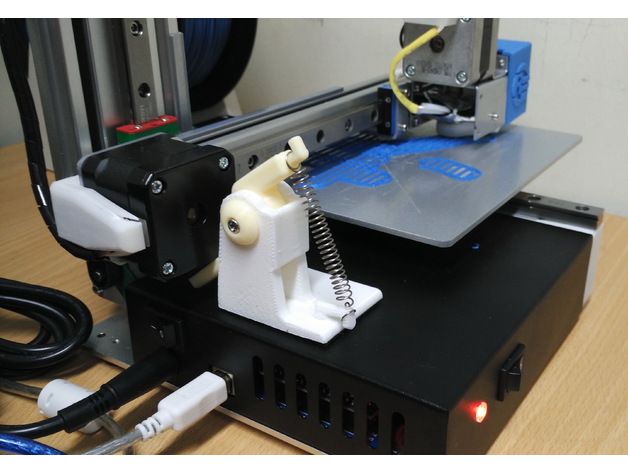
Cetus 3D Z-axis shock absorber
thingiverse
Additional Hardware Required: Five to ten millimeter long M4 screws Tension coil springs (I sourced mine from a used laser printer cartridge) Three-millimeter VHB tape for secure adhesion How It Works: When you turn off the power on your Cetus 3D printer, the horizontal arm will drop. When it reaches the shock absorber's arm, the spring extends to reduce the impact and bring the arm to a stop before it touches the print bed. During actual printing, the stepper motor is able to overcome the spring tension and reach the print bed without requiring any user action whatsoever to operate the shock absorber. It is recommended that you place the arm of the shock absorber at a point below the stepper motor (move along the X-direction) so that the nozzle touches the print bed just before the arm reaches the bottom (adjust along the Y-direction). The base of the shock absorber is securely attached to the printer's metal casing with strong double-sided tape. P.S. A double spring version is included if you can't find a spring with enough tension. To see the shock absorber in action, visit https://youtu.be/I4b1CjHHJ4g Printing Recommendations: As the hooks on the base and arms will take a lot of impact from the springs, it's recommended to print with as high an infill as you have time for. A layer height of 0.2mm is sufficient, and both the base and arm should be printed lying flat. CAUTION: Remove the print nozzle when testing to find the right spring with enough tension. No part of the print head should touch the print bed when the horizontal arm drops and stops due to the shock absorber. For extended Z-axis machines, a double spring version is recommended.
With this file you will be able to print Cetus 3D Z-axis shock absorber with your 3D printer. Click on the button and save the file on your computer to work, edit or customize your design. You can also find more 3D designs for printers on Cetus 3D Z-axis shock absorber.
