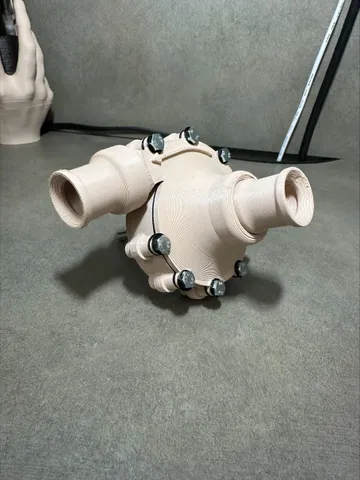
Centrifugal impeller style water pump- drill powered
prusaprinters
Video performance demonstration through the following link- All components 3D printed except nine M4x16 hex head bolts & nuts and one M6x50 hex head bolt and nut.Size: roughly 80mm x 80mm x 50mmCouplers intended for 1/2"IDx 5/8"OD acrylic tubing.See photos for support material placement and print orientations. Disregarding the message on the picture, give some support material to the shaft sleeve. When printing the housing, pause the print at 12.2mm height and insert the nine M4 nuts. this can be done from the printer UI or within the gcode using PrusaSlicers “add pause print” option which can be accessed in the preview window at a specific layer height by right-clicking the plus sign on the layer slider after slicing the model. The drive shaft sleeve is secured with adhesive, using the drive shaft as a guide. Gaskets are printed in TPU for malleable water seals. If you prefer to not use TPU, still print and install the gaskets in your choice of rigid filament to maintain tolerances and spacing, and consider using silicone or another sealant.I use a generous amount of silicone grease to lubricate and additionally seal the pump. Use extra on the underside and lower circumference of the impeller, and on the top surface of the impeller where it makes contact with the lid. Use also within the drive shaft sleeve, and on both sides of the inlet and outlet gaskets. Assembly: lubricate/seal the parts as explained above. secure the drive shaft (M6x50 bolt) to the drive wheel.insert the drive wheel and shaft into the impeller.install the impeller assembly into the housing. glue the shaft sleeve onto the housing using the shaft as a guide.place the housing gasket onto the housing.position the lid.insert the bolt gaskets onto the M4 bolts.given the M4 nuts have been embedded in the housing, insert the M4 bolts into the lid and down through he gasket and housing, gently tightening them into the embedded M4 nuts following a star pattern. insert the outlet coupler gasket into the outlet coupler and install the coupler. insert the inlet coupler gasket into the lid and install the inlet coupler.Operation:Due to the discrepancy between the densities and centrifugal inertia of water and air, the pump must be full of water to initiate the flow of water. AKA Priming the pump.this can be done by partially submersing the pump as you begin to give it power, or by scooping water into the inlet tube and letting it pore into the pump before you give it power. always turn the impeller in the direction indicated by the arrow on the lid of the pump.
With this file you will be able to print Centrifugal impeller style water pump- drill powered with your 3D printer. Click on the button and save the file on your computer to work, edit or customize your design. You can also find more 3D designs for printers on Centrifugal impeller style water pump- drill powered.
