Centrifugal Compressor 120mm Case Fan Conversion
prusaprinters
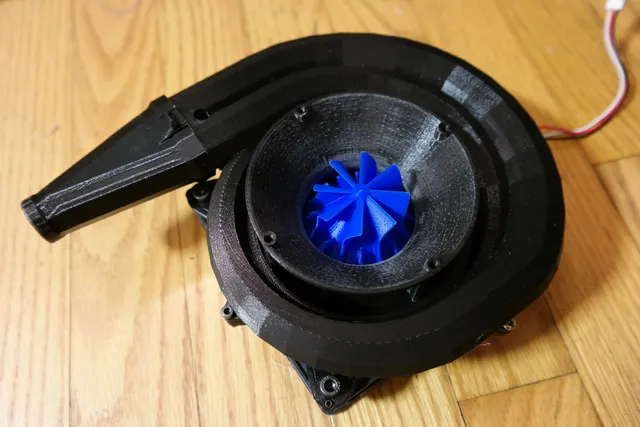
Conversion kit to transform a 120mm case fan (any with a hub in the neighborhood of 39-40mm diameter, which was all the spare ones I had floating around) into a centrifugal compressor with a double volute. 6.11.21 UPDATE: Finally, a smoke test video! https://www.youtube.com/watch?v=K-HYQMxhOmg 7.3.18 UPDATE: Added a second impeller base that should be able to accommodate fans with larger hubs (from ~42 to ~46mm, possibly up to 47mm with sanding). I haven't tested this base myself, but it's reported to work fine. It's taller than the original due to internal clearance needs, though, so you may need extra spacers of some kind to stand the diffuser far enough from the fan case. 5.27.21 UPDATE: Well, these units are still going strong on my machine -- although I have replaced the case fan motors once apiece on my two units. Fans with bearings are definitely the way to go. Anyway, I uploaded two new STLs -- one for a quite effective, but not the quietest, high-flow "short" impeller that works very well on a .3A case fan, and one for a stator stack you can stick on the intake to improve the effectiveness of a 92mm booster fan. I'm also attaching editable (Sketchup) files for the hubs, nozzle, and latest impeller so you can adapt them to other fan hubs if you choose (NOTE that the Sketchup models are upscaled 100x for editing, so size them to 1% for any STL exports). Cheers! Includes straight and 90 degree outlet nozzles (these will nicely fit a 19mm cPAP hose), two flavors of inlet bells (tall/quiet and short/quick-to-print), adapters for 80 and 92mm case fans to serve as boosters on the inlet (these only fit the tall inlet bell, though), as well as 5 flavors of impeller. Note that two of the impeller options (V3 and V4, the best ones, in my opinion) are designed to attach magnetically to an "advanced" impeller base with adjustment points for axial alignment, tilt, and balance; the other three (the V1's and V2) are slip-fit if you don't want the hassle/complication of tuning for lowest vibration (and a more complicated print job). 7.3.18 NOTE: Consider your needs before picking this design! Fans and compressors come in many shapes and sizes for a reason -- and that reason is that there's no one-size-fits-all design. This design is great for re-using old case fans for low-to-moderate-pressure air-pump-type applications like remote cooling and blowing up inflatables, and is optimized for quiet, low-power operation. If you need to move a lot of air with no major pressure difference between up and downstream, an axial fan (that is, like your unmodified case fan) is what you want. If you need to move a lot of air into a small or high-pressure space (like an air compressor would), then you want an air compressor or a positive displacement pump. If you know you need a centrifugal compressor but you need a ton of power for your application, you'd almost certainly be better off running with a model that was designed from the get-go for some kind of RC brushless motor (or another readily-available high-power motor). It's not that I don't think this model is rad (I do!), but it can't do everything, and I heart ya too much to let you go through all the effort with the wrong idea of what you'll get out of it. I did some subjective/qualitative testing looking for a good balance between noise level and power, and I'm finally posting this after many design iterations because I feel the backswept impeller hits this target zone nicely. I've included the other impeller options (which provide straight-tip and foreswept-tip designs) for anyone who wants to experiment, since depending on your application and fan power there may be advantages to some of them. I think the short foreswept impeller might move the most air when it's unloaded, but it may not handle backpressure well, and it's also very loud (and the noise is high-pitched), which wasn't my preference for my application (cooling input for a printer that I have to work right beside). Actual performance will vary depending on your fan's power; both .2A and .3A work fine, but I'm sure the design could take a lot more. For a quantifiable performance measure, the backswept impeller on a .3A fan fills a 13-gallon kitchen trashbag to rigid in 16-18 seconds. Stuff to print: 1 Diffuser (the big star-shaped part that transfers air from the impeller into the volute) 1 Volute (the snail-shaped thing) 1 nozzle (straight or 90 degree, your choice) 1 inlet bell (tall or short -- tall is best if you use one of the tall impellers or want to mount a booster fan, plus it's quieter, but it seems to choke the short fan somewhat) 1 adapter if using a booster fan OR if you just want something protective to keep bigger stuff out of the impeller (80 or 92 mm depending on your fan) EITHER: 1 Impeller base and 1 impeller cone (straight or backswept, backswept is recommended)(best/most tunable/complex) OR 1 impeller (short foreswept, foreswept, or straight)(these are simpler to print and mount but harder to balance and may not hold their balance unless you glue them on, which I haven't tried -- the short foreswept spins fastest and seems to move a lot of air, but is very reactive to input/output load changes and is loud) Materials: 120mm case fan (I wouldn't recommend less than 0.2A, and a model with ball bearings would probably be best long-term compared to a sleeve bearing type) Sheet of heavy plastic film (or similar) at least as big as your case fan hot glue gun 4x M3x12-16mm bolts 4x M3 nuts 4x M3x12 bolts if you want to use one of the inlet fan adapters, plus whatever bolts and nuts (probably M4s) you need to attach your inlet fan of choice 4x M5x12mm bolts 8x M3x8mm grub screws (flat point) 5x M3x4mm grub screws (flat point) + 3x M3x6mm grub screws (cone point) if using impeller base 6x 1x5mm magnets if using impeller base superglue if using impeller base Print Settings Printer: Anycubic Linear Kossel XL Rafts: No Supports: Yes Resolution: .2 for the diffuser and impeller base (if used), .1 for the rest Infill: 10-12% Notes: Use 3 perimeters on the diffuser and volute, 2 on the rest. Basically everything needs supports. I recommend support roofs, but be careful with your gap/temperature settings -- if the roofs don't want to break off cleanly with the 2-piece impeller options, they're a serious hassle to get out. For the volute, I recommend playing with your support settings (like minimum support X/Y distance) to prevent supports from being generated within the inlet ring. Also, be aware that the big parts, especially the volute, really want to warp, so do what'cha gotta do to deal with that. I enjoyed good success printing on heated glass with a light salt haze (google "glass bed salt haze adhesion" if you haven't heard of this), but it seemed like pointing a small fan at the bed helped with the big pieces too, especially with the volute's overhangs (I aimed the fan into the volute's outlet so the air would swirl around the whole piece). Post-Printing To prep the case fan, break or cut off the blades (carefully -- don't bend the axle) and then shave the stubs with a utility blade until they're gone, then sand the hub smooth (easy if you just connect it to a power supply and spin it). Slide the diffuser down into the fan body. You use the 4 M5s [6.18.18: Corrected! Mistakenly said M4's before, but the M5's are what threaded into my fans!] and 8 M3 long grub screws to get this positioned precisely around the impeller (the M5's hold it down, the M3's hold it up). Note that the holes for the M5's are a bit oversized on purpose so that you have a little wiggle room to center it perfectly later. If using one of the one-piece impellers, slide it on the hub and adjust as needed until it spins freely and upright. You may need to cut some pieces of tape, paper, and/or thin cardboard as wedges / spacers between the fan hub and the impeller to get a good fit. If using the two-piece impellers (my recommendation), I recommend figuring out the correct way they fit together, then making matching marks with a sharpie inside the base and cone so you don't have to think about it every time -- you might be popping them apart a lot during tuning. Glue all the magnets into the wide, shallow holes (be careful about orientation since these need to grab each other and there's only one way they fit). Also, it's not a bad plan to use the hot glue on the inside grippy parts of the base (trim the excess) to give it a solid grip on the hub. NOTE that you want to let the hot glue cool first -- the goal isn't to glue the parts together, just to increase the friction. Then insert the cone-point grubs in the outer three holes (these control alignment and also tilt, a bit) and the 5 3mm grubs in the other holes. The inner group of three control tilt, and the center pair are for adjusting the balance. I recommend tuning tilt, then alignment, then balance; also, tune the hub alone first, then retune with the impeller attached. You should be able to get it so that there's almost no vibration. Once the impeller's in, use the M5s and long grubs to adjust the diffuser as high as it will go without the impeller scraping, and ensure it's perfectly centered. If you spin the impeller now, you should feel air flowing smoothly from the ring of holes in the diffuser even at very low speed (I think this is pretty cool). Click the inlet bell into the diffuser over the impeller and make sure the impeller still spins freely. If not, try playing with the diffuser alignment and/or sanding the inside of the inlet bell. There are three ring slots around the bottom of the volute; fill these with hot glue to form seals, then use a straight razor to trim the excess so they're flush. You can also apply some hot glue around the inside of the nozzle where it fits on the volute (again, trim the excess) to help give it a solid hold. In both cases, let the glue cool first -- we're not gluing parts together here, just making a semiflexible seal/gasket. Screw the volute onto the diffuser and apply nuts from underneath -- you want this tight. You can test the compressor now if you want! If you want the best performance, though, you'll need to do a bit more sealing. Flip the whole unit over and hot-glue around the outer edge between the diffuser and the fan case to prevent air bleeding up that way, then take your plastic film and hot-glue that to the back of the hub and all the way around the back of the case (be sure to get around the wires as well). If you do this right and get the volute sealed on correctly, you shouldn't feel any escaping air around the unit when it's running. Enjoy! How I Designed This Designed from scratch in Sketchup, with a lot of reading about compressor fan designs online but no actual math done. Category: 3D Printer Accessories
With this file you will be able to print Centrifugal Compressor 120mm Case Fan Conversion with your 3D printer. Click on the button and save the file on your computer to work, edit or customize your design. You can also find more 3D designs for printers on Centrifugal Compressor 120mm Case Fan Conversion.