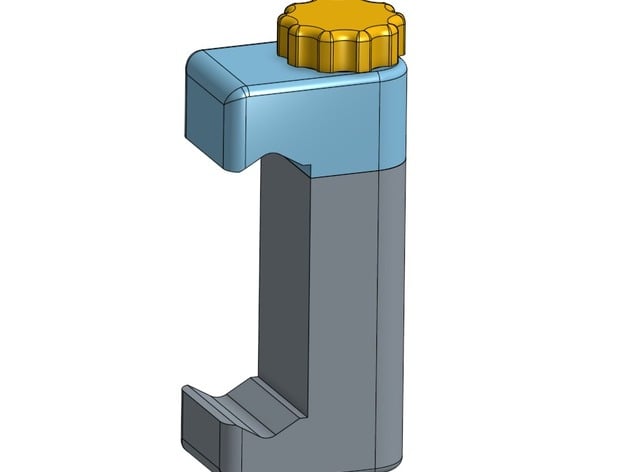
Cell phone Adjustable Tripod Mount
thingiverse
This is an adjustable tripod mount designed specifically for your cell phone. It can also accommodate an old small iPod touch and a big phone (not a tablet). The design has three distinct parts to print, making it a bit more challenging than other prints. To achieve the desired durability, you will need to manipulate g-code slightly during the printing process. This is because two steel nuts are embedded inside the plastic, which makes the mount extremely resistant to wear and tear over time. These embedded nuts also prevent the plastic threads from stripping. In addition to printing the tripod mount itself, you'll need to purchase a few hardware components easily available at any hardware store. Refer to the attached picture for a clear view of the required hardware. It's also recommended that you acquire some sticky foam padding to safeguard your valuable phone (this is optional). You will require super glue specifically designed for plastics (you likely already have this in your inventory). Gorilla Super Glue worked well with PLA, but it took longer than expected to dry; however, allowing the glue to dry overnight ensured a sturdy bond that wouldn't come apart. Print Settings: - Printer Brand: RepRap - Printer Model: Prusa i3 - Rafts: No - Resolution: 0.2mm - Infill: 30% Notes: 1st Part to Print: "Bottom Mount" This part doesn't require any support material. It's the most complex print in this design, requiring you to split your g-code program into three separate programs. To begin, slice the part and inspect your slicer for layers. Once you've located the layer where the first nut pocket gets covered up, backtrack one or two layers and edit your g-code to stop the first program there (make sure to save a copy of your original program before making any changes). If using 0.2mm resolution, this will typically occur around layer 34. Insert the first nut into the pocket, ensuring it doesn't protrude above the pocket. Repeat this process for the second nut, stopping the second program at approximately layer 289. You now have three programs: one that stops after the first nut, another that stops after the second nut, and the final one completes the part from that point onwards. Please note that you should be familiar with basic g-code concepts to print this design safely. If you're not comfortable manipulating your printer's settings or risk damaging it, consider printing my simpler tripod mount design, which works great too! The first nut is used to screw onto a tripod, while the second nut allows for opening and closing of the top mount. 2nd Part to Print: "Top Mount" This part is straightforward, with no significant challenges. However, you'll need to enable support material for this print. Make it as flimsy as possible because the support material will be inside a pocket and difficult to remove cleanly. You might want to use a Dremel tool or simply try tapping it gently, but I removed my supports using a pointy file without issues. When you have finished removing the support material, try to make the top portion break loose (it should rotate nicely inside the top mount). If it doesn't work, tapping it gently might help. My own came free really easily. Last Part to Print: "Knob" This part requires no special considerations or support material. Once you have all three parts printed, insert the top mount into the bottom mount and screw in a bolt (make sure the square drive on the bolt goes inside the square pocket in the top mount). Turn the bolt a few times to ensure it's straight before gluing the knob. Apply some glue inside the round pocket at the top of the top mount (be careful not to get any glue on the outside) and insert the knob, ensuring it sits straight. Let the glue dry overnight; in the morning, your tripod mount should be working perfectly! Feel free to ask questions or share your experiences with this design. If you've made one, consider uploading a picture; it's always great to see how others have put their prints together!
With this file you will be able to print Cell phone Adjustable Tripod Mount with your 3D printer. Click on the button and save the file on your computer to work, edit or customize your design. You can also find more 3D designs for printers on Cell phone Adjustable Tripod Mount.
