cAT-hAT
prusaprinters
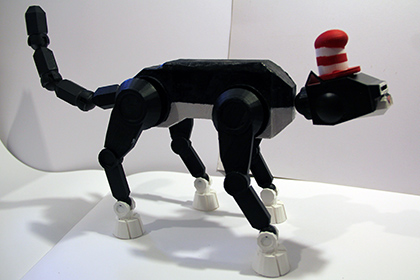
<p><strong>Description</strong></p> <p>I made this because my husband thought that the AT-AT model I made should have cat ears and a hat. I thought it would be a fun joke that would take a few hours but I ended up taking over a month. It has been a good project to learn about articulating joints and 3d printing in general.</p> <p>It is not a perfect model and I may work on it in the future. The sockets are prone to breakage. If you make this, please let me know any suggestions you have for improvement!</p> <p><strong>Print quantity</strong></p> <p>4x foot<br/> 4x lower leg<br/> 4x leg socket<br/> 3x tail (As pictured. More or fewer to make tail longer / shorter.)<br/> 1x everything else</p> <p><strong>Instructions</strong></p> <p>Snaps together. No gluing necessary, unless you want the hat to stay on permanently. Filing may be needed on head socket and tail ball pegs depending on how you print it.</p> <h3>Print instructions</h3><h3>Category: Model Robots Print Settings</h3> <p><strong>Printer Brand:</strong> Prusa</p> <p><strong>Printer:</strong> <a href="http://amzn.to/2DxjZlB">i3 MK2S</a></p> <p><strong>Rafts:</strong> No</p> <p><strong>Supports:</strong> Yes</p> <p><strong>Resolution:</strong> 0.20mm</p> <p><strong>Infill:</strong> 20%, 100% on some pieces</p> <p><strong>Notes:</strong></p> <p>Head socket and tail ball are recommended at a high infill to create a sturdier piece.</p>
With this file you will be able to print cAT-hAT with your 3D printer. Click on the button and save the file on your computer to work, edit or customize your design. You can also find more 3D designs for printers on cAT-hAT.