Case for Seven Decade Programmable Resistor Board
thingiverse
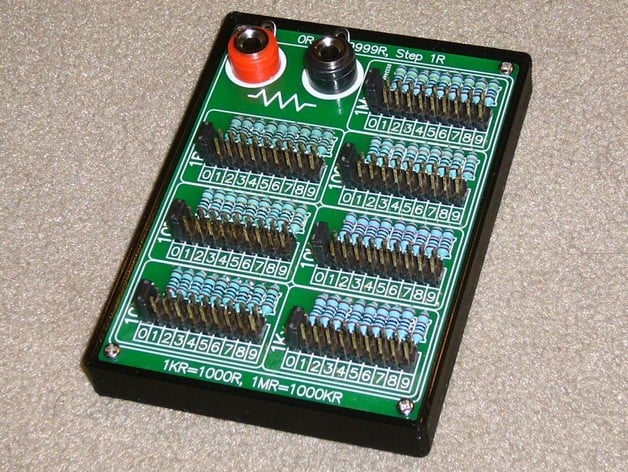
This is an adaptation of Gerry Sweeney's Seven Decade Programmable Resistor Box, available at http://www.thingiverse.com/thing:521303. The remix modifies the design for use with a different China-sourced seven decade programmable resistor board found on eBay. This specific board measures about 65 by 90 mm in size and features text including "1R 9999999R Seven Decade Programmable Resistor Board Step 1R" in its listing title. Initially, I had planned to build a switch-based decade box, but after seeing the option for $9.98 USD, which covers total cash outlay, I couldn't resist buying one of these boards. Besides adjusting the design dimensions according to the different board and size of corner screws, the remix utilizes the MCAD library polyhole function to improve control over the dimensional measurements of the corner screw mounting holes. Geometric overlap in the design has been optimized for cleaner previews in openSCAD and fewer mesh issues during production. Revision notes detailing additional improvements can be found within the openSCAD source code. Print Settings Rafts: No Supports: No Notes: A test print was generated on an 8-inch customized MakerFarm i3v fitted with Smoothieboard and an e3dv6 hot end featuring a 0.40mm nozzle. Print settings utilized in Simplify3D slicer include layer height of 0.20mm, two perimeters, two solid top and bottom layers, 20% rectilinear infill without support structures, and a print speed of 80 mm/sec. Voltivo Excelfil 1.75mm Cool Black PLA filament was used at an extruder temperature of 215 degrees C while printing onto a hair-spray coated glass bed set to 55 degrees C for the initial layer and 50 degrees C thereafter. Additional constraints on cooling or minimum layer times were not applied. Estimated parameters in Simplify3D indicate a required filament length of about 5.8m and an estimated print duration of 55 minutes. Post-Printing Remove the corner screws and standoffs from the eBay board, retaining the M2 screws for possible reuse in the future. Gently bend the solder tabs on the banana jacks up to ensure they can clear the edge of the programmable resistor board when it is installed. Adding a small rubber bumper to the bottom of the box can provide further stabilization as desired.
With this file you will be able to print Case for Seven Decade Programmable Resistor Board with your 3D printer. Click on the button and save the file on your computer to work, edit or customize your design. You can also find more 3D designs for printers on Case for Seven Decade Programmable Resistor Board.