Case for DAOKI DC-DC USB Buck Boost Converter
prusaprinters
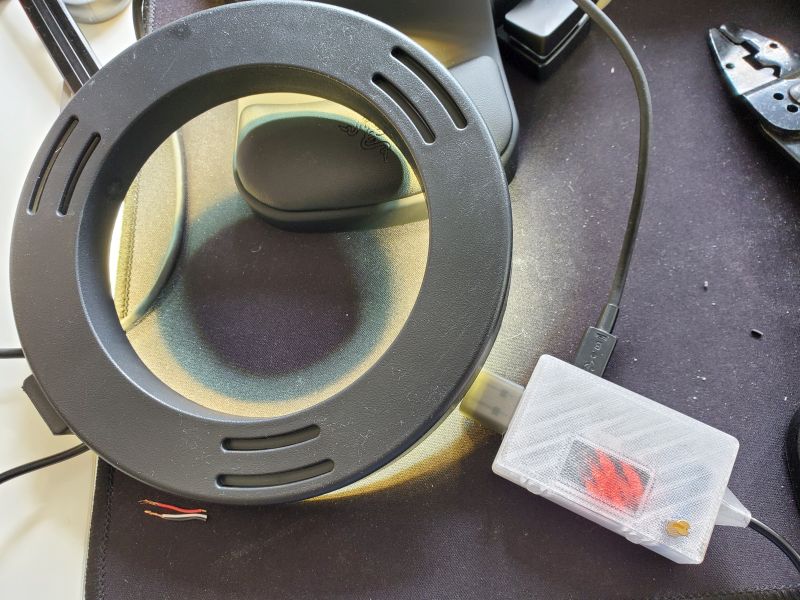
<p>This case is for a <a href="https://www.amazon.ca/gp/product/B08M34RXJW?tag=thingiverse09-20">DAOKI USB buck-boost converter</a>, which you can get from <a href="https://www.amazon.com/?linkCode=ll2&tag=thingiverse09-20&linkId=e4759bff1fa9a55a0f897d801ce2d765&language=en_US&ref_=as_li_ss_tl">Amazon</a>.</p><p>I have a USB LED ring light that I've mounted to my CR-6 SE. The light has an inline controller for power, brightness, and colour temperature, but that prevents me from turning the light on/off automatically with my printer.</p><p>I cut off the USB controller and wired the LEDs directly to the DAOKI buck converter, which enables me to turn the light on when it receives power. The converter enables manual dimming with a thumbscrew, so I set it to 3.2V (the max output of the controller).</p><p>There are two small switches on the converter. The first one cuts and restores power, and turns off the display with a long-press. The second one cycles between showing voltage, amperage, or both. Whenever you plug the converter in, it always defaults back to turning on with the display showing voltage.</p><p>The case has a window to see the display, built-in buttons for the controls, and holes for the thumbscrew, USB-A connector, and microUSB connector.</p><h3>Print Settings</h3><p>There are two versions of the case. The transparent version has a single 0.2mm layer to cover the screen. It blurs the display a little, but you can still read it. The regular version has an open window for the display.</p><p>The strain-relief is sized for a cable with a 3mm diameter. If you need to fit a bigger cable, you can widen the hole. Feel free to ask for help with that. I originally planned to print the strain-relief in TPU, but that didn't turn out to be necessary.</p><p>I printed each part with two walls with no infill.</p><h3>Post-Printing</h3><p>After printing the case, test-fit the converter to make sure everything lines up.</p><p>You'll need to feed your output cord through the strain-relief, then connect it to the terminals on the converter. You can optionally wrap a small piece of tape around the cable to widen it and prevent it from pulling out of the strain-relief.</p><p>The panel is a compression fit. Pop it in place, and you're all done.</p>
With this file you will be able to print Case for DAOKI DC-DC USB Buck Boost Converter with your 3D printer. Click on the button and save the file on your computer to work, edit or customize your design. You can also find more 3D designs for printers on Case for DAOKI DC-DC USB Buck Boost Converter.