Case for Adafruit QT PY RP2040 and Seeed XIAO RP2040 (for ADXL345)
prusaprinters
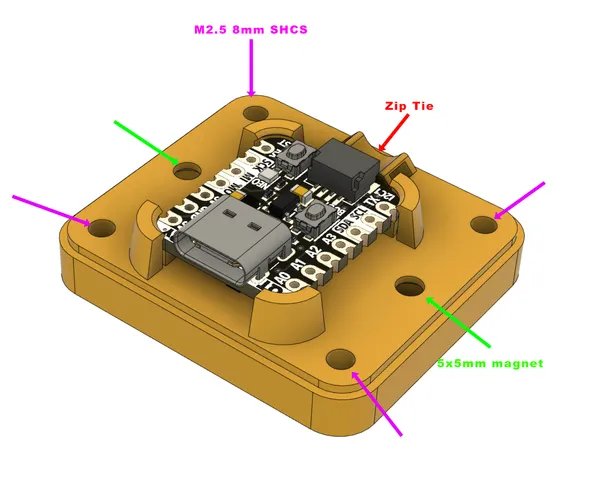
Case for Small RP2040 BoardsThis is a case for the small RP2040 boards such as the Adafruit QT PY RP2040 or the Seeed XIAO RP2040. These small boards based on the Raspberry Pi RP2040 microcontroller. They have a USB interface and are able to run Klipper firmware. I am using this to interface with an ADXL345 accelerometer for use with Klipper's Resonance Compensation (aka Input Shaper). I wanted something to hold the RP2040 so that it doesn't short out. The underside of the case has holes for two (optional) magnets, which can be used to secure the case to a nearby ferrous object (like the X axis rods, or the heatbed on a Prusa MK3) during measurements.Hardware(Optional) 5x5mm rare earth magnets Amazon.comM2.5 x 0.45mm thread, 8mm long Socket Head Screw McMaster-Carr or BoltDepot.com (Note: longer lengths should work too)Tapered Heat-Set Inserts for Plastic - M2.5 x 0.45mm thread McMaster-CarrAssemblyPress heat-set inserts into top using heat-set press or soldering iron.Press magnets into the two large holes in the bottom. They should go in with a little resistance, but should not require gorilla force to insert. If you have issues inserting them, or if they are too loose, I have provided the Fusion 360 source (check the User Parameter, magnet_hole).Insert a zip tie through the slot in the cable retainer. This is used to provide strain relief for your the cable going to the ADXL345 (or whatever other electronic device you are controlling). The hole is big enough to accept ~5-6mm shrouded, 6-conductor cable.Insert M2.5 screws in bottom, and into heat-sets on top.WiringSee the included file, "Wiring and Klipper Pin Config.pdf" for wiring instructions. Note that Klipper supports a limited number of PIN configurations for the SPI interface on the RP2040 that is used to communicate to the ADXL345. This isn't documented anywhere, so I had to go through the Klipper source code to find it. The SPI pinouts listed there are the ones that Klipper supports. This file lists two potential pinouts for the Seeed Studios board, and one for the Adafruit board.Klipper ConfigurationStart by reading the Klipper document on Measuring Resonances. Note that this document discusses connecting the ADXL345 to the Raspberry Pi. We are going to instead be connecting it to our RP2040 board, which will then connect to the Raspberry Pi via USB. After reading this document, take a look at the documentation on the [adxl345] configuration section.Once you have wired up the board and placed it in the case, connect it to your Raspberry Pi, build the Klipper firmware for it, and and flash it using the instructions in the Klipper documentation. Find the serial port device name of the RP2040 by doing a `ls /dev/serial/by-id' and looking for a device with "rp2040" in the name. Now add a section like this to your Klipper printer.cfg:[mcu rp2040] serial: /dev/serial/by-id/RP2040_SERIAL_PORT_DEVICE_NAME For each pinout, the aforementioned file has a column named "klipper", that lists the klipper configuration values for the cs_pin and spi_bus configuration entries. So suppose that you are using a Seeed Studio RP2040 board, and you have chosen the "Alt 1" pinout for that board. In Klipper, you would add to your printer.cfg (or an included file), a section like this:[adxl345] cs_pin: rp2040:gpio1 spi_bus: spi1cTesting the Board and determining the Axes mapOnce you have the configuration sorted out, and Klipper is starting and recognizing the new board, run this command to read a value from the ADXL345:ACCELEROMETER_QUERYNote that there is a bug where the FIRST reading after a power cycle or after connecting the RP2040 to Klipper will always fail. So just run the command a second time, and you should see something like this:Recv: // adxl345 values (x, y, z): 470.719200, 941.438400, 9728.196800The axes with the large reading corresponds to the axis oriented downwards (towards the center of earth). You can use this in order to figure out the axes mappings, and then update the Klipper configuration accordingly.Related DesignsAs mentioned above, I designed this case to use for calibrating Klipper's Resonance Compensation on my Prusa MK3 printers with the Bear mod. If you have an MK3, I have uploaded a heatbed holder for an ADXL345. If you have the Bear Extruder, I also have an ADXL345 holder for that.Magnetic (Heatbed) Mount for ADXL345 AccelerometerADXL345 Mount for Bear Extruder
With this file you will be able to print Case for Adafruit QT PY RP2040 and Seeed XIAO RP2040 (for ADXL345) with your 3D printer. Click on the button and save the file on your computer to work, edit or customize your design. You can also find more 3D designs for printers on Case for Adafruit QT PY RP2040 and Seeed XIAO RP2040 (for ADXL345).
