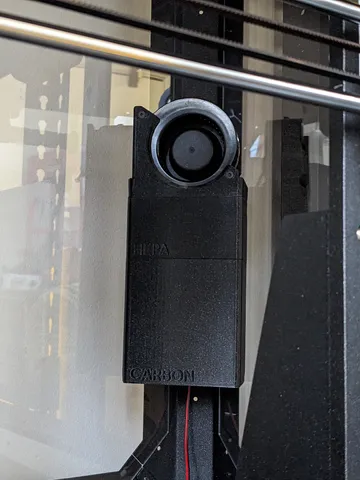
Carbon/HEPA filter for Prusa Enclosure
prusaprinters
Carbon/HEPA filter designed for the Prusa Enclosure This started off as a modification to some of the existing designs (Bento Box, Nevermore, etc), but now I think its design is far enough away to warrant calling it an original model. The idea is to keep the warm air inside the enclosure and recirculate it through the filter using the carbon pellets to adsorb VOCs and ultra fine particles. It bolts directly to any of the corner pillars of the Prusa enclosure (I have mine in the back right), and the cables can be routed neatly to the power supply. I am based in the UK, so I have made this using parts from Amazon/Ebay UK. Links are posted below. Prices are mentioned at the time of purchasing. 7530 blower fan (£8.99):sourcing map DC Brushless Cooling Blower Fan Cooler 7530 75x75x30mm Turbine Turbo Dual Ball Bearing Centrifugal Flow Blower DC24V 2 Pin for 3D Printer : Amazon.co.uk: Computers & AccessoriesMotor Controller (£6.29 for 2):Youmile 2PACK 5A Motor Speed Controller module Mini DC Motor PWM Speed Controller switch control controller Switch LED Dimmer 3V 6V 12V 24V 35V Max 90W : Amazon.co.uk: Business, Industry & ScienceHEPA Filters (£7.99 for 10): YanBan Replacement Hepa Filter for iLife V3, V3S, V3S Pro, V5, V5S, V5S Pro Robot Vacuum Cleaner, Accessory for iLife Robotic Vacuum, 10PCS : Amazon.co.uk: Home & KitchenN52 Magnets, 5mm diameter x 2mm thickness (£4.95 for 25):Strongest N52 Magnets Strong Various Size 2-40mm DIY, Craft, Small Disc Magnet | eBayNevermore Carbon Pellets refill XL (2300ml) (£24.05 incl. shipping)Nevermore Carbon refill XL (2300ml) - OneTwo3DFilter bags for Carbon Pellets (£6.99 for 12)12 Pieces Aquarium Small Filter Bags With Zipper, Reusable High Flow Nylon Mesh Media Net Bag For Fish Tank Activated Carbon, Finer Particles, Bio Balls, Ceramic Rings, Volcanic Rock (6 x 10CM, White) : Amazon.co.uk: Pet Supplies Extras: 2 x M3 x 35 CSK bolts (to secure fan to fan mount)2 x M3 Nuts (to secure fan to fan mount)2 x M3s Nuts (to secure filter to Prusa Enclosure)4 x M3 x 12 CAP bolts (2 used as locating pins for Fan Mount/HEPA Section, 2 used to secure filter to Prusa Enclosure)Length of cable (24AWG) to run the fan to the power supplyCable ties for cable management This design has 4 parts: Fan MountHEPA SectionCarbon SectionMotor Controller Mount (shown later) At first, I wasn't sure I wanted to include the motor controller for the fan. In this configuration, the fan spins at full speed as soon as the printer is turned on. It was a little noisy for my liking, so I added the motor controller/motor controller mount with some super glue. I still have it wired so that the fan spins when the printer is turned on, but I find that running it at 50% speed gives me enough airflow, while reducing the ambient noise. At this speed, I cannot hear the fan running. The cables are connected directly to the power supply at the back of the enclosure. I've printed this design using the 0.1mm FAST DETAIL profile, however, some of the bases showed signs of elephants foot. I suspect the bed temperature for the Prusament PETG filament is too high for this. In the future, I would print with the 0.2mm SPEED profile, as this seems to give me better results on most other prints. Total print time on the Prusa MK4 (0.2mm SPEED profile with Input Shaping) - 4hrs 53mins, 138g Filament. Some basic calculations on the carbon pellets based on the geometry of the carbon chamber in existing designs: Nevermore: 112 500 mm3Bento: 304 704 mm3This design: 444 412 mm3 if filled up to the top, 333 234 mm3 if filled ¾. When I filled the carbon section, I found that I would have to run that fan close to 100% to get any meaningful airflow through the bottom. After this, I decided to use some filter bags for the carbon pellets so that I could run the fan at 50%. The filter can be installed directly into any of the corner pillars of the Prusa Enclosure. The fan mount stays mounted to the enclosure, while the HEPA and carbon sections can be removed independently. These 2 sections can be removed one handed.Its a bit difficult to reach the back corners with the printer inside the enclosure, so it might be easier to bite the bullet early on and remove the printer before bolting the filter to the enclosure. Assembly details: I've included the STP files for any modifications if needed. I hope this helps!
With this file you will be able to print Carbon/HEPA filter for Prusa Enclosure with your 3D printer. Click on the button and save the file on your computer to work, edit or customize your design. You can also find more 3D designs for printers on Carbon/HEPA filter for Prusa Enclosure.
