Car kit no. 1/ Stavebnice autíčka č. 1
prusaprinters
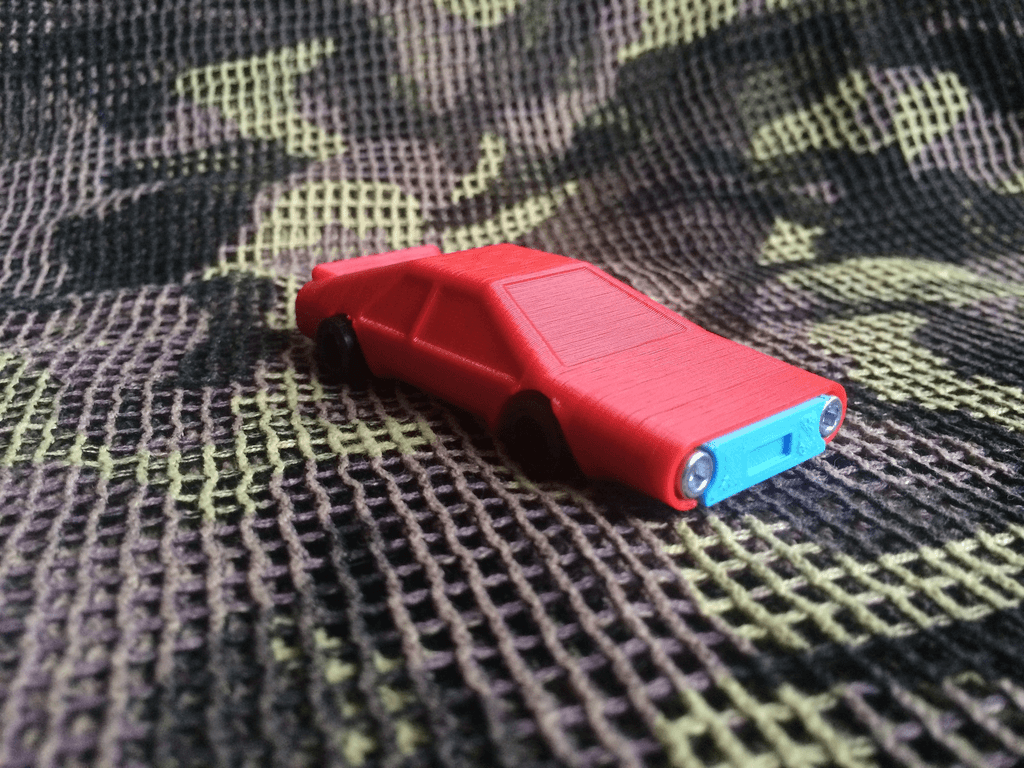
<p>[EN]<br>A simple car kit optimized for easy printing without supports. The whole car can be printed at once even on smaller printers (Průša Mini), or printed in parts from individual colours. No glue is needed for assembly, only two M3 screws (3mm diameter through the thread) with a length of 5-10mm and an adequate tool (screwdriver, wrench, ...).</p><p>video instructions - https://youtu.be/JsLs-VLHRZQ</p><p>Assembly procedure:<br>- Insert the wheels into the body part.<br>- Insert the chassis into the groove in the rear of the car so that the holes correspond to the position of the wheels.<br>- Fix the chassis to the body by inserting the front mask into the corresponding hole so that the protrusion on the chassis fits into the hole in the mask.<br>- Finally, secure everything by screwing the screws in place of the headlights.</p><p><br>The body is pressed standing upright on the rear of the car. The wheels are also printed standing upright. The bonnet and chassis are then printed flat. This eliminates the need to generate supports. Even though the model is designed with sufficient tolerance for inaccuracies, I would still have a properly assembled extruder due to the need to fit the parts together.</p><p><br>[CZ]<br>Jednoduchá stavebnice autíčka optimalizovaná pro snadný tisk bez podpor. Celé autíčko je možné vytisknout najednou i na menších tiskárnách (Průša Mini), nebo tisknout po dílech z jednotlivých barev. K sestavení není potřeba lepidla, pouze dva šroubky M3 (průměr 3mm přes závit) o délce 5-10mm a adekvátní nástroj (šroubovák, klíč, …).</p><p>video návod - https://youtu.be/JsLs-VLHRZQ</p><p>Postup sestavení:<br>- Do dílu karosérie vložíme kola.<br>- Do drážky v zadní části autíčka zasuneme podvozek tak aby otvory odpovídaly poloze kol.<br>- Podvozek upevníme ke karosérii vsunutím přední masky do příslušného otvoru tak aby výstupek na podvozku zapadl do otvoru v masce.<br>- vše nakonec zajistíme zašroubováním šroubků na místech světlometů.</p><p><br> Karosérie se tiskne na stojato postavená na zadku auta. Kola se taktéž tisknou nastojato. Maska a podvozek se poté tisknou naležato. Tím odpadá potřeba generovat podpory. Ač je model navržen s dostatečnou tolerancí k nepřesnostem, i tak bych vzhledem k nutnosti zapadnutí dílků do sebe mít správně sestavený extruder. </p>
With this file you will be able to print Car kit no. 1/ Stavebnice autíčka č. 1 with your 3D printer. Click on the button and save the file on your computer to work, edit or customize your design. You can also find more 3D designs for printers on Car kit no. 1/ Stavebnice autíčka č. 1.