Capsule (wall-mounted) Storage and Dispenser
thingiverse
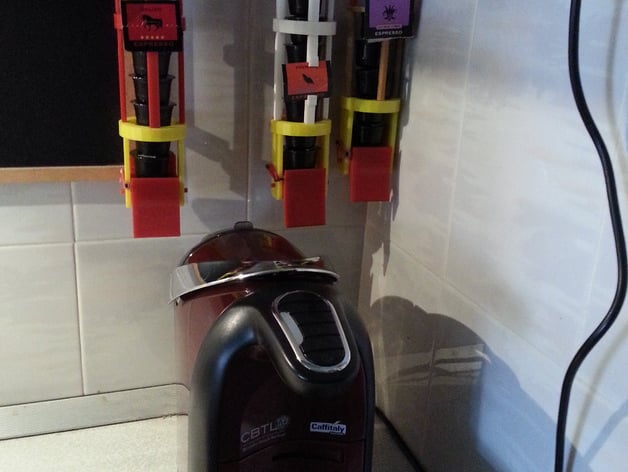
Here is rewritten content: With a limited space for countertops, you can still experience the luxury of owning a Caffitaly or Nespresso machine without sacrificing precious tabletop or shelf space. The beverage capsule dispenser keeps your capsules organized by eliminating bulky boxes that normally take up valuable space (Picture 2). You can easily and quickly dispense capsules with just a push of a paddle. Once the return action has completed, the next capsule is loaded and ready for use! The open design lets you see at a glance how many capsules are left - a relief from having to pour out capsules from boxes to count how much of your brew is remaining. Worse still is when you discover you're down to just one last capsule. Set up is easy and modular, with each set of legs and rings that allow for customization as high or low as needed based on space limitations between countertop overhangs and shelf. The standard version, featuring two levels of rings, can hold 11 Caffitaly or 10 Nespresso capsules. One of the legs comes equipped with a label clamp, allowing you to easily rip off labels from top box containers and identify which dispenser is holding your favourite capsules. You can also personalize this system - just print or paint any design in a colour combination that suits your taste. In my own installation process, I secured dispensers using short wood screws into 1/4” plastic electrical trunking mounted with double-sided tape to avoid any drilling and mess, ensuring the wife was satisfied that the kitchen was unscathed. My dispensers have progressed through various stages - version 1 on the right (Picture of three installations), left version 2, centre version 3, while an RFID-triggered motorized dispenser is my current goal project ;). For your setup: the parts included per standard set *: * Paddle * Paddle Caps * Dispenser Cage * Extension Rings * Top Ring * Short legs (three of them in 1 STL file) * Cage Legs (seven in total) * Optional - a leg with a label holder Instructions for printing these items include using an unheated bed if possible, especially as my set of curved cage legs demonstrates ;). Non-printed parts needed include a rubber band and some small screws. Start by joining Cage Legs to Extension Rings until the desired height is reached; attach it securely onto a flat surface. Note that assembling in reverse would also work fine. Install screws onto Dispenser Cage and Paddle before connecting both together with a pivotable axle through a slot of appropriate diameter at both ends. Two matching screw sizes would achieve better results if different length were not specified - it could create some spring back effects but easily fix with knotting loops smaller when using two turns for tighter spring action. Wall Brackets should then be securely fitted onto corresponding hooks available within dispensers' design while measuring distance centre-to-centre on marked spots along edges before mounting securely, followed loading final desired position, enjoy your new smart storage!
With this file you will be able to print Capsule (wall-mounted) Storage and Dispenser with your 3D printer. Click on the button and save the file on your computer to work, edit or customize your design. You can also find more 3D designs for printers on Capsule (wall-mounted) Storage and Dispenser.