Canterbury School Seal
thingiverse
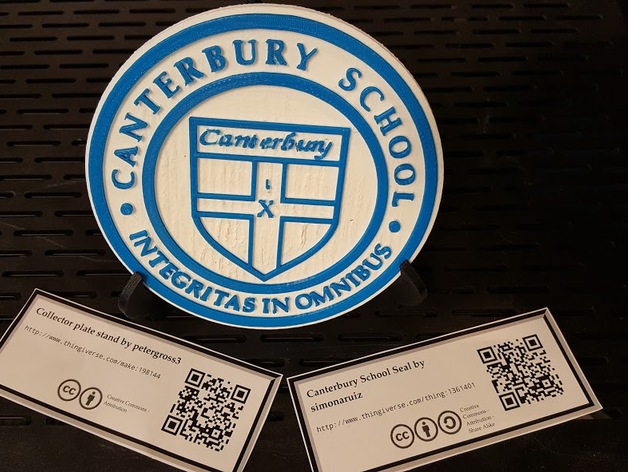
This was one of my first major projects in 3-D design. I started by using a high-resolution JPG file of my school's seal, which served as the foundation for creating a 3-D printable version on our MakerBot Replicator (5th Generation) printer. To achieve this goal, I went through several steps: converting the raster image to a vector image, then to a CAD programming language, and finally to a 3-D model. Once I had all the necessary components, I intended to combine them into a single 3-D model, but I didn't have enough experience at that point to succeed. Instead, I set it aside and returned to it later after learning more about working with solid shapes. Here are the print settings I used: Printer Brand: MakerBot Printer: MakerBot Replicator (5th Generation) Rafts: Yes Supports: No Resolution: High Infill: Default Notes: Initially, I started printing with white plastic but switched to blue shortly after completing the backing plate and printing the raised details. To design this project, I began with a raster image. The higher the resolution of the source image, the better the results will be; conversely, a higher contrast ratio also yields more impressive outcomes. Since my source image was black and white, I was able to take advantage of these characteristics. My next step was converting the raster image to an SVG file using Inkscape's tracing tool. This is an effective way to create vector graphics from raster images, especially when dealing with simple shapes or illustrations. However, when working with more complex images like my school's seal, this process becomes challenging due to its intricate design featuring multiple components within each other. To overcome this issue, I had to run the tracing tool several times on progressively simpler versions of the original image, focusing only on individual elements such as the outer ring, text, inner ring, shield, and inner text. After obtaining these individual shapes in SVG format, I converted them into OpenSCAD files using an Inkscape extension specifically designed for this purpose. Unfortunately, this extension struggled with complex shapes, so I had to execute it multiple times on different versions of the original image before reassembling all the parts. Once I had all the necessary 3-D models in OpenSCAD format, I rendered them as STL files using that software. These STL files can then be imported into your preferred CAD program for further manipulation and assembly. In my case, I chose to use SketchUp to combine the individual shapes and attach a circular plate as a backing. The result was a cohesive 3-D model that accurately represented my school's seal in a printable format.
With this file you will be able to print Canterbury School Seal with your 3D printer. Click on the button and save the file on your computer to work, edit or customize your design. You can also find more 3D designs for printers on Canterbury School Seal.