Candy Dispenser!
prusaprinters
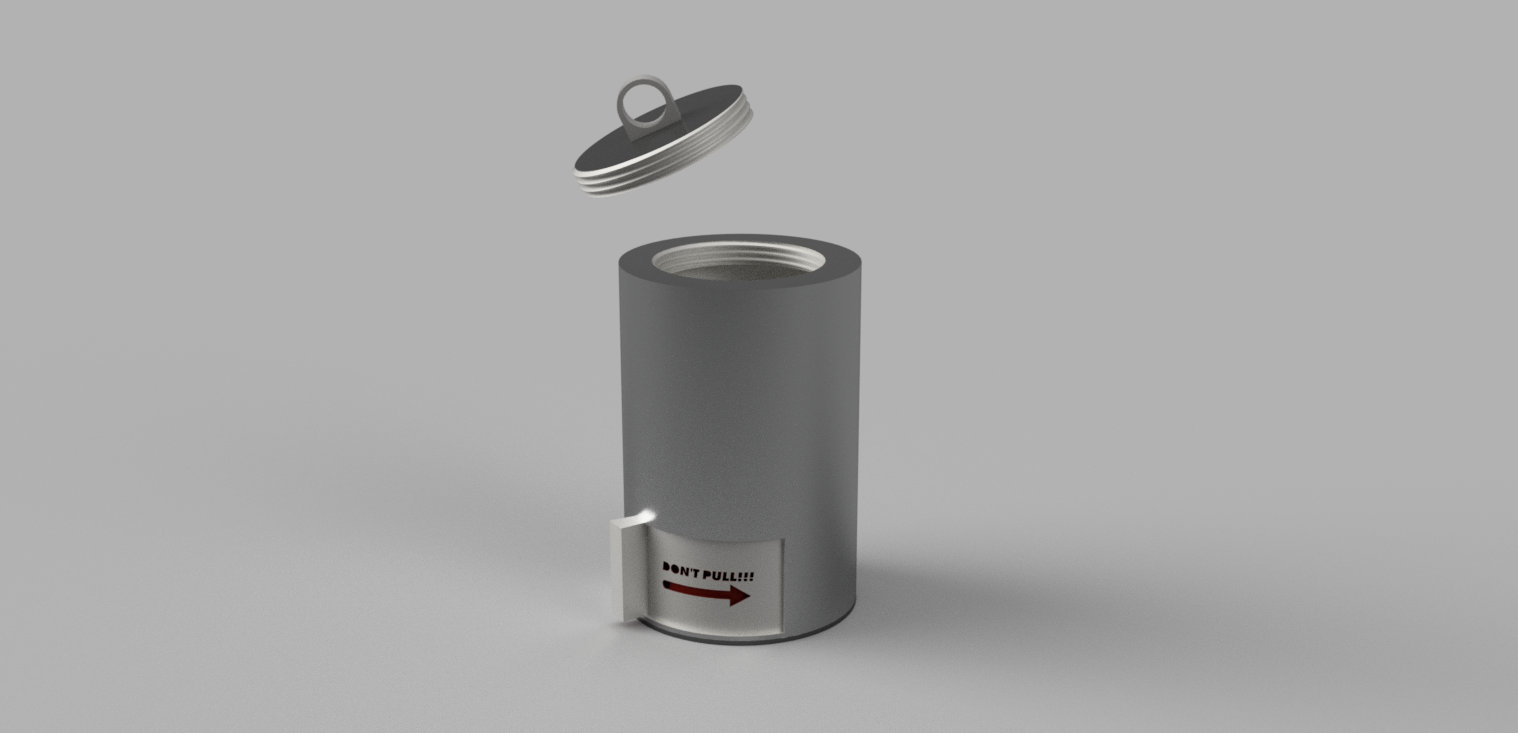
<h3>Candy/Sweet Dispenser</h3><h5> </h5><figure class="media"><oembed url="https://www.youtube.com/watch?v=6cwgJoz5jEk1"></oembed></figure><p> </p><h5><i>Have you always found out that every time you put something tasty and sweet on your table it disappears in less than two minutes? </i></h5><p>So, how about a candy dispenser? This will make your candy have more dread every time you pull the lever to retrieve a piece from the sweet sweet storage. It even has a Very Motivational Message: "<strong>DO NOT PULL</strong>" that will make your candy last at least a minute longer ;)</p><p>So you might be wondering HOW DO I GET THIS PLEASE!!1! It's very simple, </p><p>First, download the .stl files down below and slice it!</p><p>Second, Print it and assemble it, you might need some glue for the bottom part if you want it to stick. Remember to not eat the glue.</p><p>Third, open up the top cap for the candy dispenser and fill in the candy of choice, It is preferred to get small candy like M&M's or Skittles and seal the candy container.</p><p>Done! 3 Simple Steps and you are finished! To use this beast of a contraption, </p><p>First, you do the hard step and think if you really want to pull the level to get can- Yes! You pull the level and completely ignore the DO NOT PULL sign and pull it. Then you will receive a small batch of your choice of candy to enjoy.</p><p>But what if I want to get more? Well then simply reset this machine by pulling back the hopper/dispenser.</p><h4> </h4><p><i>Make note that this is the V1 of this Dispenser project. I may upload a follow-up V2 who will require less glue!</i></p><h4><br>Assembly</h4><h4> </h4><h5>Prep:</h5><p>To Fully complete your Candy dispenser, you will only need glue and Candy.</p><p><strong>Pre-Assembly Note:</strong></p><p>Some pictures were rendered before the final product.</p><p> </p><h5>Step 1:</h5><p> </p><figure class="image image-style-align-center image_resized" style="width:75%;"><img src="https://media.prusaprinters.org/media/prints/111123/rich_content/1f2afe2b-a652-4cfe-9023-9b5d38364469/inkeduntitled-v10_li.jpg#%7B%22uuid%22%3A%22b6bbe226-792a-48fd-bd10-3d85c4f92154%22%2C%22w%22%3A1518%2C%22h%22%3A732%7D"></figure><p>First things first, insert the hopper as so the dropper hole is exactly in the same position as the Lever (In The Closed Position)</p><figure class="image image-style-align-center image_resized" style="width:75%;"><img src="https://media.prusaprinters.org/media/prints/111123/rich_content/9f9ba22b-25be-4de2-bbf6-67a09f52e6ad/inkedf_li.jpg#%7B%22uuid%22%3A%22e21a3d05-d1cb-48c5-9d73-6ee959f218be%22%2C%22w%22%3A1518%2C%22h%22%3A732%7D"></figure><p>(View from the top, again, with the lever closed) As shown in the picture this is how the hopper and the lever should be positioned when reloading aka Closed. </p><p><strong>! Don't stress out if it doesn't line up the first time you are trying to position it. Take a piece of candy to calm yourself down and try again ;D You can do it!</strong></p><p>If you think you are happy with the position of the hopper, then it's time to glue! First, apply some glue at the sides to bond the Hopper to the Enclosure and let it dry for a bit, while drying you can take another piece of Candy to congratulate yourself!</p><p><strong>! Make sure you didn't glue the Hopper to the Lever.</strong></p><p> </p><h5>Step 2:</h5><h5> </h5><figure class="image image-style-align-center image_resized" style="width:75%;"><img src="https://media.prusaprinters.org/media/prints/111123/rich_content/4c0fed0f-2425-4f94-b24d-9c32303f7a0c/inkeduntitled-v9_li.jpg#%7B%22uuid%22%3A%2207c2a246-429b-49eb-98ec-2ab6e73fbc96%22%2C%22w%22%3A1518%2C%22h%22%3A732%7D"></figure><p>Insert the Lever at the bottom of the enclosure.</p><p><strong>! Make sure that the arrow for the lever is pointing to the right –-></strong></p><p><strong>! The Lever mechanism should have a small clearance from the bottom (~1mm)</strong></p><p>Then, place the Bottom Lid in the dispenser bottom so the dispenser should stand up nicely flat. The Bottom lid should also fit nicely in the bottom part of the enclosure.</p><p>Next, glue the bottom lid to the enclosure.</p><p><strong>! Make sure that you didn't glue the Lever mechanism too to the enclosure (Especially for Ultra-Strong glue)</strong></p><p> </p><h5>Step 3:</h5><p> </p><figure class="image image-style-align-center image_resized" style="width:75%;"><img src="https://media.prusaprinters.org/media/prints/111123/rich_content/640b0af3-1985-4d5e-87de-2ac0cb2d5195/inkedg_li.jpg#%7B%22uuid%22%3A%225058e47e-23e6-46a0-9bca-f9f309740f1d%22%2C%22w%22%3A1518%2C%22h%22%3A732%7D"></figure><p>Take your Screw-On Lid Top piece and screw it in</p><p><strong>! Do not add force to the Screw-On lid. This may make your lid permanently stuck.</strong></p><p> </p><h5>Finish!</h5><p> </p><figure class="image image-style-align-center image_resized" style="width:75%;"><img src="https://media.prusaprinters.org/media/prints/111123/rich_content/ddd153ca-96fd-49c6-8cb0-8536fdc2ff84/untitled-v7.png#%7B%22uuid%22%3A%221ca62211-d892-433d-aaf8-0e75663ee879%22%2C%22w%22%3A1518%2C%22h%22%3A733%7D"></figure><p>This is the result</p><p> </p><p><br> </p><p>Enjoy! And Happy Printing!</p><p>-------------------------------------------------</p><p>Originally designed in Fusion 360 and printed with Prusa Mini+</p><p> </p><p>THIS MODEL IS UNDER CC (Creative Commons) LICENCE.</p><p> </p><p><i>Note: The DO NOT EAT sign might not print properly due to your nozzle size. If you have a small nozzle, it will print nicely.</i></p><p> </p><p>Please leave a review if you have printed and used this dispenser! </p><p> </p><p><3</p><p>Happy Printing!</p><p>Foxytisy / Martins T.</p>
With this file you will be able to print Candy Dispenser! with your 3D printer. Click on the button and save the file on your computer to work, edit or customize your design. You can also find more 3D designs for printers on Candy Dispenser!.