Camera bed mount - Logitech C910 on Wanhao Duplicator 6 or Monoprice Maker Ultimate
thingiverse
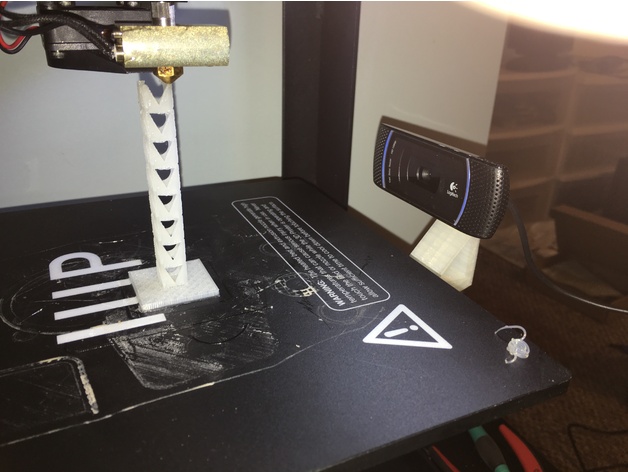
Human: I made some significant changes to my original design that deserved a remix. The main difference is it's now centered, surrounding the front bed leveling screw. A huge thank you goes out to Nathan Bachman (http://www.thingiverse.com/Nbachman/about) for all his input on the original design, which has been integrated into this new one. Design Features The camera is now perfectly centered on the print bed, so you don't have to adjust your camera angle to get a good shot. The camera is positioned higher than before, clearing the top of the frame but still giving a great view of the print. The camera is securely held in place by the front bed leveling screw, making it less likely to move around. There's still room for tapping an M5 thread into the bottom as an extra set screw. However, if you have a front door on your printer, the camera will only clear it by a tiny margin. You'll also find that the camera clears the print head, but just barely. There's almost no room for movement in either direction! Design Limitations This design assumes you have a nut driver (I use http://a.co/8H6qbOT) to turn the M3 nut on the bed leveling screw - a combination wrench or pliers wouldn't be able to reach it with this setup. Thumb screws also wouldn't work unless they had an offset. With the camera now square with the print head, you'll get a lot of direct reflection from the printer lights in the first 20-30mm of printing. You could probably design something that attaches to the print head and reduces that glare. No threads are included - I prefer cut threads over modeled ones. It's not too hard to download the right threads from the Nut Job customizer and integrate them into the design, but I haven't done it yet. Various Notes I used an M5 water bottle cage bolt from a bicycle as the set screw. I had an M4x25 bolt on hand that fits the camera mount perfectly. Sample video: https://youtu.be/qemzDMVHnPA The first photo and sample video are of the PLA temp calibration tower for the D6: (http://www.thingiverse.com/thing:1808306) Disabling Auto-Focus in OctoPrint If you use OctoPrint, the autofocus on the C910 can be really annoying as it gets confused by the moving print head. To disable auto-focus and set it to what I consider the middle of the print bed: sudo apt install uvcdynctrl Add the following lines to your /etc/rc.local before the exit 0 at the bottom:uvcdynctrl -s "Focus, Auto" 0uvcdynctrl -s 'Focus (absolute)' 122 Yes, I know /etc/rc.local is old school and sloppy, but it works. Print Settings Printer: Monoprice Maker Ultimate Rafts: No Supports: Yes Resolution: 0.2mm Infill: 15% Notes: Infill can be light since the camera is not heavy and doesn't require heavy-duty support. Nathan Bachman proved that with his C910 remix, extra diagonal support isn't even necessary. (http://www.thingiverse.com/thing:2002585) If you're going to tap it like I did, consider at least three shells so you don't cut through the walls with the tap. This might be more of an issue on the M5 set screw than the M4 camera holder. Supports are necessary for the split upper foot (going around the bed spring) and the camera mount.
With this file you will be able to print Camera bed mount - Logitech C910 on Wanhao Duplicator 6 or Monoprice Maker Ultimate with your 3D printer. Click on the button and save the file on your computer to work, edit or customize your design. You can also find more 3D designs for printers on Camera bed mount - Logitech C910 on Wanhao Duplicator 6 or Monoprice Maker Ultimate.