Calibration Square - Three Layers
prusaprinters
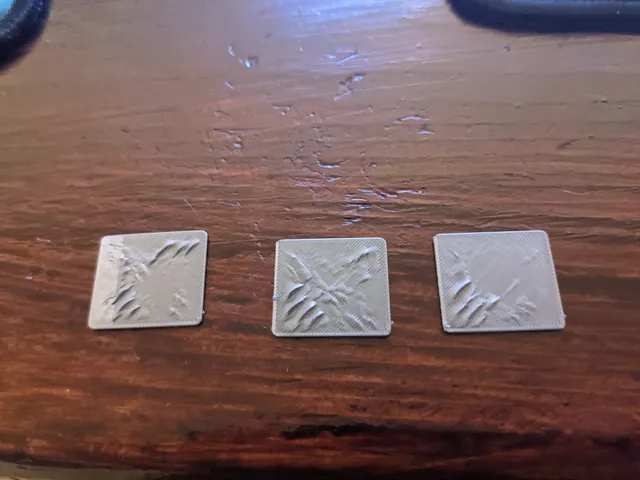
This is designed to print THREE layers - bottom, infill, and top.Often times you can have what appears to be a perfectly calibrated first layer, only to discover the 2nd layer has issues sticking to the first (like forming gills). This is usually due to over-squishing layer 1, thereby causing too large of a gap between layers 2 and 1. The resulting gap between these layers causes layer 2 to act oddly. Sometimes subsequent layers recover, sometimes they don't. By building in layers 2 and 3 into a calibration, we can fix the issue before moving on to a "real" print.1. Get layer 1 to stick by moving the nozzle closer.2. Observe layer 2. If it peels away or forms a sort of gill, your nozzle is too close and a vertical gap results between layer 1 and where the printer starts layer 2.3. Observe layer 3. If you had to accept minimal peeling/gills to keep layer 1 sticking, ensure layer 3 at least squishes them back down.Relevant SettingsNote: Currently set to calibrate a .25 nozzle. To adjust, set to 3x the layer height you are after, then adjust the settings below.--------------------------------------Fill Density: 100%Layer Height: 0.2mmFirst Layer Height: 0.2mmPerimeters: 1Solid Layers: 1Minimum Shell Thickness: 0.2mm Photo:In the photo you can see where I started with a printer that was set with a nozzle offset that was too low. It is progressively adjusted to reduce the “gills" effect on prints from left to right.
With this file you will be able to print Calibration Square - Three Layers with your 3D printer. Click on the button and save the file on your computer to work, edit or customize your design. You can also find more 3D designs for printers on Calibration Square - Three Layers.
