Calculus project 2: Making a mold
thingiverse
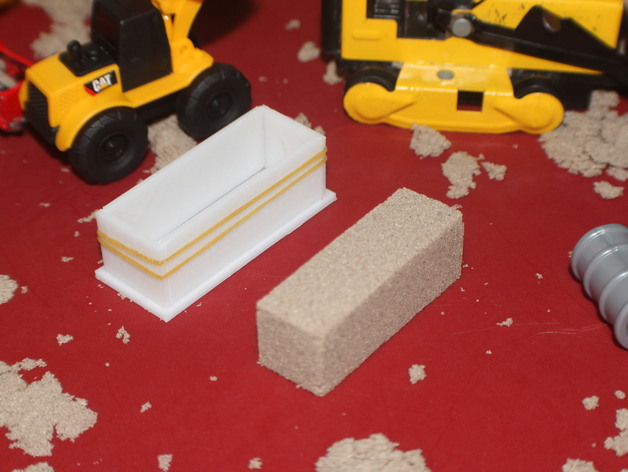
This is the second installment in a series of projects designed for first-year calculus students. Throughout this series, pupils will master various mathematical equations to analyze solids and containers' properties. I apologize if using an "X" and "x" format causes confusion; however, it's essential when formatting makes asterisks impossible. Big X represents a variable, whereas little x signifies multiplication. In this part, we will create molds that enable students to visualize the negative space they are solving for, as well as produce 3D castes of volumes. Print Settings: Printer: CraftBot Rafts: No Supports: No Resolution: optimum Infill: 30% square Notes: I optimized this design to be printed in ABS with maximum settings. I recommend adding a skirt with an offset of 0mm (also known as a brim) and 2-5 loops for ABS. It's also suggested to increase the infill ratio. How I Designed This I utilized a free program from Autodesk called TinkerCAD, which I have been using for years along with AutoCAD, a desktop drafting program from the same company. I chose TinkerCAD because it is free and easy to use, running directly in your browser with built-in instructional lessons at www.tinkercad.com. For part two of this project, I started by using our product from the first part. If you recall, we used X = 20mm, which gave us a base of 60x20mm, two flaps with dimensions of 60x20mm, and two flaps with dimensions of 20x20mm. To make this into a mold, I created a channel around the base consisting of: A border sunk down to 1.0mm that was 2.1mm thick (the extra .1mm ensures all pieces fit together perfectly on max resolution but may require more if using low resolution) A border around the first border that was 2.0mm thick and 2.0mm tall Remember, you can adjust your snap to .1mm in the lower right corner of TinkerCAD. Next, I extended all flaps from being 20mm tall to being 21mm tall to account for the channel. I also had to extend the width of small sides to 22mm (from 20mm) to fill in the remaining space. Project: Lidless Box Mold Objective: At the end of this project, teachers and students will have a way to create molds assisting them in understanding derivatives. Audience: Although the overall project is designed for calculus students, this part can be used by pupils in other subjects as well. Establishing your X value is essential. You may want to make models with X = 10mm, 20mm, 30mm, etc., or create them for X = 5mm, 10mm, 15mm, etc. Step 1: Establish your X value. For the following parts of this project, you may want to make models with X = to 10mm, 20mm, 30mm, etc... Or you can make them for X = 5mm, 10mm, 15mm, etc... depending on how many groups of students there are or how precise you would like your data to be. Step 2: Use what we learned in part one of this project to make your representation. Step 3: Either review my process for making this project and create your own, or download the ones I have made (I will post more soon). Step 4: Print out your thing(s). For tips on settings, see the top of this project. After you things are done, pop them off your print bed and remove the loops if you used them. Sometimes some slight sanding of the edges with a high grit sandpaper may be useful in getting the "flaps" to sit in place better. Also, I designed this thing so the addition of rubber-bands would add to the stability as well as hold the flaps together better. Step 5: Fill your mold with your choice of substrate. Some fun things to try: Sand Kinetic Sand Play-doh Clay Silicone (see next project for how to make your own) You can add silicone to the bottoms and sides of your flaps to make your thing water-tight if you would like to add a liquid. Results: You have now created a mold that you can use to make positive representations of the negative space that students will be solving for. For many students, being able to interact and create is a big part of learning. The more hands-on projects like this that they get to do, the more likely they are to succeed.
With this file you will be able to print Calculus project 2: Making a mold with your 3D printer. Click on the button and save the file on your computer to work, edit or customize your design. You can also find more 3D designs for printers on Calculus project 2: Making a mold.
