Cable Spool from Prusa Spool Upcycling
prusaprinters
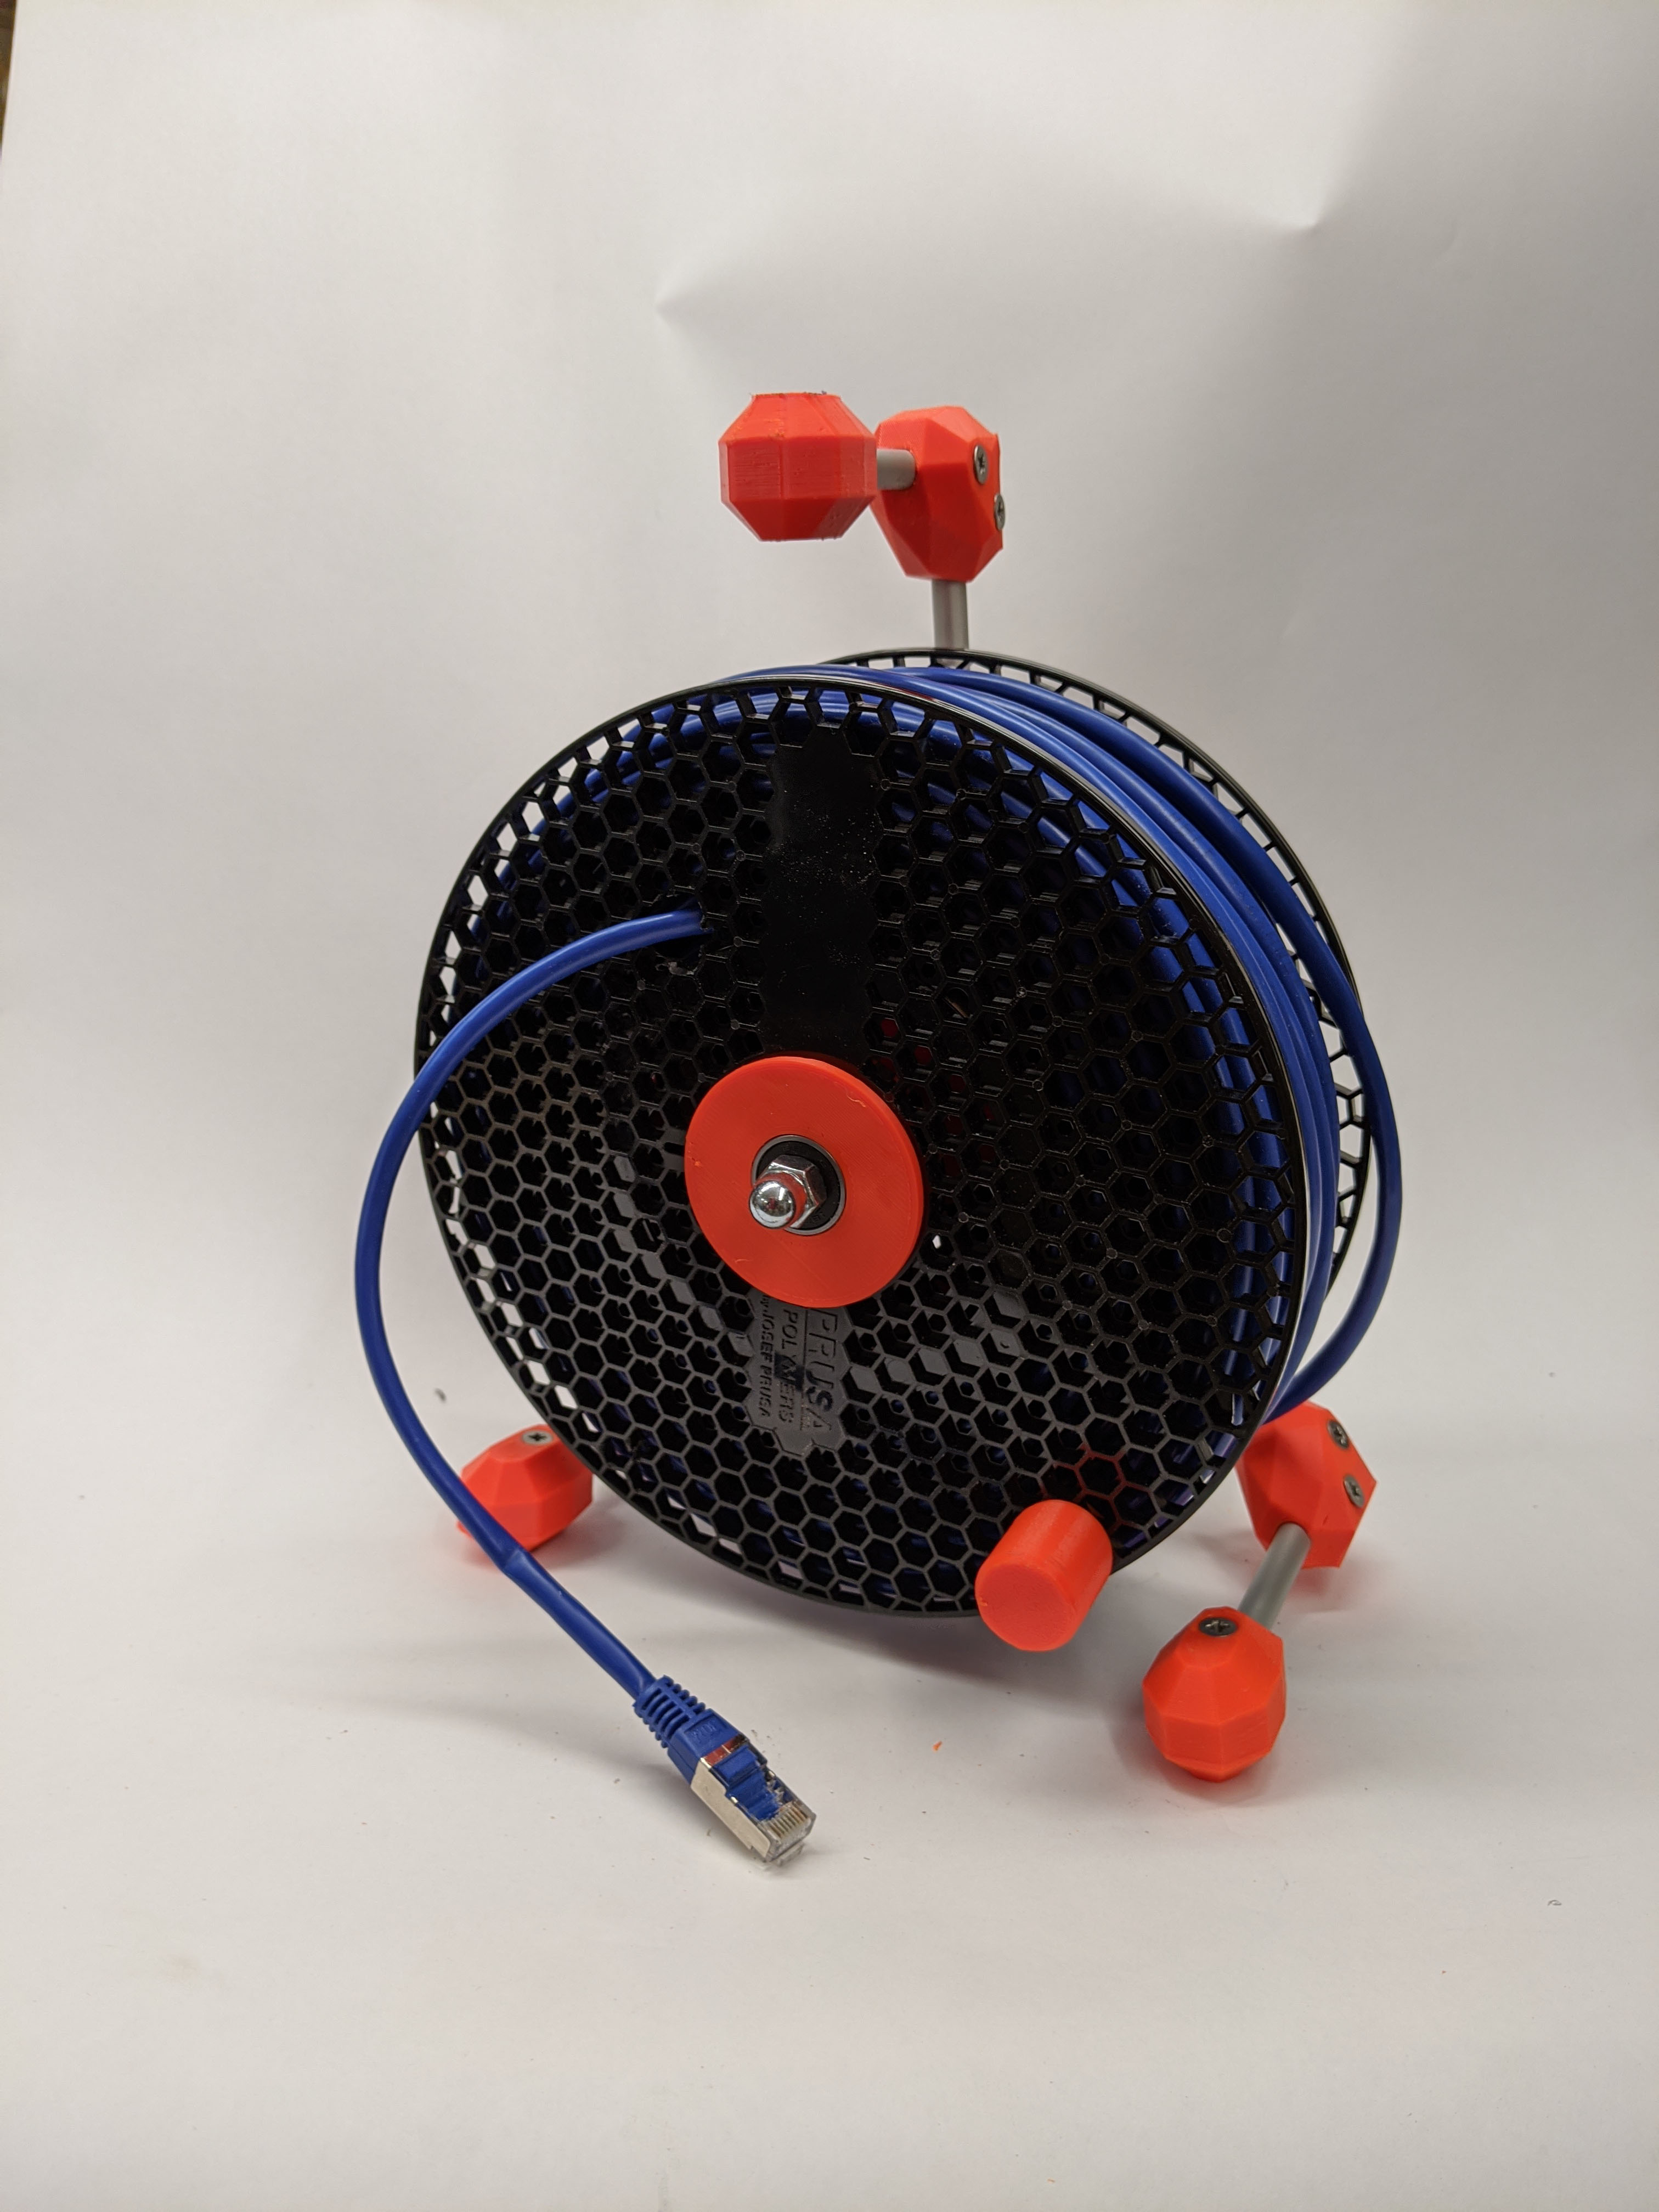
<p>With some additional parts you can make a perfect cable spool of a empty Prusament spool. It is made with bearings and rock solid. For example capable of holding 30m patch cable or what ever you like!</p><h3>Print instructions</h3><p><!DOCTYPE HTML PUBLIC "-//W3C//DTD HTML 4.0 Transitional//EN"></p><p><!-- @page { margin: 2cm } P { margin-bottom: 0.21cm } H1 { margin-bottom: 0.21cm } H1.western { font-family: "Arial", sans-serif; font-size: 16pt } H1.cjk { font-family: "Microsoft YaHei"; font-size: 16pt } H1.ctl { font-family: "Arial Unicode MS"; font-size: 16pt } H4 { margin-bottom: 0.21cm } H4.western { font-family: "Arial", sans-serif; font-size: 11pt; font-style: italic } H4.cjk { font-family: "Microsoft YaHei"; font-size: 11pt; font-style: italic } H4.ctl { font-family: "Arial Unicode MS"; font-size: 11pt; font-style: italic } A:link { so-language: zxx } --> </p><h4>Printing</h4><p>I propose printing with a 0.6mm nozzle. Beacause of print speed. The print is tested with this values:</p><p>Material – Prusament Prusa Orange</p><p>Nozzle 0.6mm</p><p>First layer 0.25mm, Layer hight 0.25mm</p><p>Middle Part, End Pieces and Angles,: 4 perimeters, brim, 20% infill</p><p>Conus: 3 perimeters, 15% infill no brim</p><p>Crank Grip and Back: 2 perimeters, 15% infill no brim</p><h3> </h3><h4>BOM - Bill of material</h4><p><br> </p><h4>Printed Parts</h4><p>1x Middle Part</p><p>3x Angle</p><p>3x Endpiece</p><p>1x Crank Grip</p><p>1x Crank Back</p><p><br> </p><h4>Metall parts:</h4><p><br> </p><p>1x Threaded Rod M8 x 130mm</p><p>1x Drive in nut M8 ISO 6930, 11mm height</p><p>2x Nut M8 DIN 934</p><p>1x Cap Nut DIN 1587 or a normal nut and some screw glue</p><p>1x Spacer M8 DIN 9021</p><p><br> </p><p>1x Screw M3 x 15 or 3,5mm Chipboard Screw</p><p>2x Bearing 608 2RS (8x22x7 mm)</p><p><br> </p><p>1x Aluminium Tube 8mm x 130mm (Middle part to handle)</p><p>2x Aluminium Tube 8mm x 120mm (Middle part to foot angle)</p><p>2x Aluminium Tube 8mm x 90mm (foot angle to foot end)</p><p>1x Aluminium Tube 8mm x 70mm (handle)</p><p>13x Screw M3 x 10 or 3,5mm Chipboard Screw</p><p><br> </p><h4>Assembly Instructions:</h4><p><br> </p><p>Follow simply the pictures. The numbers of the pictures give the order of assembly. I have also written comments for most of the steps:</p><p><br> </p><h4>Cable_Spool_Instructions_02</h4><p>You can cut the aluminium tube with a tube cutter</p><p><br> </p><h4>Cable_Spool_Instructions_08 and Cable_Spool_Instructions_09</h4><p>Place the Crank Back. The plate only fit at some place!</p><p><br> </p><h4>Cable_Spool_Instructions_10 and Cable_Spool_Instructions_11</h4><p><br> </p><p>Remove one side of the filament spool and use the Crank Back as a stencil for drilling. Drill a hole depending on your screw. Something between 3mm and 4mm is possible</p><p><br> </p><h4>Cable_Spool_Instructions_16</h4><p>Align the printed parts and drill a hole through one half of the tube</p><p><br><br> </p><h4>Cable_Spool_Instructions_17</h4><p>Fix all tubes with screws. Save the End Pieces for the next step. Take the screw you like. M3 x 10 and drill a thread in the tubes or quick and dirty some 3,5mm – 4mm Chipboard screws. Chipboard screws are harded and they cut easy an alumium tube</p><p><br> </p><h4>Cable_Spool_Instructions_18</h4><p>Align the End Piece</p><p><br><br> </p><h4>Cable_Spool_Instructions_23</h4><p>Assemble the handle like the feet. Adjust the handle and drill the hole for the screws.</p><p><br><br> </p><h4>Cable_Spool_Instructions_26</h4><p>Place the drive-in nut over the openings</p><p><br><br> </p><h4>Cable_Spool_Instructions_27</h4><p>Place the threaded rod in the drive-in nut. Put first the plate on the rod and then two nuts on the other side of the rod. The turn both nuts against each other.</p><p><br><br> </p><h4>Cable_Spool_Instructions_28 and Cable_Spool_Instructions_28</h4><p>Now you are able to drive the drive-in nut in the middle part.</p><p><br><br> </p><h4>Cable_Spool_Instructions_30</h4><p>Losen the two nuts and leave one nut on the rod.</p><h4>Cable_Spool_Instructions_31</h4><p>Adjust the rod and tighten the remaining nut a little.</p><h4>Cable_Spool_Instructions_31 and Cable_Spool_Instructions_33</h4><p>Place the second nut on driv-in nut side and tighten the system now.</p><p><br><br> </p><h4>Cable_Spool_Instructions_34 and Cable_Spool_Instructions_35</h4><p>Place the bearing and then the assembly on the threaded rod</p><p><br><br> </p><h4>Cable_Spool_Instructions_36</h4><p>Place the Prusament Spool on the Conus</p><p><br><br> </p><h4>Cable_Spool_Instructions_40</h4><p>Fix the spool with the second Conus</p><p><br><br> </p><h4>Cable_Spool_Instructions_41</h4><p>… and the second bearing goes into place</p><p><br><br> </p><h4>Cable_Spool_Instructions_42</h4><p>Fix the the system with a cap nut</p><p><br><br> </p><h4>Cable_Spool_Instructions_43</h4><p>May you need a hole for one end of the cable</p><p><br><br> </p><h4>Cable_Spool_Instructions_46</h4><p>Finish !</p>
With this file you will be able to print Cable Spool from Prusa Spool Upcycling with your 3D printer. Click on the button and save the file on your computer to work, edit or customize your design. You can also find more 3D designs for printers on Cable Spool from Prusa Spool Upcycling.