Business Card Phone Stand (personalizable)
prusaprinters
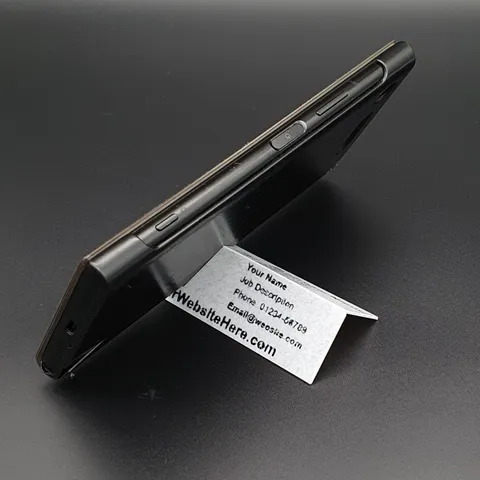
Business cards are often thrown away - but this one is a keeper.It can be folded and used as a phone stand! It is simple, practical and can be carried in your wallet!You always have a phone stand at hand whenever you need one and it has your name on it. With Fusion360 you can personalize it to make it your very own.But it also works as a blank card, if you just want a portable phone stand. ;-) Instructions: Plain Phone Stand:It couldn't be simpler - just print and fold it.No supports needed and it's done is a few minutes. Business Card Phone Stand:Of course you want your own name and business on it, don't you? For this, you will need Fusion360.Import the provided F3D file, go to “Sketches” and edit the “Address_Sketch”.Double click on the Text parts you want to edit and change the letters.You also can delete unwanted text fields.When you're done, click on “Finish sketch” and the file will update automatically. Now all that's left to do is exporting the STL files:If you want to print it with a single extruder, go to “Bodies”, right click on “Business_Card_Phone_Stand_Blanco_V01” and choose “Save as mesh”.A window will open where you can choose your settings, click OK and save it in your desired folder.If you want the MultiMaterial version, you also have to export the letters.For this you need to activate the component “Business_Card_Phone_Stand_Letters_V01” by clicking on the circle so a dot appears inside.Now right click on the component and choose “Save as mesh”.In the window with the settings which will open, make sure to choose “One File” in the “Structure” field. Otherwise each letter will be saved as a single STL. Adding a Logo:If you also want to add a Logo, you can upload a SVG file of it in the “Insert” tab.Now position it where you want it to be, change the size if necessary and go to “Extrude”.Extrude it into the card for 0.4 mm to cut it out.For the MMU version extrude it a second time into the card and create a new body.Move this body/s to the “…._Letters_V01” component by right clicking on the body, choosing “move to group” and choose as “Target group” the folder “Bodies” in the “…Letters…” component. (you can open the folders underneath by clicking on the triangles on the left of the component).Now export the STL files as described before. Printing:For printing with PrusaSlicer you can use my provided 3MF files.If you don't change the names of the STL files, you can simply update to your own card by clicking on the editing icon on the right of the file name in PrusaSlicer and choosing “Reload from disk”.You will need to choose the correct folder/file when done for the first time.Otherwise just upload the file/s to your slicer and choose your favourite settings.I had best results by printing with the letters facing the buildplate and only one perimeter.My prints were done with a 0.4mm nozzle and 0.2mm layer height.If you want to add a filament swap for single extruder printing, the swap should be made after 0.4mm height (PrusaSlicer: at 0.6mm, when printed with 0.2mm layer height). For even more detail on the letters I can highly recommend to use a smaller nozzle, like 0.25mm or even 0.1mm. It will make a great difference! I hope you will enjoy this one!Happy printing!
With this file you will be able to print Business Card Phone Stand (personalizable) with your 3D printer. Click on the button and save the file on your computer to work, edit or customize your design. You can also find more 3D designs for printers on Business Card Phone Stand (personalizable).