Bullseye LED Clip
prusaprinters
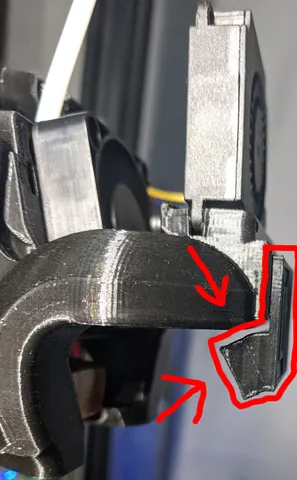
I liked the idea of having an LED under the Bullseye top part to illuminate the front of a print. I was going to make a simple angled bracket and just glue it to the bottom but Sixteenbit had the idea of combining it with the insert for the Bullseye. While his idea does work, I wanted a (IMO) cleaner solution.This can accommodate a LED strip that is 8 mm wide and about 35 mm in length. It is held in by a friction fit but I will more than likely modify the design to add ridges that will hold the LEDs in place also.I have written a step by step guide on how I added the LEDs to my Ender here! I should work for other printers as well.I also paired it with my LED light bar to have illumination coming down from the top of the printer and make it look nice hiding the wires on the side.These are the thing I used to create my lighting setup: (Links are associate links for Amazon)LED Lights - Cool white at 6k. Very nice to work with. 20 AWG Wire - This is way more than you need but I will be using the rest of it for other projects. Any 20 AWG wire will do, but you need like 10 ft to do the setup that I did. Silicone coated is highly recommended.20 AWG Silicone JST Connectors - I used these to connect the buck converter to the power supply. I will be posting a guide on how I did this on my website shortly. Alternatively, you can also use XT60 connectors or use an XT60 splitter and cut one of the female connectors off to solder to the buck converter if you don't feel comfortable opening up your power supply.LM2596 DC to DC Buck Converter - converts the 24v from the power supply down to the 12v the LEDs use.AutoEC 3pc 12V 20A Round Rocker Toggle LED Switch - I didn't get these exact ones but ones like these to add a power switch to the front of my Ender 3.I wired it on the inside of the air duct as shown in picture number 3. I will more than likely add a little bit of glue on either side for stress relief on the wires and to keep it in place.The print can be printed vertically with supports for a cleaner front look or on the flat face without supports.I have included the STEP file for modification. If you are going to 'engrave' in to the design, I would not go more than .5 mm in. That is what I did with mine and it looks decent. (The letters are going to be painted to give it more of a pop.) If you use Fusion 360, I have also made the design public for anyone to download.Print SettingsRafts:Doesn't MatterSupports: YesResolution:.2Infill: 20 Category: 3D Printer Accessories
With this file you will be able to print Bullseye LED Clip with your 3D printer. Click on the button and save the file on your computer to work, edit or customize your design. You can also find more 3D designs for printers on Bullseye LED Clip.