Bulldog Lite Extruder, eBay E3D clone heatsink and Heatbed fan mount
thingiverse
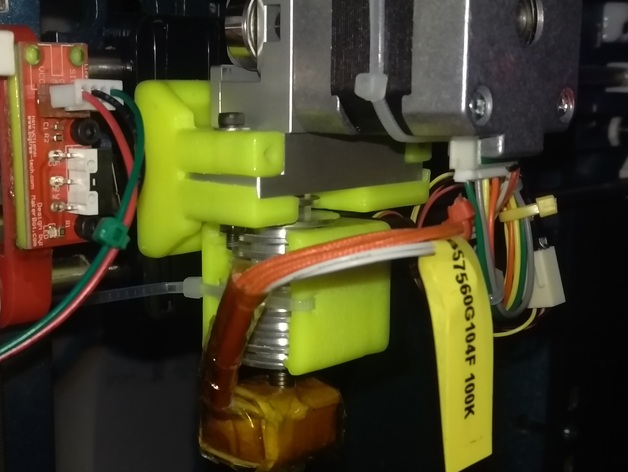
I'm Frustrated with My Bulldog Lite Extruder. It's Time for an Upgrade! I Decided to Expand on the Heatsink Fan Mount I Designed. The Extruder Mount Comes in Two Flavors - Either 2 Hole Mounted onto the Ooznest Carriage or Onto the Stock Rework Carriage with 4 Holes. Included is a STL for a Fan Mount for an eBay E3D Style Heatsink. This One's a Breeze, Just a Millimeter Shorter Than the Standalone Version. The Fan Will Fit Neatly Under the Extruder Mount with a 6mm or 7mm Deep Cooling Fan. I Also Included a Heatbed Fan Mount That Duplicates the Spacing of the Stock Extruder Mount. This Means Any Heatbed Cooling Solution You're Currently Using Should Simply Just Bolt On Without a Hitch. PLEASE NOTE: The eBay E3D Style Heatsink Clone is Different to a Proper E3D Heatsink. Count the Number of Fins - That's the Main Difference. Next Up, an Add-On for a Inductive Sensor Pickup. Print Settings: Rafts: Yes Supports: Yes Resolution: 0.2mm Infill: 50% and Higher Notes: bulldog_lite_extruder_v7_mount* I Suggest Printing Both Bulldog Lite Extruder V7 Mounts Oriented As They Are. You May Need to Add Support, But the Layers Will Align with the Extruder and Make It a Lot Stronger. The Shafts in These Parts Are 3mm, and the Nut Traps Fit 3mm Nuts. You'll Likely Need to Tidy Up with a 3mm Drill Bit. eBay Heatsink Rework* Please Follow My Suggestions/Instructions for the Standalone Heatsink Mount I've Published. Bulldog Lite Extruder V7 Fan Final Nothing Special Here. Just Do Whatever Works. Bulldog Lite Mount V7 Screw Spacing This One's Purely for Tinkering Purposes. Don't Print This - It's Meant to Help You Measure the Add-Ons Without a Ruler. Post-Printing Acetone Fuming. Don't Bother on the Extruder Mount Unless You Want a Nice Finish. The Nut Traps Will Get Messed Up, But It'll Look Good. Fitting the Extruder into the Mount is Easy - Just Push it In and Make Sure the Slot is Tight Enough to Hold It in Place. A Couple of M3 Bolts or Cable Ties Will Do the Trick. Use Washers, but Be Aware That the Two Washers on Top Will Need One Side Filled to Fit. bulldog_lite_extruder_v7_mount_4_hole_spacing.stl This is for Use on the Stock Rework Carriage. The Mounting Bolts Sit Proud of the Surface, So I Extended the Section the Extruder Slips into So You Can Rotate the Heatsink Fan Mount Underneath. Heatsink Fan Mount: If You Use a 6mm Deep Fan, It Makes No Difference What Version You Use - Just Rotate it Out of the Way Under the Extruder Mount. Suggestions Welcome! How I Designed This I Spent 7 Days and Nights Meditating Beneath a Waterfall in the Upper Himalayans. The Design Came to Me in a Vision Complete and Finished. OR, I Could've Bang My Head Against the Laptop Through Multiple Versions of This Design.
With this file you will be able to print Bulldog Lite Extruder, eBay E3D clone heatsink and Heatbed fan mount with your 3D printer. Click on the button and save the file on your computer to work, edit or customize your design. You can also find more 3D designs for printers on Bulldog Lite Extruder, eBay E3D clone heatsink and Heatbed fan mount.