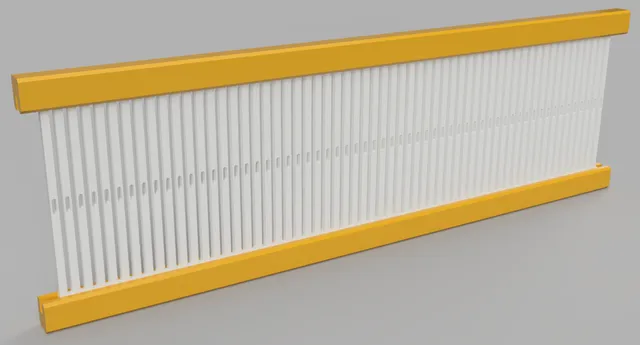
Build-Your-Own Rigid Heddle for a Loom
prusaprinters
I picked up an older model Easy Weaver loom at a second hand shop, but it was missing quite a few pieces. They are generally made out of a wood species such as beech, which is hard to find around here. In addition, other woods hard enough would cost me more than I paid for the loom. I have also found that replacement parts online are generally cheap and poorly made. This is where the 3d printer comes in.Here we have a do-it-yourself rigid heddle. Why do-it-yourself? Well, the Easy Weaver loom heddle was made in smaller pieces, despite typically only being produced in one final size. The original heddle came with two pieces for the top and bottom (which were identical) and six identical internal pieces for the actual heddle. Instead of making one long one, they made six short ones and just lined them up inside the wooden bars, and tacked them down. The spacer was built in to the end of the single piece, so putting two together was automatically spaced correctly.I have included 6 different files for the inner heddle. You can choose to just print the heddle inner part to size and you'll have a replacement. If you want to match the original, you need the top and bottom pieces as well. It would be difficult to print these with the heddle, so they are separate files and the heddle glues into them. You may choose to make these out of wood, if you are trying to match the original. You can print many of the smaller heddle pieces and slide them together, just like the original! Or maybe you want a different color for each section. Go for it. They are in multiples of 62-⅔mm, because that's what the original was and I was trying to make a replacement. The top/bottom pieces have an extra 9mm at each end. This is a few millimeters longer than the original. Please note that the spacer is only on one end, be sure the orientation is correct before gluing them in place.Let's say you want to build the original heddle that's 394mm long that includes the inner part, and a top and bottom. You would choose the 394mm bar, and could choose any combination for the inner pieces to add up to 376mm (6, 1+5, 2+4, 3+3), depending on your printer bed size. If you're looking for smaller top/bottom pieces to stick together, read on.For those of you with smaller printers who want to print the top/bottom for a bigger heddle, I have made an extra six files with 9mm removed. Why? This is so you can glue two smaller pieces together to make a longer one and not have an extra 18mm afterward! I suggest overlapping the inner pieces in this case so the seams don't match up. As an example, if you want to build a 394mm long heddle: Print x2 and x4 inner pieces, and then the x3 and x3 top/bottom pieces. I don't suggest gluing the top/bottom pieces together first. Glue them as you put the inner pieces in, so you have something to hold them in place. (Note that you should only combine two pieces so as not to have too much extra on each end. If you combined three “Heddle_Outer_minus9mm” pieces, you'll have 27mm extra, or 13.5mm on each end instead of 9mm.)Length (Pcs)Inner piece (mm)Top/Bottom (mm)Top/Bottom (-9mm)63763943855313.33331.33322.334250.67268.67259.6731882061972125.33143.33134.33162.6780.6771.67Naming:Heddle_Inner: These are the inner heddle pieces.Heddle_Outer: These are the top/bottom pieces. Since they're identical, just download the one and print two copies. These include 9mm extra on each end.Heddle_Outer_minus9mm: These are the top/bottom pieces with the extra 9mm on one end only. These are if you need to combine them to make longer outer pieces. See above for an explanation.Printing recommendations:Heddle_Inner: 3 wall loops/shells and infill of 15% or 5 loops with 10% infill is recommended. (5 loops will give more strength and significantly decrease print time with minimal increase in filament use.) 0.20-0.28mm layer height. While larger layer heights will give you a faster print time, smaller will give you a smoother edge. 0.4mm nozzle or smaller is required for the inner heddle piece unless you can get the lines to appropriate thickness. See the image below for what you want to see in your slicer.Heddle_Outer: Basically anything will work in terms of nozzle size and layer height, but you'll want 2 wall loops/shells with 25% infill or 3-4 wall loops/shells with 15% infill.The clearance between the inner piece and outer piece is designed large enough to allow for sliding but small enough to still be glued. If you don't think your printer is calibrated enough, cut the models in your slicer into small test pieces first.No brims or rafts unless you know you absolutely need it.No supports.For more loom models, visit my Loom collection on Printables.com.
With this file you will be able to print Build-Your-Own Rigid Heddle for a Loom with your 3D printer. Click on the button and save the file on your computer to work, edit or customize your design. You can also find more 3D designs for printers on Build-Your-Own Rigid Heddle for a Loom.
