Brushless Worker Hurricane Cage + Flywheels
thingiverse
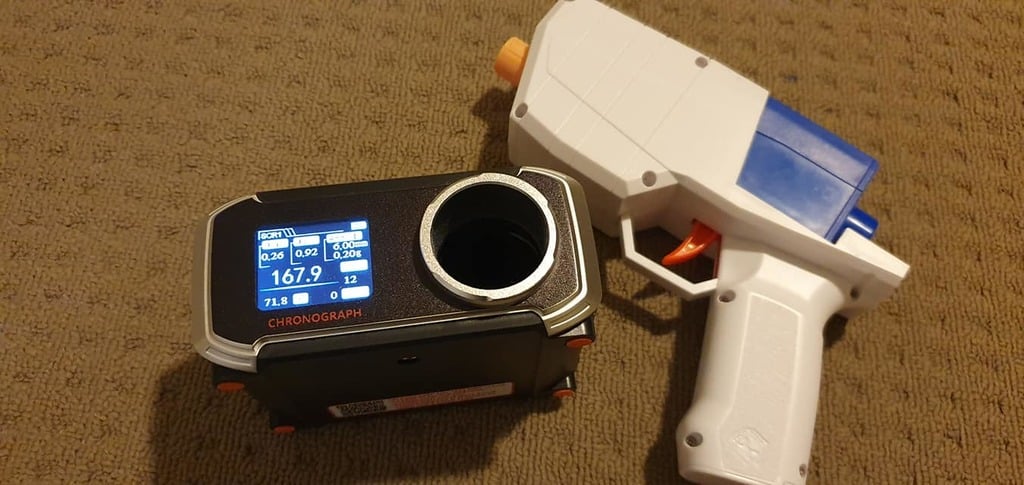
Stock motors in a Worker Hurricane are subpar. However, they can now be upgraded to a Brushless setup. Performance on 3s averages 142fps with highs reaching 167.9fps. **Version 2:** An update to version 2 was released on May 5, 2019. Both the upper and lower cage have undergone changes, and are not compatible with v1: - Integrated barrel. - Reduced (eliminated) barrel jams. - Enhanced performance. - Easier installation. You will need to remove the barrel nubs. **Shopping List:** 2 x Turnigy Viking 1308 4100kv motors: One CW and one CCW https://hobbyking.com/en_us/multistar-viking-brushless-outrunner-drone-racing-motor-1308-4100kv-cw.html https://hobbyking.com/en_us/multistar-viking-brushless-outrunner-drone-racing-motor-1308-4100kv-ccw.html 2 x Brushless ESC of 20a or more. I prefer BLHeli and have the Turnigy BLHeli_s 30a units installed. 30a - https://hobbyking.com/en_us/blheli-s-30a.html 20a - https://hobbyking.com/en_us/blheli-s-20a.html 1 x BEC module https://www.aliexpress.com/item/Receiver-Power-Supply-5V-3A-Brushless-ESC-External-Type-BEC-UBEC-Support-2-6S/32882504953.html 1 x Arduino Nano or Pro Micro https://www.aliexpress.com/item/New-Pro-Micro-for-arduino-ATmega32U4-5V-16MHz-Module-with-2-row-pin-header-For-Leonardo/32768308647.html Please be aware that with the Pro Micro, you must ensure you select the right CPU clock frequency and voltage in Arduino. The default is 3v3 / 8mhz instead of 5v / 16mhz. If you get it wrong, you will soft-brick your Arduino. If you're unsure what this means, get the Nano instead. You may struggle to fit a nano in. **Printing Info:** Flywheels must be printed at 30% infill, with a 3d infill pattern (e.g. cubic). 4 Walls, floor, and roof layers are required for structural integrity. No supports are needed. I use Polymax for flywheels as it's nearly indestructible. Cage needs to be printed at 100% infill. Supports are required. I use ESun PLA+ for my cages. Upper cage can be printed in any settings you like. I typically use a 25% infill. **Installation Process:** Screw the motors into the cage using the included hex bolts. I have videos on the details of this particular build, but I assume that you have a basic level of knowledge on brushless setups. There are plenty of videos on brushless nerf builds - especially based on Ultrasonic2's Ultra Stryfe. The process is fundamentally the same. My ESC's are tuned in the following way: - Timing = Medium High - Startup Power = 100% Everything else is set to default. **Wiring:** Firmware has been uploaded. - Rev trigger connects to Pin 4. The side of the switch connects to Ground. - Speed Pot center pin connects to Pin A1. One side of the Speed Pot connects to 5v from the BEC, the other connects to Ground - ESC A connects to Pin 10 - ESC B connects to Pin 9 You can connect both ESC's to the same pin, but it will be a challenge to fit a servo split adapter in the shell. **Video Info:** Pt1 - Demo https://youtu.be/QGZdFIZZkgs **Shoutouts:** Shoutout to Ultrasonic2 as I cut my teeth building a number of brushless setups based on his files. That experience allows me to develop this. **License:** Absolutely no commercial use of these models, firmware, circuit diagrams, etc are allowed. My exception is when you pay a general purpose print lab / service (such as 3dHubs) to print models for your own personal use. If you have anything else in mind, please contact me.
With this file you will be able to print Brushless Worker Hurricane Cage + Flywheels with your 3D printer. Click on the button and save the file on your computer to work, edit or customize your design. You can also find more 3D designs for printers on Brushless Worker Hurricane Cage + Flywheels.