Broomstick Shirt Rack - A Beginner Circular Economy Project
prusaprinters
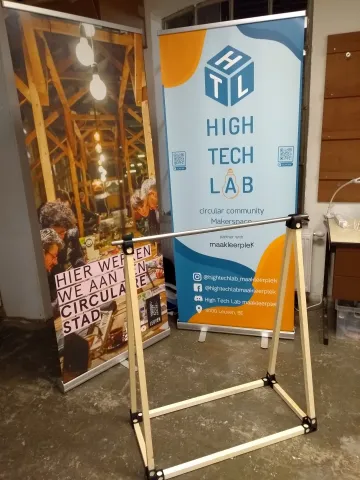
DisclaimerThis is my personal entry for the Contest Theme : Print Tables. If I win the printer then it will be for personal use which will include creating more projects and workshops like the current one for the High Tech Lab. Below in this Description I ask for donations of old Prusa 3D printers. Donated printers will go directly to the High Tech Lab and be available for public use. This disclaimer will be removed once the winner of the contest is announced. What to do with old or broken broomsticks?Use them as structural members for furniture!Here we use it to build a small shirt rack. It is a first prototype using a broken broom and 27x27 scaffolding wood found at a local DIY home improvement store. Ideally the whole rack would be built using only broomsticks. The joinery is made using parametric models in Fusion 360 which can be easily adapted for different broomstick diameters and wood sizes.Circular EconomyI intend to use the concept of “broomstick furniture” as a fun easy to understand hands-on example of how to combine 3D printing with materials that have reached the end of their primary intended function. For people new to 3D printing, this is a first project to understand how to use and modify a model, slice it, print it and make everything fit properly. Please join us at the High Tech Lab to explore more about 3D printing and the circular economy.This is a first demonstration project to illustrate how to reuse items that would be normally thrown away. It was built in the HIGH TECH LAB at MAAKLEERPLEK Leuven, Belgium.Every Thursday we have an Open Lab Night where you can use the our facilities including our laser cutter and other tools.One project you can easily join is to help us build a collection of other reuse or recycle projects using 3D prints here at printablebles.com. We plan to do workshops showing our community how easy it is to find models and print them. Maybe you can join and become one of our volunteers ;)DONATE YOUR OLD PRUSA PRINTER :)At the moment we only have one 3D printer at the High Tech Lab. We would like to have at least 3 more printers available for our community and future workshops. We would prefer an old Prusa printer in working condition or that just needs a few parts replaced or fixed. The Build Tools:SawDrillMaterials:a broomstick (the one I had a diameter of 21mm – yours might be different)27x27x2100mm scaffolding wood4mm wide pan head woodscrewsInstructions:1. Print the parts. Hint: Print only one part and make sure the wood fits the hole. Which part do you print first? You will have to mirror one of the parts, which program do you use to mirror the part? Which infill will you use? How much will your infill density be? How many walls will you have?2. Cut the wood. Hint The important measurement is the longest wood side of the triangle which in this build is 100cm. What is the length of the bottom piece of wood from the triangle? What is the length of wood that will connect the two triangles? The wood will be warped. How do you detect board wood warpage? How do you cut your wood to make the parts look similar? 3. Assemble the bottom of the triangles. Hint: Make sure the angle part of the joint is pointing inwards and upwards.4. Connect the two sides of the bottom frame. Hint: First connect them to one triangle. Your wood might be warped in one direction or another, how do you minimize the effect of the warpage?5. Connect the other side to complete the frame. Hint: Is it square enough?6. Add the long sides of one triangle. Hint: Are the two edges at the top of both sides of the triangle touch each other or are they offset… (Hmmm)7. Add the top joint. Hint: Make sure the screw holes are inwards towards the frame. Look down from the top of the joint towards the bottom of the triangle… what do you see?8. Add the other triangle. Hint: How can you know if it is parallel with the other triangle?9. Add the top joint. Hint: Look through one hole of a top joint to the other hole. Do they line up? Does it have to be perfect? Does it need to be fixed and how?10. Insert the broomstick through both top joints. Hint: Is it parallel with the frame?11. Add the screws. Hint: Do you you start with the bottom frame or the top joints?12. Enjoy your new shirt rack :)
With this file you will be able to print Broomstick Shirt Rack - A Beginner Circular Economy Project with your 3D printer. Click on the button and save the file on your computer to work, edit or customize your design. You can also find more 3D designs for printers on Broomstick Shirt Rack - A Beginner Circular Economy Project.
