Bridging Beyond Belief
prusaprinters
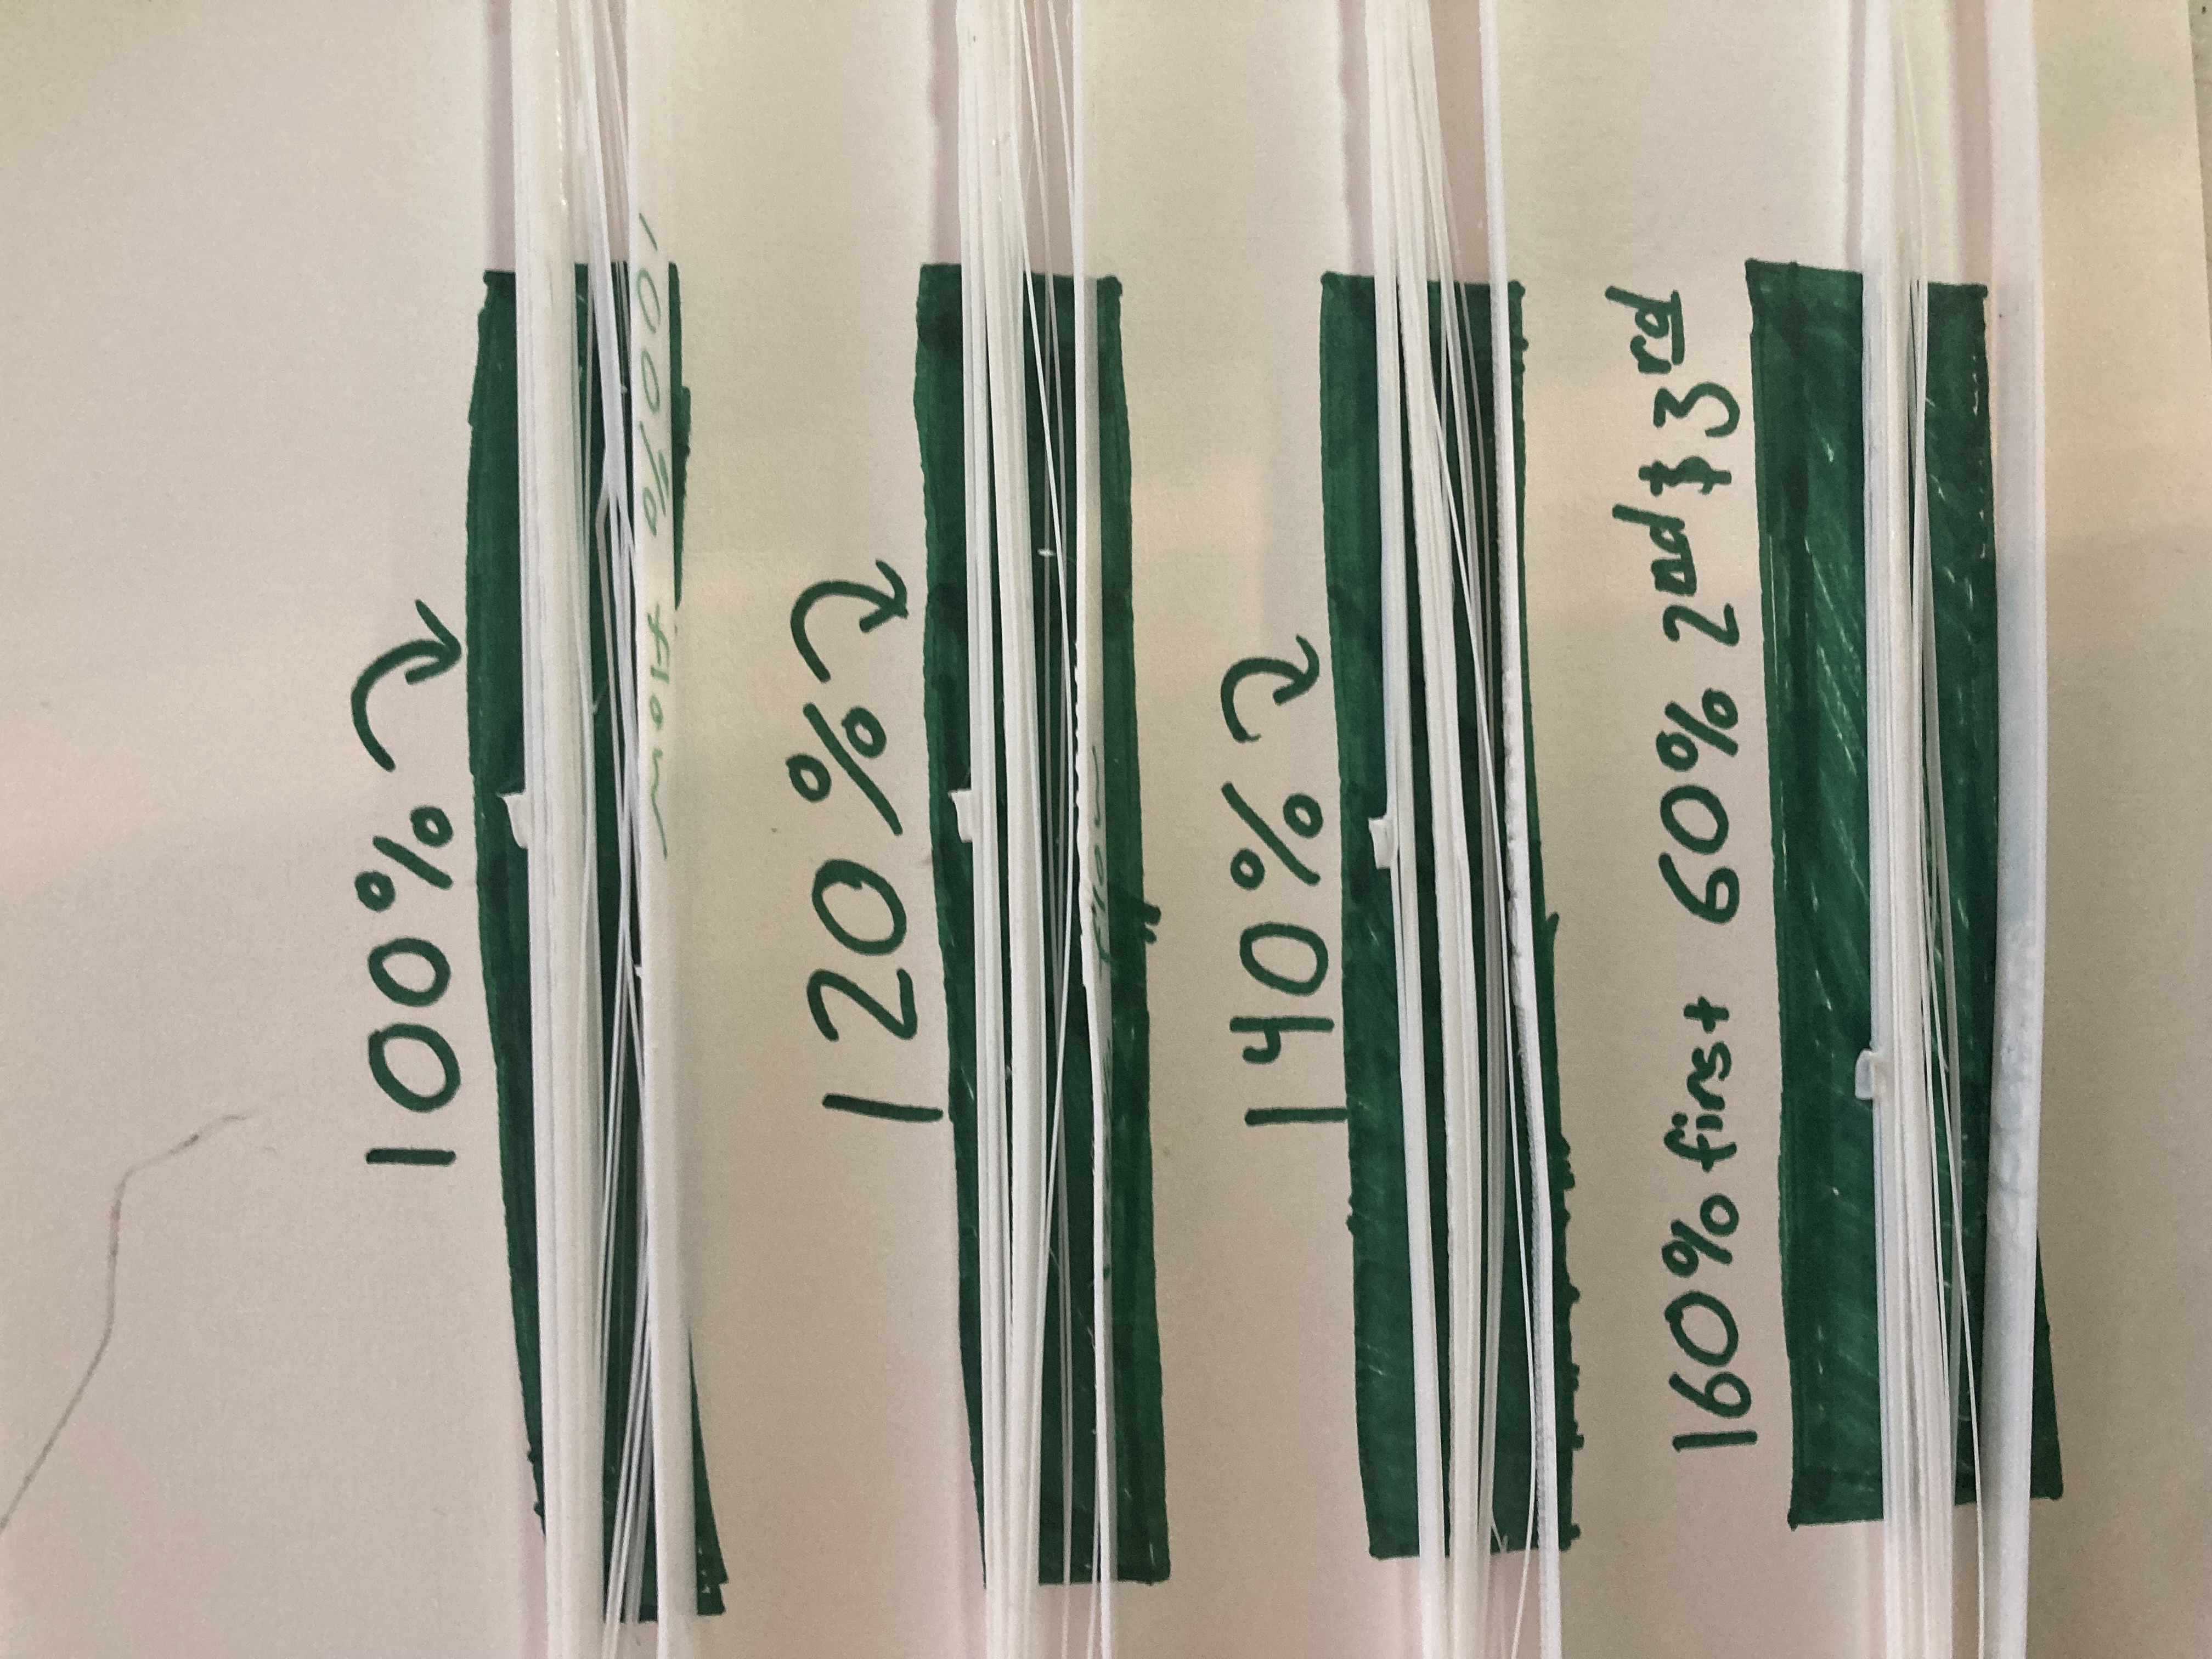
<p>https://newdimension.company.site/</p><p><strong>Before we begin, I'd like to thank </strong><i><strong>ktothestank </strong></i><strong>for his </strong><i><strong>250mm Bridge Test </strong></i><strong>Model which I used in these tests.</strong></p><p> </p><p>Slicer: Cura 5.1.0</p><p>Resolution: 0.2mm</p><p>Nozzle: 0.6mm</p><p>Printer: Creality Ender 3 Pro</p><p>Modifications: Creality Silent Mainboard</p><p>Creality Glass Bed</p><p> </p><p>Bridges are by far the most common stress test of all. You will find these bridges in almost all stress tests, from the 3DBenchy to the temperature tower. These will make life a lot easier if you can master them. You are laying down molten plastic that needs to be cooled to properly bridge. You can accomplish this by increasing fan speed, decreasing print speed, and lowering print temperature. In Cura, under experimental in the print settings, enable the “enable bridge settings”. Make sure all fan speeds have been turned up to 100%. Next, you may want to consider changing the print speeds. Here are the conclusions of my tests. </p><figure class="image image-style-align-left"><img src="https://media.printables.com/media/prints/315658/rich_content/a08c6565-9025-43b8-8b5b-0cc4c3230ceb/screenshot-1.png#%7B%22uuid%22%3A%221c3cc977-3761-4753-ad10-e768e8a90788%22%2C%22w%22%3A452%2C%22h%22%3A648%7D"></figure><p>Firstly, we have the settings used in print 1. These were my slicer's pre-sets so we are going to be using them as a control sample. The results were underwhelming. The bridge only met 2 of the qualifications. It did complete the bridge successfully, and I did not modify the STL file in any way, but there was quite a lot of sagging threads. That's the problem with FDM printers, they are not capable of spewing molten plastic over nothing. It needs something to rest on, but it also has a strange property where it is able to act like a rope, (assuming it is properly cooled) to stretch across the gaps. The nozzle seemed to melt the joints to the previous strand while starting another strand. Have a look at the results to judge for yourself.</p><figure class="image image-style-align-left"><img src="https://media.printables.com/media/prints/315658/rich_content/8f419033-a214-4a84-805c-6e5c5cd475b8/img-7136.jpg#%7B%22uuid%22%3A%222acdae87-0f55-4ad1-aa83-643b639fc05d%22%2C%22w%22%3A3024%2C%22h%22%3A4032%7D"></figure><p> </p><p> </p><p> </p><p> </p><p> </p><p> </p><p> </p><p> </p><figure class="image image-style-align-left"><img src="https://media.printables.com/media/prints/315658/rich_content/9814510f-b777-4916-89f2-b53c5147f5b2/screenshot-2.png#%7B%22uuid%22%3A%22bb951f55-16d7-4826-91aa-f48153a502f9%22%2C%22w%22%3A440%2C%22h%22%3A641%7D"></figure><p><br> </p><p> </p><p> </p><p> </p><p> </p><p> </p><p> </p><p> </p><p> </p><p> </p><p> </p><p> </p><p> </p><p> </p><p> </p><p> </p><p> </p><p> </p><p> </p><p> </p><p>Next, we will try to lower the bridging speed to 50mm/s. The goal of this is to better cool the plastic while it is still bridging. This should help to dampen the amount of sagging threads. The results were better than the previous model, but only by slightly. The amount of sagging strings seems to be reduced slightly, so it's far from perfect, And perfect is what we need. If you want to complete a bridge faster with minimal affects, I recommend leaving the print speed at 17.5mm/s.</p><figure class="image"><img src="https://media.printables.com/media/prints/315658/rich_content/b6dedd9d-1f7c-4b6f-bbc3-e913826305ee/img-7137.jpg#%7B%22uuid%22%3A%222e2b17be-164f-46b9-9ab4-dd3501eab32c%22%2C%22w%22%3A3024%2C%22h%22%3A4032%7D"></figure><figure class="image image-style-align-left"><img src="https://media.printables.com/media/prints/315658/rich_content/756d5303-1367-4c84-9568-e0b4110fca6e/screenshot-3.png#%7B%22uuid%22%3A%223cf46691-99a5-4419-8ef3-dbaac104bc92%22%2C%22w%22%3A451%2C%22h%22%3A643%7D"></figure><p> </p><p>So what can we do to accomplish this perfect bridges? I'm going to really try something controversial here. I was just explaining how important it was to cool your parts instantly to create the bridging affect. However, the fan seems to be blowing the fan seems to be blowing the strings off their joints. What could I possibly do to counter this? Well… I'm going to completely shut the fan off. Following the mess that I expect to be created from this, I will set the fan speed to 50%. The rest of the settings are staying the same, this way we can compare 100%, 50%, and 0% fan speeds. Quite unsurprisingly the 0% fan speed performed much worse than the 100% fan speed. The 50% speed seemed to sag the actual bridge itself, while a few strands above seemed to make it successfully. The least I can say is that 100% fan speed seems to be the best.<img src="https://media.printables.com/media/prints/315658/rich_content/3c93e9dc-765d-4067-ad59-3e3955f994ef/img-7141.jpg#%7B%22uuid%22%3A%227edb10aa-2259-469a-bcb1-3aeb2a0f7232%22%2C%22w%22%3A3024%2C%22h%22%3A4032%7D"></p><figure class="image image-style-align-left"><img src="https://media.printables.com/media/prints/315658/rich_content/d86fd1b1-25b7-4e95-ba06-d04c29f5af79/screenshot-5.png#%7B%22uuid%22%3A%22dd1ca54f-e0d0-47fe-870e-2ff7cc7d0b84%22%2C%22w%22%3A443%2C%22h%22%3A378%7D"></figure><p>Next, we will try flow rate. These settings will be at 100%, 120%, and 140%. And for the sake of simplicity., since all the settings are the same for the multiple layers, we can go ahead and un-check the <i>bridge has multiple layers</i> box. The 100% flow seemed to be pretty saggy, though more predictable than any other tests. The 120% flow was quite interesting. It had only a few sagging strings, then the majority of the bridge was saggy, all topped off by a few layer perfect bridge. The 140% layer seemed to work really well! </p><figure class="image image-style-align-left"><img src="https://media.printables.com/media/prints/315658/rich_content/889eeca1-4bdc-4f41-bb00-5f892c7482cc/screenshot-6.png#%7B%22uuid%22%3A%22b97166e3-a0c3-4c3d-9737-cecfa8c55807%22%2C%22w%22%3A448%2C%22h%22%3A643%7D"></figure><p>It only has a few sagging strands until the upper layers, so I will test a 140% flow rate as well to get more adhesion between layers. The weight of the above layers seem to be too much before the bridge can gain structure. So, I will re-select the multiple layers, and dial back the next few layers. The results were shocking. It had only a few strings that didn't bond with the supports, but I think that was because I accidentally turned on the wipe between layers. This was by far the best print so far. Any more flow rate, and it would collapse under it's own weight. So in conclusion, if you want to really dial in your overhangs, then there is a good chance these are the best settings for you. However, every printer is different, and I recommend only using this as a starting point guide, and fine-tuning it to your specific printer.</p><figure class="image"><img src="https://media.printables.com/media/prints/315658/rich_content/e255b6b3-8243-4386-8e38-971688bd4418/img-7142.jpg#%7B%22uuid%22%3A%2223ad3229-28a8-4e68-98d7-5da7af416bae%22%2C%22w%22%3A3024%2C%22h%22%3A4032%7D"></figure>
With this file you will be able to print Bridging Beyond Belief with your 3D printer. Click on the button and save the file on your computer to work, edit or customize your design. You can also find more 3D designs for printers on Bridging Beyond Belief.
