 myminifactory
Bridge Test
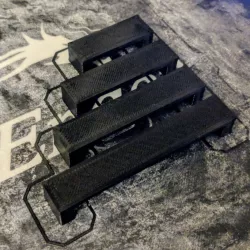
This is the beginning of a larger suite of test prints I am developing that can be used to calibrate your 3D printer cheaply, and quickly.
Find a full write up and other tests on my blog
SummaryThe two major factors that come into play when printing a good bridge are Temperature and Print Speed. The lower both of these respective values are the better your bridges are likely to succeed. The goal of this project is that its a test that prints very fast, the full test should print in under 45 minutes.
This model is fully parameterized if you have Inventor.
ContentsThis project contains two .stl files that are ready to be sliced and printed. bridgeTest.stl is a complete test with 4 different lengths. oneBridge.stl contains only the longest of the bridges at 25mm. The other files is bridgeTest.ipt this is a parameterized inventor file for changing the parameters of the test for anyone who wishes to do that, but I think the default setup is good.
Goals of This PrintThis print is designed to be fast to help you troubleshoot any issues your printer may encounter as your bridges increase in length. By default, the bridge spans are 10mm, 15mm, 20mm, and 25 mm. Another thing to note concerning this print is by default the bridge is 3mm above the print bed. In most cases, I think this is enough to avoid heat coming off your print bed to affect the bridge quality but your results may vary and it is something to consider.
From what I've seen, horizontal bridges will never quite match the quality of a normal print operation, but you can get pretty close. You will always have very defined lines, but if done correctly these should be connected to the print pretty well and shouldn't be an issue outside of being a slight eyesore on some prints.
SpeedIf your speed is off it will be very obvious. Over extrusion is going to mean that you have a bridge that may sag lower than it should, meaning any layers above it aren't going to have anything to support them which will cause structural and visual issues above the bridge for a few layers before your printer hopefully recovers.
The other issue is under extrusion which in a worst case scenario means your bridge will break in the middle of the process leading to a huge mess under the bridge and may cause even more issues than over extrusion.
TemperatureThe key element in bridging is that your cooling melted plastic in place while it is suspended in the air. This means its important to make sure your temperature isn't higher than its required to be, and that your print head fans are running at full to ensure the filament hardens as quickly as possible once it leaves the print head.
Direct link to the original creator's page
Also Available On
More from bigg




Similar Models
 cults3d
 thingiverse
 thingiverse
 thingiverse
 cults3d
 thingiverse
 thingiverse
 thingiverse
Model Specifications
Frequently Asked Questions
How do I download Bridge Test?
Click the "View on myminifactory" button above to visit the original model page on myminifactory. You can download the STL file directly from the creator's page.
What 3D printer can I use for this model?
This STL file is compatible with most FDM 3D printers (Creality Ender 3, Prusa MK3S+, Bambu Lab, etc.) and resin printers (Elegoo, Anycubic). Check the original page for recommended print settings and materials.
Is this 3D model free to download?
This is a premium model priced at on myminifactory. Premium models often include higher detail, multiple parts, and print-tested files.
Can I modify this STL file?
Most STL files can be modified using free software like Blender, TinkerCAD, or Meshmixer. Check the license on the original myminifactory page to see if modifications are permitted by the creator.