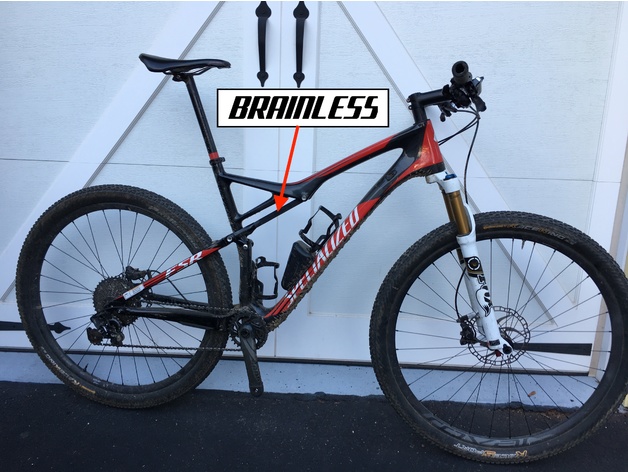
"Brainless" shock blank for Specialized Epic
thingiverse
Disclaimers Yes, this is probably - okay, certainly a bad idea. Just like everything on Thingiverse, choosing to print and use this is at your own risk. Not comfortable with it? Don't print it. No way in hell Specialized would be cool with this. If they had any idea about it, they'd probably void your warranty. If installed, it breaks under your weight, the seat stay stiffening bridge will drive into the back of the seat tube with quite a bit of force. Odds are good that will break your frame. I addressed this by stuffing a rolled up towel between the bridge and the seat tube. Yes, that's as ugly as it sounds, but it worked when I broke the first prototype. There's a reason I named this "Brainless". Get the hint. I'd really only suggest this to get you back on the road or really light trails while your suspension is being serviced. Having a spare bike is an even better solution. Explanation I've got a Specialized Epic, and I ride it often. Love the Brain suspension technology, and ride the bike a bunch. Unfortunately, the technology is proprietary, and routine maintenance requires sending the shocks back to Specialized. They turn the stuff around quick, but with shipping there and shipping back, it can be a couple weeks before your bike is back together. If only there was a way we could use 3D printing to address the problem! Before I sent in my rear shock, I took a bunch of measurements, and have created "Brainless" - a shock blank to replace the Specialized Brain rear shock on my Epic while the suspension is being serviced. It'll basically turn the bike into a hardtail and has about 20% sag designed in. The lower mount uses an M6x1.0 threaded bolt, and I've modeled this hole at 5mm so I can use a tap to cut in threads. (I like the results better than printed-in threads) There are a bunch of reasons why this is a bad idea... (see the earlier photos with the red piece for just a small sampling if you can't think of several on your own) but I still found it to be an interesting idea and since I could try it with so little problem, (thanks to the wonders of 3D printing technology) - I decided to pursue it. Also, this isn't an integral structural part of the frame - the frame is intact and functional without this part, so the only real risk with breakage is the frame sags - and the cross brace of the seat stays could hit the seat tube, which on my bike is carbon. But - the wheels will still be attached and pointing the same direction, and the fork won't fall off. In testing, the original PLA prototype survived a 10 mile ride with no problems including curb hopping and light off-roading as well as riding through a drainage ditch with babyhead rocks. Surprisingly, no issues. So, I got greedy and wheelie dropped off a tall curb, and broke it. Thankfully, I had wadded up a towel behind the seat stay, so I didn't smash the seat tube. PLA seems to be too brittle, and I also didn't print it at 100% infill, partially to see how much it could actually survive. I was surprised how much it did survive, and wasn't surprised that I did manage to catastrophically break it. I've reprinted in ABS as 100% infill, but haven't put much distance on that one. The font used is "Braille" regular, which was chosen as it looks kinda slightly vaguely similar to the font used in the Specialized logo. I've got two versions of the v2.0 No ("oh no", get it?) - one with and one without the "Brainless" logo. I only include the original version for reference. Print Settings Printer: Monoprice Ultimate Rafts: No Supports: No Resolution: 0.2mm Infill: 100% Notes: Original prototype was several shells and a 50% infill, and I managed to break that by wheelie dropping off a curb. Reprinted in ABS at 100% infill with 10 shells and 10 top and bottom layers to increase strength. ABS is also more flexible and should be more forgiving than PLA. Nylon would probably be the best choice if you really wanted to take this thing off-road, which I honestly wouldn't recommend. Post-Printing Post-printing and installation: After printing, tap the threads in the bottom using an M6x1.0 tap. Install the blank on the frame linkage with the M6 bolt first, then moving the suspension to line up the M8 thru-bolt on the main triangle.
With this file you will be able to print "Brainless" shock blank for Specialized Epic with your 3D printer. Click on the button and save the file on your computer to work, edit or customize your design. You can also find more 3D designs for printers on "Brainless" shock blank for Specialized Epic.
