Bracket for Bosch Powertube on MIK adapter plate
prusaprinters
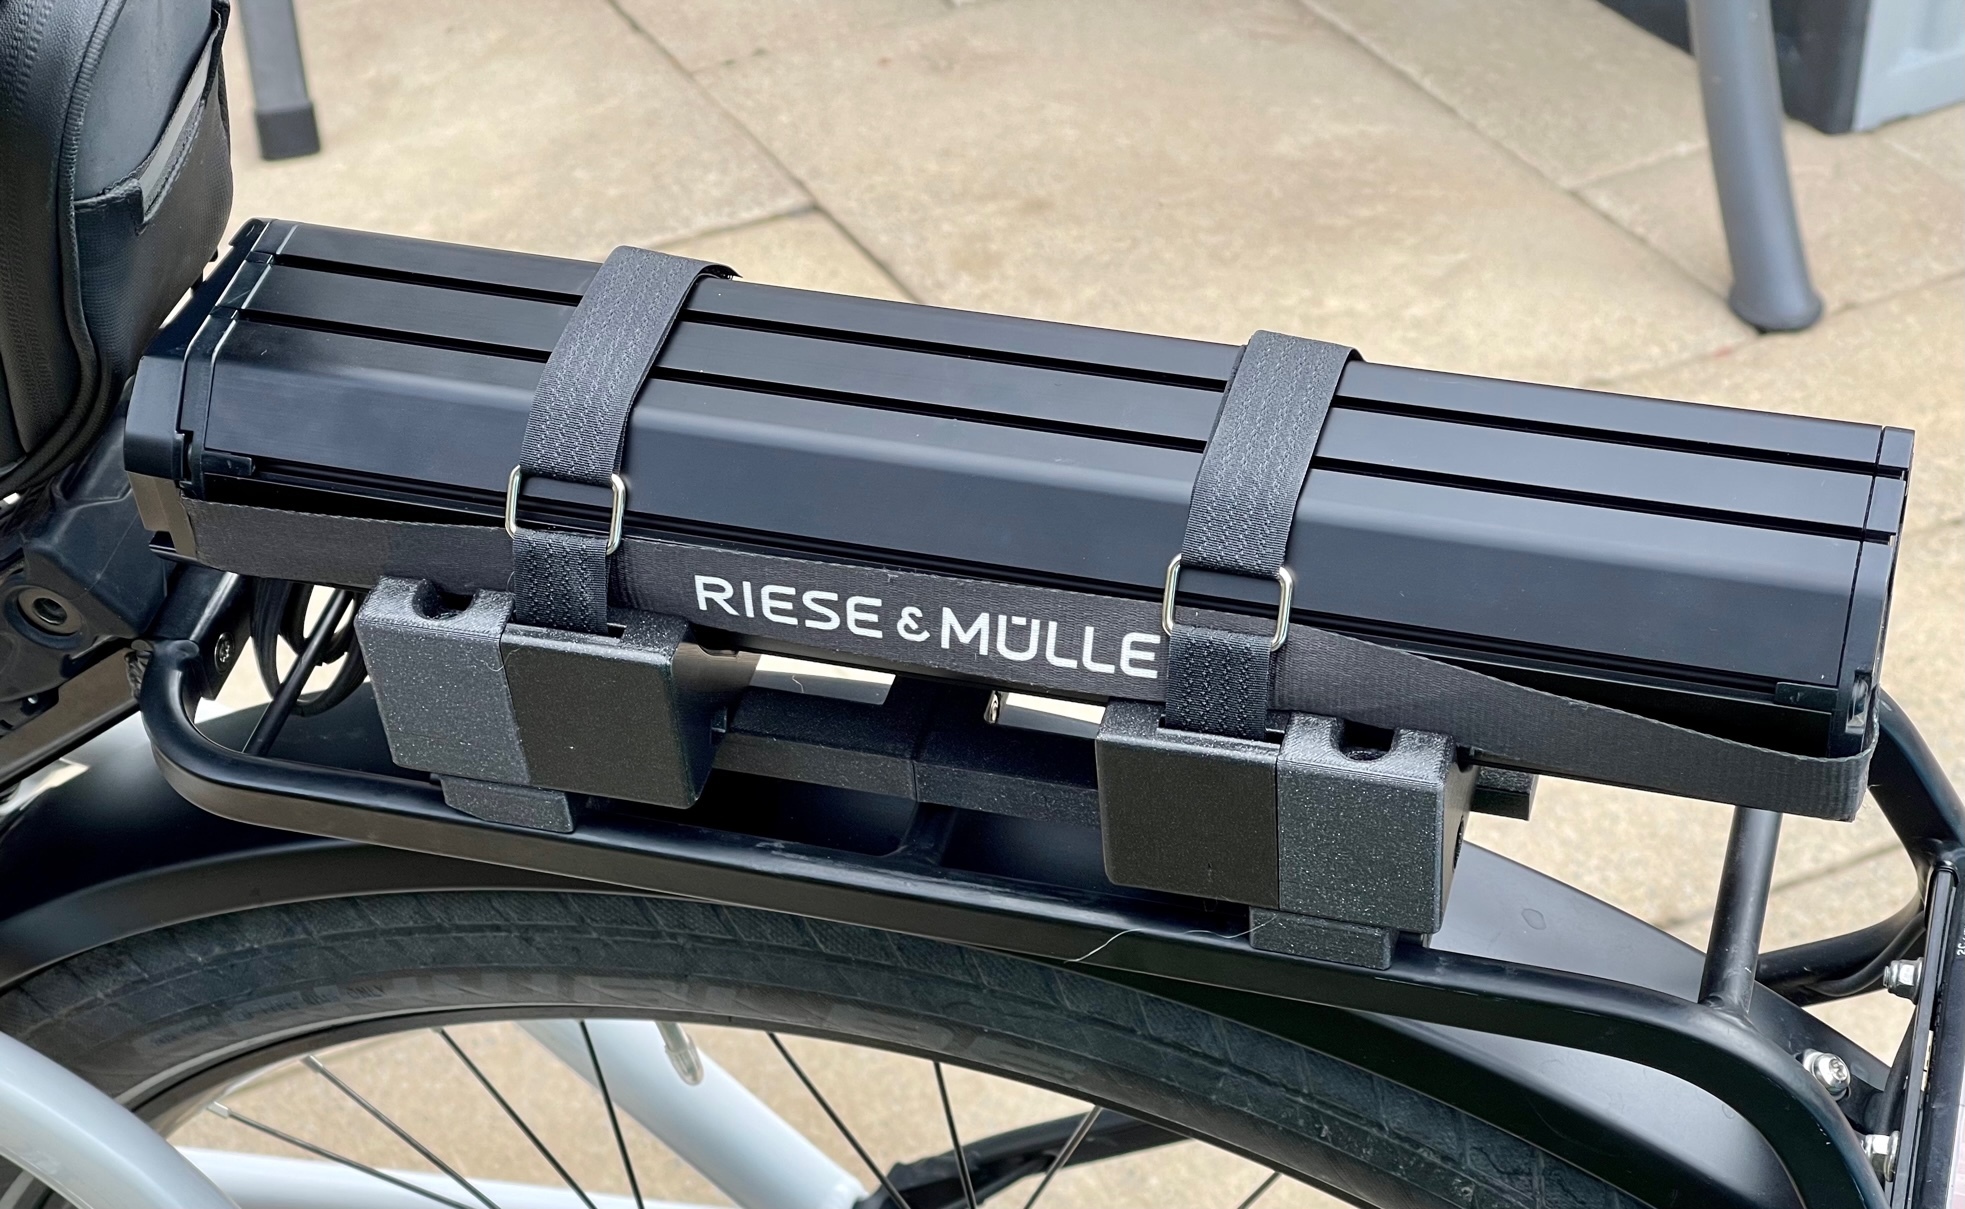
<h3>Motivation (english)</h3><p>I have a second Bosch Powertube for long distances and attach it to the luggage rack. My mount allows for easy, stable and secure attachment.</p><p>If you also need a mount for this purpose, but don't have a MIK adapter plate, you can either buy the original or print my modified model.<br><a href="https://www.printables.com/de/model/265683-modified-mik-adapter-plate-suitable-for-ortlieb-re">https://www.printables.com/de/model/265683-modified-mik-adapter-plate-suitable-for-ortlieb-re</a></p><p>If you find my mount useful, I would be very happy about comments, likes, makes.</p><h3> </h3><h3>Motivation (deutsch)</h3><p>Ich habe eine zweite Bosch Powertube für lange Strecken und befestige diese auf dem Gepäckträger. Meine Halterung ermöglicht eine einfache, stabile und sichere Befestigung.</p><p>Falls auch du eine Halterung für diesen Zweck benötigst, aber keine MIK Adapterplatte besitzt, dann kannst du dir entweder das Original kaufen oder mein modifiziertes Modell drucken.<br><a href="https://www.printables.com/de/model/265683-modified-mik-adapter-plate-suitable-for-ortlieb-re">https://www.printables.com/de/model/265683-modified-mik-adapter-plate-suitable-for-ortlieb-re</a></p><p>Falls ihr meine Halterung nützlich findet, würde ich mich über Kommentare, Likes, Makes sehr freuen. :-)</p><h3> </h3><h3>Materials required (english)</h3><p>First of all: Basically - and very probably also completely sufficient - the plate parts P1 and P2 can be glued together with superglue. I prefer screws in this case because the mount is exposed to significant loads. In addition, precise bonding is not always easy.</p><ul><li><strong>4 x M5 screw</strong> (not required when using superglue) <br>Hexagon socket, thread length min. 20mm, head width 9.0-9.5mm<br>Example:<br><a href="https://www.amazon.de/ANSIEDIO-Linsenkopf-Innensechskant-Schrauben-Maschinenschrauben/dp/B08TW5VTND/ref=sr_1_20?__mk_de_DE=%C3%85M%C3%85%C5%BD%C3%95%C3%91&crid=282I606QHJ4AR&keywords=m5%2Binnensechskant&qid=1661428734&s=industrial&sprefix=m5%2Binnensechskant%2Cindustrial%2C73&sr=1-20&th=1">https://www.amazon.de/ANSIEDIO-Linsenkopf-Innensechskant-Schrauben-Maschinenschrauben/dp/B08TW5VTND/ref=sr_1_20?__mk_de_DE=%C3%85M%C3%85%C5%BD%C3%95%C3%91&crid=282I606QHJ4AR&keywords=m5%2Binnensechskant&qid=1661428734&s=industrial&sprefix=m5%2Binnensechskant%2Cindustrial%2C73&sr=1-20&th=1</a><br> </li><li><strong>4 x M5 nuts</strong> (not required when using superglue)<br> </li><li><strong>Velcro</strong><br>Width max. 2cm<br>Example: <a href="https://www.amazon.de/gp/product/B09YPRX6WM/ref=ppx_yo_dt_b_asin_title_o00_s00?ie=UTF8&psc=1">https://www.amazon.de/dp/B076LVLZR8/ref=pe_27091401_487024491_TE_item</a><br> </li><li>Later:<br><ul><li>If you use my MIK variant (see above):<br><strong>4 x M5 screw</strong> to attach the bracket to “my” adapter plate. <br>Hexagon socket, thread length min. 20mm, head width 9.0-9.5mm (as above)<br> </li><li>If you use the original MIK adapter plate: <br>The four screws belonging to the MIK plate are used for fastening. I can't give the exact dimensions.<br> </li></ul></li></ul><h3>Erforderliches Material (deutsch)</h3><p>Vorab: Grundsätzlich - und sehr wahrscheinlich auch völlig ausreichend - können die Plattenteile P1 und P2 mit Sekundenkleber aneinander geklebt werden. Ich bevorzuge in diesem Fall Schrauben, weil die Platte doch deutlichen Belastungen ausgesetzt ist. Außerdem ist eine passgenaue Verklebung nicht immer einfach.</p><ul><li><strong>4 x M5-Schraube</strong> (nicht erforderlich bei Verwendung von Sekundenkleber)<br>Innensechskant, Gewindelänge min. 20mm, Kopfbreite 9,0-9,5mm<br>Beispiel:<br><a href="https://www.amazon.de/ANSIEDIO-Linsenkopf-Innensechskant-Schrauben-Maschinenschrauben/dp/B08TW5VTND/ref=sr_1_20?__mk_de_DE=%C3%85M%C3%85%C5%BD%C3%95%C3%91&crid=282I606QHJ4AR&keywords=m5%2Binnensechskant&qid=1661428734&s=industrial&sprefix=m5%2Binnensechskant%2Cindustrial%2C73&sr=1-20&th=1">https://www.amazon.de/ANSIEDIO-Linsenkopf-Innensechskant-Schrauben-Maschinenschrauben/dp/B08TW5VTND/ref=sr_1_20?__mk_de_DE=%C3%85M%C3%85%C5%BD%C3%95%C3%91&crid=282I606QHJ4AR&keywords=m5%2Binnensechskant&qid=1661428734&s=industrial&sprefix=m5%2Binnensechskant%2Cindustrial%2C73&sr=1-20&th=1</a><br> </li><li><strong>4 x M5-Mutter</strong> (nicht erforderlich bei Verwendung von Sekundenkleber)<br> </li><li><strong>Klettband</strong><br>Breite max. 2cm<br>Beispiel: <a href="https://www.amazon.de/gp/product/B09YPRX6WM/ref=ppx_yo_dt_b_asin_title_o00_s00?ie=UTF8&psc=1">https://www.amazon.de/dp/B076LVLZR8/ref=pe_27091401_487024491_TE_item</a><br> </li><li>Später:<br><br><ul><li>Falls du “meine” MIK Variante verwendest (s. o.): <br><strong>4 x M5-Schraube</strong> zum Befestigen der Halterung an die “meine” Adapterplatte.<br>Innensechskant, Gewindelänge min. 20mm, Kopfbreite 9,0-9,5mm (wie oben)<br> </li><li>Falls du die Original-MIK-Adapterplatte verwendest:<br>Zur Befestigung werden hier die vier zur MIK Platte gehörenden Schrauben verwendet. Die genauen Maße kann ich nicht nennen.</li></ul></li></ul><h3> </h3><h3>Print settings (english)</h3><p>Print both parts, P1 and P2, twice.</p><ul><li>Because the mount is used outside, PLA is not suitable due to UV sunlight. PETG is a much better choice here.<br> </li><li>I printed all parts with 30% infill.<br> </li><li>Some support is required for parts P1. <br>Part P2 can be printed without support.</li></ul><figure class="image image-style-align-center"><img src="https://media.printables.com/media/prints/266896/rich_content/b4441b6f-cd77-4d5a-ba85-223e9bfa9b27/slicer.png#%7B%22uuid%22%3A%22644dd4df-3a04-4558-a67b-c450e50fef55%22%2C%22w%22%3A514%2C%22h%22%3A439%7D"></figure><h3> </h3><h3>Druckeinstellungen (deutsch)</h3><p>Drucke beide Teile, P1 und P2, zweimal.</p><ul><li>Weil die Halterung draußen genutzt wird, ist PLA wegen UV-Sonnenlicht nicht geeignet. PETG ist hier die wesentlich bessere Wahl.<br> </li><li>Alle Teile habe ich mit 30% Infill gedruckt.<br> </li><li>Für Teile P1 ist etwas Support erforderlich.<br>Teile P2 können ohne Support gedruckt werden.</li></ul><figure class="image"><img src="https://media.printables.com/media/prints/266896/rich_content/ed38ebc3-3311-46a0-871f-b8ef17b3e1fe/slicer.png#%7B%22uuid%22%3A%2283d540aa-2086-483a-b445-8808f81453f7%22%2C%22w%22%3A514%2C%22h%22%3A439%7D"></figure><h3> </h3><h3>Building instructions / Zusammenbau (english /deutsch)</h3><p> </p><figure class="image image-style-align-center"><img src="https://media.printables.com/media/prints/266896/rich_content/3c6ee2d3-78be-48ab-864d-048356204ec2/konstruktion-10.png#%7B%22uuid%22%3A%22f13bf36b-7217-4222-bc59-c554b3409846%22%2C%22w%22%3A935%2C%22h%22%3A436%7D"></figure><p>---------------------------------------------------</p><figure class="image image-style-align-center"><img src="https://media.printables.com/media/prints/266896/rich_content/3ac3f656-ec68-4391-9e22-a83dd5f73272/konstruktion-20.png#%7B%22uuid%22%3A%2299f7d794-0f44-48ce-9ecc-15af533dc6e7%22%2C%22w%22%3A885%2C%22h%22%3A822%7D"></figure><p>---------------------------------------------------</p><figure class="image image-style-align-center"><img src="https://media.printables.com/media/prints/266896/rich_content/b5a7fc06-6723-4433-90a6-dd50cf13b645/konstruktion-30.png#%7B%22uuid%22%3A%225338350a-1e0a-4e9c-851a-f4ab6e9d6d4c%22%2C%22w%22%3A439%2C%22h%22%3A506%7D"></figure><p>---------------------------------------------------</p><h5>Finally, tips for a secure hold (english)</h5><p>I myself have a special bag for the spare battery and only attach it with the two Velcro straps described above. Stable and safe. If you want to attach the battery without a case, I recommend two options so that the battery cannot slip: <br>1. You can thread another velcro through parts P1 and around the battery along its entire length. A slot is provided for this purpose. <br>2. Probably the better alternative - you can glue a rubber band to the contact surfaces.</p><h5>Abschließend Tipps für sicheren Halt (deutsch)</h5><p>Ich selbst habe eine spezielle Tasche für den Ersatz-Akku und befestige ihn ausschließlich mit den beiden oben beschriebenen Klettbändern. Stabil und sicher.<br>Falls du den Akku ohne Tasche anbringen möchtest, empfehle ich zwei Möglichkeiten, damit der Akku nicht verrrutschen kann:<br>1. Du kannst ein weiteres Klettband durch die Teile P1 führen und um den Akku über seine gesamte Länge führen. Ein Schlitz zu diesem Zweck ist vorhanden.<br>2. Die vermutlich bessere Alternative - du kannst einen Gummiband auf die Auflageflächen kleben.</p>
With this file you will be able to print Bracket for Bosch Powertube on MIK adapter plate with your 3D printer. Click on the button and save the file on your computer to work, edit or customize your design. You can also find more 3D designs for printers on Bracket for Bosch Powertube on MIK adapter plate.