boxSCOPE: Run your own biological experiments!
prusaprinters
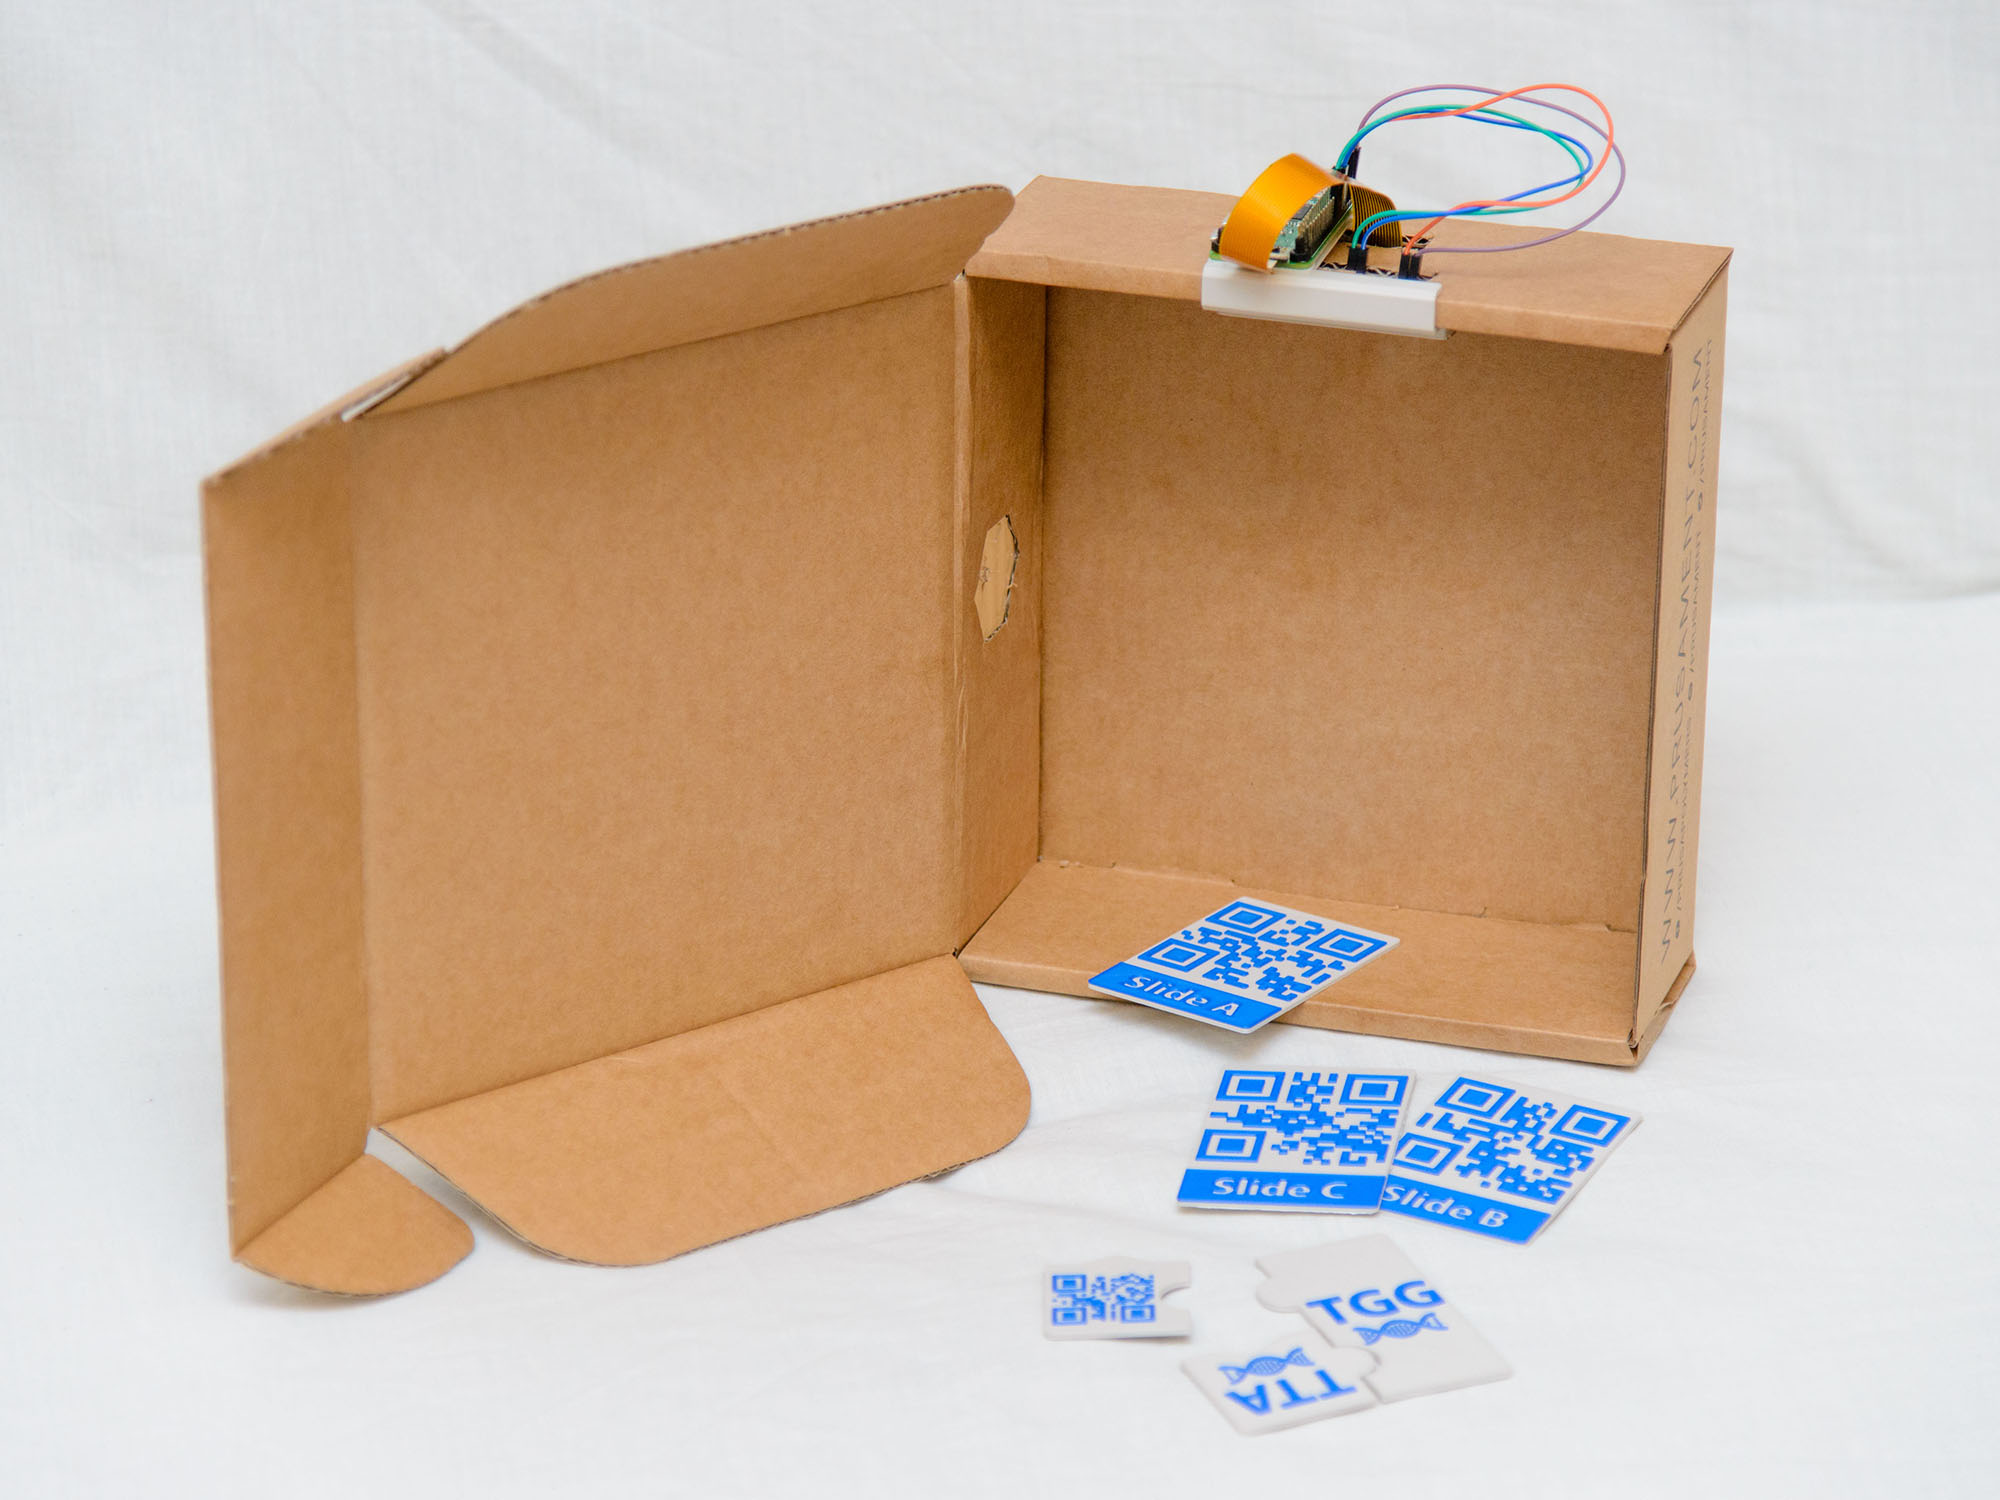
<p>We have returned with version 3.0 of SCOPES. Here we present boxSCOPE (aka PrusamentSCOPE)! This version of SCOPES is designed to make it even easier for young scientists to try out SCOPES and was inspired by other projects on the site that use Prusament Filament boxes.</p> <p><u><b>3D files included here at Prusa Printers</b></u></p> <ol> <li>All parts to make your own boxSCOPE.</li> <li>26x 3D printable QR-code microscope slides which are used to simulate real microscope slides</li> <li>18x puzzle piece files (glued together to form 9 puzzle pieces in the end. These are used in the DNAscope activity.</li> <li>Test tube holders - Included multiple files for different width test tubes. I recommend measuring the width of your tubes and using the holder with the closest dimension since a tight fit ensures the tube stands straight.</li> </ol> <p><u><b>Activities included with boxSCOPE:</b></u></p> <ol> <li><a href="https://scopeseducation.org/tutorials/displayscope/" target="_blank">DisplaySCOPE</a>: View digitized samples from real labs.</li> <li><a href="https://scopeseducation.org/tutorials/chronobioscope/" target="_blank">ChronobioSCOPE</a>: Run your own real biological experiments.</li> <li><a href="https://scopeseducation.org/tutorials/dnascope/" target="_blank">DNAscope</a>: Learn about DNA and environmental DNA (eDNA). </li> <li><a href="https://www.prusaprinters.org/prints/28554-virusscope-educational-game-about-covid-19-diagnos" target="_blank">virusSCOPE</a> - Learn about COVID-19 diagnostics! Currently only 3D printable "offline" version available, but the digital boxSCOPE version is coming soon! </li> </ol> <p>Complete assembly instructions, including basic lesson plans and explanations of all included files, can be found <a href="http://scopeseducation.org/wp-content/uploads/Read_Me_boxSCOPE.pdf" target="_blank">here.</a></p> <p><b>More information about SCOPES Education:</b> <a href="https://scopeseducation.org/">https://scopeseducation.org/</a></p> <p><b>Video tutorials for all activities can be found at:</b> <a href="https://scopeseducation.org/setup/">https://scopeseducation.org/setup/</a></p> <p><b>Download for Raspberry Pi disk image:</b> <a href="https://scopeseducation.org/downloads/">https://scopeseducation.org/downloads/</a></p> <p><u><b>What is SCOPES?</b></u></p> <p>SCOPES (Sparking Curiosity through Open-source Platforms in Education and Science) is an open-source STEM didactic tool that is self-contained, independent of local resources and cost-effective. SCOPES can be adapted to communicate complex subjects from genetics to neurobiology, perform real-world biological experiments and explore digitized scientific samples.</p> <p><b>Our design philosophy:</b></p> <p>We have developed SCOPES as a cost-effective platform to bring life science labs to the classroom. SCOPES is designed to be a modular platform that can be easily adapted for the specific needs of the educator, even without any computer or programming skills. During the design of SCOPES, we considered resource limitations that some classrooms might face. While dedicated computer classrooms in schools are becoming standard in developed countries, buying new hardware is both time consuming and expensive. Sometimes a stable source of electricity might also not be available in some areas. Therefore, we chose the Raspberry Pi Zero W (Pi for short) which is a tiny, power-efficient computer, to be the brains of our project. The Pi is powered via a 5V USB port that is commonly used for charging smartphones and tablets and can be run remotely from a battery or small solar panel. We also do not want you to have to run out and buy a new screen or adapter. Therefore, we chose to make use of your mobile devices to display the visual output of SCOPES. The Pi acts as a wireless access point that mobile devices can connect to and display information provided by the Pi. Several devices can connect to SCOPES in parallel, allowing for multiple young scientists to interact with an individual SCOPES. Thus, SCOPES is self-contained and can be operated in the complete absence of any infrastructure with just a mobile device and a battery.</p> <p><b>Why are we using a box and not 3D printing the entire case?</b></p> <p>This is a great question and it comes back to our design philosophy. We purposely want to keep costs to a minimum, and for some, that might mean they have limited access to a 3D-printer. Therefore, we tried to minimize both the amount of material required to print and the number of additional parts required to build and assemble the boxSCOPE case. There is also the environmental aspect and we felt that including “found” material and encouraging recycling, is an important lesson in itself. Also, some materials can be substituted for other components if necessary. For example, in most cases, M3 screws can be substituted with zip ties or similar thin material.</p> <p><b>Custom User Interface:</b></p> <p>We have developed a custom web-based interface that makes operating SCOPES simple and doesn’t require any prior programming knowledge. As SCOPES builds on open-source Raspberry Pi hardware, it can be readily adapted for novel projects. We also anticipate that through collaborative learning, SCOPES will encourage interdisciplinary experiential learning where programming skills are used to explore biological concepts and thus bridge several STEM disciplines. An example might be that students build the boxSCOPE case, follow tutorials on how to program time-lapses on the Raspberry Pi, and then use this to perform a biological experiment as described for the ChronobioSCOPE (see above). In this way, SCOPES facilitates hands-on interdisciplinary learning and problem-solving opportunities for students. SCOPES can also be expanded using the exquisite capabilities of the Raspberry Pi to interact with a spectrum of sensors to record environmental parameters.</p> <p><b>SCOPES 3.0</b></p> <p>The boxSCOPE case is the latest revision of our original SCOPEScase. The original version can be made from laser-cut plywood, and if you are interested in learning more about this, we recommend visiting our website to find all the files (<a href="http://scopeseducation.org">http://scopeseducation.org</a>). We have also made a 3D printed version that uses a 2 L pop bottle instead of a box. For more information and all the files, please see this <a href="https://www.prusaprinters.org/prints/27346-popscope-pop-bottle-digital-microscope-to-run-your" target="_blank">post</a> on Prusa Printers.</p> <p>Our goal in making the boxSCOPE 3D printable was to hopefully make this project available to a wider audience.</p> <p><u><b>Parts required (See figure)</b></u></p> <p><b>3D printed parts:</b></p> <ol> <li>1x Box Mount</li> <li>1x Camera/LED Mount (9 mm works for filament box, 3 mm for shoe box)</li> </ol> <p><b>Electronic parts:</b></p> <ol> <li><a href="https://thepihut.com/products/raspberry-pi-zero-w?variant=547421782033" target="_blank">Raspberry Pi Zero W</a> (simpler if the male header is already attached to the GPIO pins)</li> <li><a href="https://thepihut.com/products/raspberry-pi-camera-module" target="_blank">Raspberry Pi Camera v1 or v2</a></li> <li><a href="https://shop.pimoroni.com/products/blinkt" target="_blank">Pimoroni Blinkt LED</a></li> <li><a href="https://thepihut.com/products/noobs-preinstalled-sd-card" target="_blank">Micro SD Card</a></li> <li><a href="https://thepihut.com/products/adafruit-premium-female-male-extension-jumper-wires-40-x-12-300mm" target="_blank">Male to female jumper cables (30 cm)</a></li> <li><a href="https://thepihut.com/products/raspberry-pi-zero-camera-cable-300mm" target="_blank">Pi Zero camera cable (30cm)</a></li> <li><a href="https://thepihut.com/products/beaglebone-universal-power-supply-5v-2a" target="_blank">5V power adapter/power supply</a></li> </ol> <p><b>Additional parts:</b></p> <ol> <li>M3 Screws and nuts (8x 10 mm, 2x 14 mm or longer)</li> <li>Screwdriver</li> <li>Empty Prusament filament box (or most likely any box)</li> </ol> <p><u><b>Assembling the boxSCOPE</b></u></p> <ol> <li><p>Download and install the <a href="https://scopeseducation.org/downloads/" target="_blank">FlaskSCOPE disk image</a> on the SD card. This can be found on our website or our <a href="https://github.com/scopeseducation/flaskSCOPE" target="_blank">github page</a>. We provide some advice with installation on our github page, but since the process of installing raspberry pi disk images on an SD card can vary depending on the operating system you are using, we suggest the reader follows the <a href="https://www.raspberrypi.org/downloads/raspbian/" target="_blank">well-prepared guides</a> by the Raspberry Pi Foundation for more information.</p> </li> <li><p>Slide the 3D printed box mount piece onto the end of your box. Ensure that the long rectangular piece (for mounting the pi) is positioned on the outside of the box. Move the box mount into the position you would like it to be. Note: there are two different box mounts available depending on the box you are using. The 9 mm is designed for filament spool boxes and the 3 mm for shoe boxes.</p> </li> <li><p>Using a marker, trace the outline on the inside of the box the small rectangle where the LED will eventually sit and bottom edge of the mount.</p> </li> <li><p>Using these lines as a guide, cut out the cardboard as shown in the photo below. This step and the next should be performed by an adult.</p> </li> <li><p>Preparing the camera and LED mounting bracket. Place the LED strip in the mounting bracket, paying careful attention to the curve on one side of the LED. This should be pointed away from the camera.</p> </li> <li><p>Place the camera in the camera mounting bracket so that the cable mount is pointed away from the 8 little holes. The version of raspberry pi camera does not matter at this point (v1 or v2 work equally well).</p> </li> <li><p>Secure the camera/LED mount to the box mount with 2x 10 mm M3 screws. The screw head should be on the inside and the nut on the outside. This ensures that even with different length screws, the screw should always sit flat on the inside plastic side. These two screws do not need to be overly tight and can be held in place while you tighten the nut with your fingers.</p> </li> <li><p>Secure the Pi to the back of the box mount with 4 screws. You will see a little grove in the Pi mount, which should provide space for the header on the GPIO pins. Again, make sure that the screw head is on the inside and the nut on the outside.</p> </li> <li><p>Plug the camera cable into the camera, ensuring correct orientation.</p> </li> <li><p>Run the camera cable through the lower hole you cut in the box. Be very careful to not bend or twist this cable, it is very fragile.</p> </li> <li><p>Slide the box mount with the camera/LED mount, onto the box, aligning it with the holes you previously cut.</p> </li> <li><p>Plug in 4x jumper cables into the LED strip according to the pinout diagram below. Be careful to plug in your Blinkt the correct way round, it has curves on the top that match the corners of your Raspberry Pi. For more information regarding the details of this LED strip please see Pimorini. The order of the cables should be exactly the same as the way you plug them into the GPIO in the next step (see pinout diagram above or also at <a href="https://pinout.xyz/pinout/blinkt#" target="_blank">pinout.xzy</a>.</p> </li> <li><p>Plug the 4 jumper cables into the 4 GPIO pins on the Pi in the exact same order as you plugged them into the Blinkt. Refer to the diagram in step 12. The wiring should look something similar to shown below.</p> </li> <li><p>Plug in the camera cable into your Pi. Be careful since the cable is very delicate. Make sure the orientation is correct when inserting.</p> </li> <li><p>Your boxSCOPE is now complete! Insert the SD card, plug it into a 5V power adapter and power it on!</p> </li> <li><p>If you wish to use the ChronobioSCOPE horizontally for time-lapse experiments, we recommend cutting the box flap immediately adjacent to the camera. This will allow you to close the box and perform experiments in the dark if desired.</p> </li> <li><p>For information regarding connecting mobile devices to your boxSCOPE or using the <a href="https://scopeseducation.org/tutorials/flaskscope/" target="_blank">FlaskSCOPE</a> interface, please visit our website for more <a href="https://scopeseducation.org/setup/" target="_blank">tutorials</a>.</p> </li> </ol> <p><u><b>FAQ:</b></u></p> <p><b>Why not just make a mobile app that does everything SCOPES can do?</b></p> <p>We get this question regularly and understand that the above activities might seem simpler to do as an app. While we agree the boxSCOPE case may not be essential, however, we are convinced it provides improved didactic user experience and increases the consistency of experiments. We believe that there is also value in including didactic concepts in the classroom and that not all learning should be purely app-based. A recent report from the OECD agrees with this notion and states that while many developed nations have been quick to adopt digital communication platforms in the classroom, without dedicated didactic concepts these methods can have a negative influence on learning outcomes (OECD, 2015. Students, Computers and Learning). The act of building something with a student, instead a store-bought solution teaches them the value of engineering and problem-solving. We wanted to make this an open-source system that could be modified and tinkered with by other users, who probably have even better ideas than us! By incorporating Raspberry Pi hardware, we can also introduce a host of other sensors to create far more complicated measurements and experiments. And most importantly, do you really want to be without your mobile phone for a week while you film a plant timelapse? ;)</p> <p><b>What else can I do with my SCOPES?</b></p> <p>Currently, SCOPES comes preloaded with three activities. The DisplaySCOPE, the ChronobioSCOPE, and the DNAscope. We are striving to create additional fun and educational activities and recommend that you check back on our website regularly for updates. If you have any great ideas for projects or suggestions for future improvements, please leave us a note in the comments section!</p> <p><b>Thank you for checking out boxSCOPE!</b></p> <p>If you like this project please leave a comment or review, and share us with your friends. This is an entry for the Prusa Design "Educational Items" contest. We really want to expand our distribution of these projects, especially in developing countries. If we win this design challenge we plan to use this printer to mass-produce and share boxSCOPE with school children everywhere.</p>
With this file you will be able to print boxSCOPE: Run your own biological experiments! with your 3D printer. Click on the button and save the file on your computer to work, edit or customize your design. You can also find more 3D designs for printers on boxSCOPE: Run your own biological experiments!.